


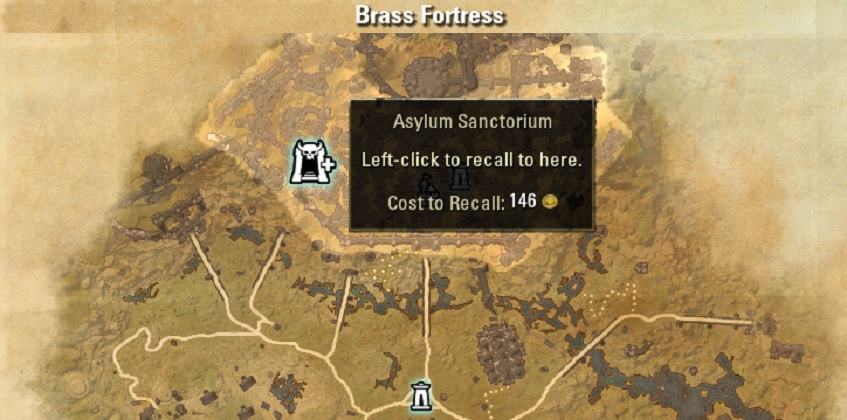
Welcome to the ESO Asylum Sanctorium Guide. Asylum Sanctorium is also often referred to as AS. The Asylum Sanctorium Guide teaches you the basics of all hardmode fights in the trial.
Story: Sotha Sil, always seeking knowledge, used three Dunmer saints in his earliest experiments into everlasting life. Using the power of Soul Gems, he created mechanical vessels for the saints and imprisoned their souls within. While the experiment was successful, the Saints were driven insane by the process. The Asylum Sanctorium was created to house the Saints so that they would not threaten the rest of the Clockwork City. The Saints have grown in power during their imprisonment and now threaten to break free of their prison. The time has come to end the threat they pose.
Table of Contents
- Group Setup
- Saint Llothis the Pious
- Saint Felms the Bold
- Saint Olms the Just
- Mainboss +1 Fight
- Asylum +2 Hardmode
General Information for the Asylum Sanctorium Guide
The Asylum Sanctorium Guide will contain all four version of the veteran Asylum Sanctorium.
- Veteran Asylum Sanctorium
- Mainboss + 1 Miniboss Poison Boss
- Mainboss + 1 Miniboss Dualwield Boss
- Mainboss + 2 Minibosses Poison & Dualwield Boss
Location of Asylum Sanctorium
This Trial can be found in the Clockwork City, you are required to have the Clockwork City DLC to access the Asylum Sanctorium trial.
Group Setup
I recommend running 2 Healers, 1 Maintank, 1 Offtank and 8 Damage Dealers. Make sure that some of the damage dealers have abilities that can interrupt the Poison Boss from casting a deadly attack. Your Healers also should run Purge to cleanse a few enemy DoTs, this is very important. For magicka setups make sure to run Harness Magicka and for stamina setups make sure to run Deadly Cloak.
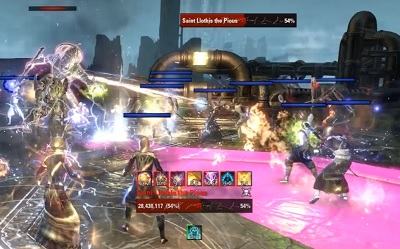
Saint Llothis the Pious
[Boss HP: 51,747 Mio.]
Make sure to kill the adds in a fairly short time, they do not have a lot of health and can be stacked next to the mainboss. If you do not kill them fast enough they will enrage and eventually oneshot everyone. The Mainboss has two dangerous attacks, Defiling Blast where he targets one Player that will slightly glow green. That person has to make sure to stand still so the other players can move out of the green conal area. People that do stand in the conal area have to block the pulses otherwise you will get oneshot. So make sure to block first and then run or dodge roll out. The second dangerous mechanic is the Oppressive Bolts where the boss will charge up for one second and glow green. Then shooting poison balls to all group members, this mechanic can and must be interrupted by either the tank or someone else.
Boss Mechanics
- Noxious Gas
- Magic Damage DoT
- Llothis teleports to 1 of 3 positions around the arena leaving behind a poison cloud which slows, damages and healing de-buffs players inside it
- Defiling Blast
- Poison damage
- Llothis’ points his weapon at 1 Player. Weapon glows green. Player also has a green glow on him. Boss fires a narrow cone of damage towards the targeted player. Non-targeted players takes much more damage in the cone than the targeted player. The cone applies a DoT that can be purged. Can apply poisoned status effect
- Targeted player stands still, other players move out of it
- Oppressive Bolts
- Magic Damage
- Boss channels for a second & his whole character glows green. Raises his weapon straight up & rains down Bolts onto all group members.
- Can and must be interrupted
- Corroding Bolt
- Magic Damage
- Boss channels for a second. Releases a Bolt which Targets only the Player/Tank currently with agro.
- Can be blocked or rolldodged
Imperfect Attendants Adds
[HP: 1,868 Mio.]
- Enrage
- The Attendants Enrage 30-35 seconds after spawning.
- Early Death
- The Attendants die/sit down at 12-20% of their HP.
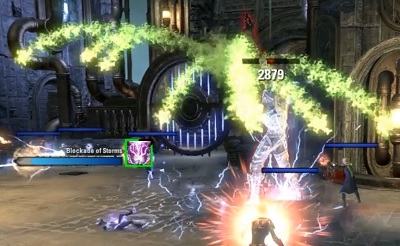
- Energy Arc
- Shock Damage DoT
- 4 Lightning Laser Beams come out of the Attendants’ eye & focuses a spot 5-10meters beyond the position of it’s current target. The further the Target is away from the Attendant the longer the range of the beams
- The lasers sweep back to the feet of the Attendant damaging those who cross the beams. Players can only be damaged once by 1 Beam. It does 14k unblocked
- Energy Convergence
- Shock Damage DoT
- Once the Energy Arc’s reach the Attendants’ feet they collect & explode dealing massive damage. Can be blocked. It does 24k unblocked
- Hydraulic Sweep
- Shock Damage
- The Attendant kneels down & creates a 90 degree cone of damage in a small area in front of it
- Pulse
- Shock Damage DoT
- A single laser beam that targets the Player/Tank currently with agro.
- Can be blocked
- Pulverize
- Physical Damage
- The Attendant flies up a short distance in the air then crashes back to the ground damaging all in an AOE around it
- Expunge
- Physical Damage
- It is the Light Attack of the add
Saint Felms the Bold
[Boss HP: 51,747 Mio.]
Two players have to be placed outside the group, one on the left and one on the right side to “catch” the Teleport Strike attack from the boss which will leave a huge red AoE on the ground. He always jumps to the furthest person away. That AoE also leaves Maimdebuff on players, which results in them dealing less damage. Manifest Wrath has to be avoided, we usually stack close to the boss and when he does this attack, we all spread out a bit and once it exploded we go back close in to the boss. The adds have to be killed fast, otherwise they will enrage so make sure to save your Ultimates for when they spawn. When Felms reaches 25% health or lower the adds will enrage faster, which means you really need to make sure to kill them fast.
Boss Mechanics
- Shrapnel Storm
- Physical Damage DoT
- The Boss teleports to a player and leaves a redish pulsing AoE on the ground. The longer you are exposed to the Shrapnel Storm, the more damage it will do to you. (Damage is exponential. Damage can be blocked)
- 1 AOE is dropped at first. From 75% the Boss will start dropping 2 Storms and at 50% 3 Storms each time.
- Interval between Shrapnel Storm is every 25-30 seconds.
- Bleeding
- If you are exposed to Shrapnel Storm, you will also get a Bleeding DoT on you which deals damage. You can cleanse this debuff.
- Manifest Wrath
- Boss holds his hand up and shoots two red AoEs on the ground where 3 small sized AoEs will pop out of and go in a certain direction and damage everyone in its way. If you stand in the middle of this AoE you will get hit by all 3 and die. You can block this to reduce the incoming damage.
Pneuma Projection Adds
[HP: 2,156 Mio.]
- Cyclonic Carving
- Physical Damage
- Whirlwind/Steel Tornado. Does around 8k normally, goes up to 40k damage when they’re enraged.
- Can be blocked/rolldodged
- Applies Maim debuff to players
- Lead to Slaughter
- Fire Damage DoT
- 1 Player is targeted. Usually the furthest away are targeted. They are pulled/chained into melee range.
- This can be blocked
Saint Olms the Just
[Main Boss HP: 99,181 Mio.]
Ordinated Protector Sphere
[Mini Monster - HP: 1,475 Mio.]
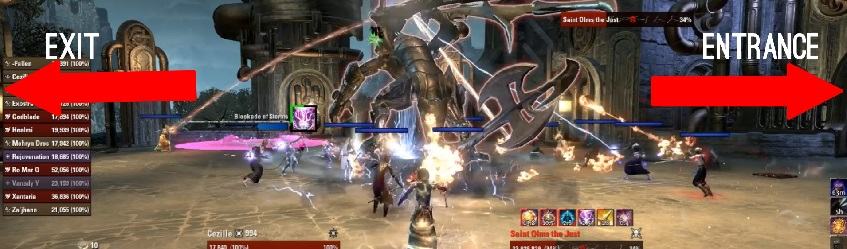
Make sure to tank the boss towards the right side of the map, like you can see in the picture here. One of the healers or a damage dealer also has to stand in front of the boss, like you can see in the picture. This needs to be like that so the person can kite the shock fields that will otherwise land on the maintank. At 90%, 75%, 50% and 25% the boss will jump to the left side, right side a few times, at the entrance or exit are save spots so you can simply go there. After that the boss will most likely use Storm of the Heavens, you need to be spread out and avoid those AoEs. If you get hit by two or more you are instantly pulverized. So it is very important that people do not run over each other, otherwise this might cause a lot of deaths.
Spheres will spawn from time to time, if a sphere is connected to the boss, then the boss is damage immune which means you need to focus down the spheres as fast as possible. The only very difficult mechanic once you reach 25% is the huge Fire AoE called “Trial by Fire” there will be 3 spots where huge fire AoEs will land at three places in the room. You need to make sure that everyone is in purge range to immediately purge the enemy DoT from you. People have to use Harness Magicka to not instantly die because it hits for a lot of damage.
If your group is new I recommend that one Magicka Templar DD or a Healer is using Kagrenac’s Hope so people can be ressurected faster and prevent a wipe.
Boss Mechanics
- Thundering Tailslap
- Physical and/or Shock Damage
- Boss slams his tail down on the player if he has agro and is stood behind the Boss near the tail
- The slam releases small Lightning AOEs which travel in different directions and stun anyone not blocking them
- Shockball spit
- Shock Damage DoT & Magic Drain
- Boss raises his head up high and fires 1/2 Lightning Orbs onto 1/2 Players which creates a Shock AOE when it lands on the player
- The AOE slows and damages anyone inside it
- Move out/rolldodge out of the AOE. If there’s a way to know that you’ve been targeted then take it to a corner so it does not land in the middle of the arena
- Storm the Heavens
- Shock Damage DoT
- Boss flies up & hovers above the arena and spits a shock beam onto the ground
- Fires 3 Lightning AOEs in each Wave. 5 Waves in Total
- The interval between each Storm of Heavens is roughly 35-40 seconds
- Storms the Heavens part 2
- Shock Damage
- Static Lightning field AOEs that are fired from the Storm the Heavens like mortars and land below each Player’s feet
- 5 waves of Charges are thrown during Storm the Heavens.
- Constant walking movement keeps the AOEs always behind you. Walking away backwards from the epicenter of the Storm the Heavens means you don’t accidentally run into more than 1 fast moving lightning AOE from the Storm
- Gust of Steam
- Physical Damage
- At 90%, 75%, 50% & 25% the Boss jumps and slams the ground 4 times. People need to make sure not to overlap with each other
- Boss jumps from one side of the room to the other
- Trial by Fire
- Fire Damage
- Starting at Execute phase 25%. Flame meteors hit the arena creating gigantic red fire wall AOEs which fill most of the arena
- 3 Meteors are dropped in total. They drop in any order in 3 positions Left, Middle & Right 2 seconds apart from each other
- Scalding Roar Fire Damage
- Boss breathes steam in a cone in front of himself and kills everything in it
Mainboss + 1 Mini Boss Fight Videos
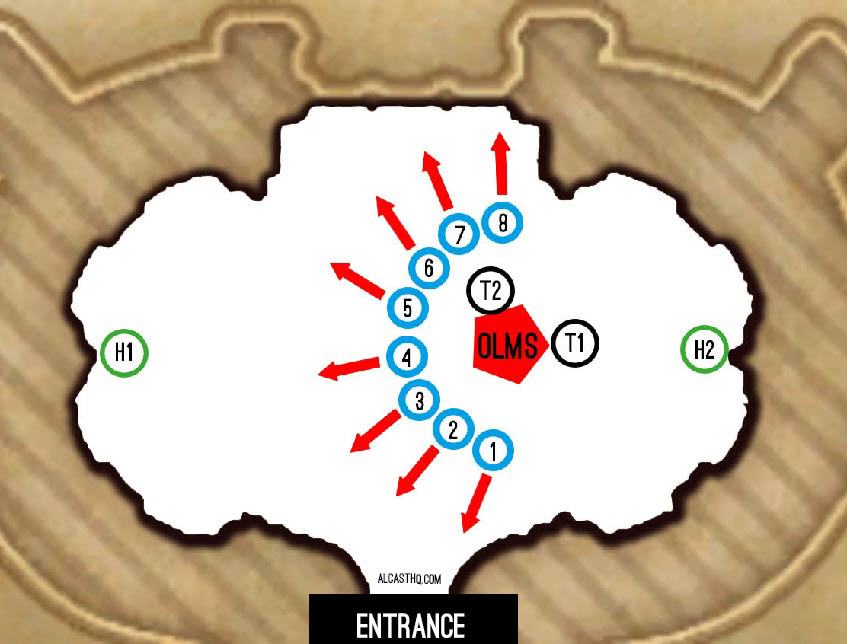
Saint Olms +2 Hardmode
In Hardmode the positioning is very important. Make sure each Damage Dealer has an assigned position. So he knows exactly where he can run when the shock AoEs falls to the ground. The healers have still to kite the Dualwield Maim fields and Healer 2 also has to take care of the Shock field AoEs behind the main tank, place them as close as possible to the wall.
More footage: