Sorry, no more commissions on fakes!

After giving this matter a lot of thought I have decided to only accept commissions on genuine Blythe dolls. I own a couple of fake customs already, and I have made a couple myself. I also have a couple commissions to complete on fakes, that I already agreed too. So it might seem strange that I do this. But in future I will not accept commissions on fake Blythes. I wish to support Takara, and not the fake industry any more. It just feels wrong when I would never consider recast BJD’s or angelgate/fake Pullips. Please know that I will never judge anyone else for buying fakes. That is your choice, and I will never look down on you for it <3. I just choose to not work on them any more. I do not wish to start the fake VS real discussions. This is just a notification of my choice.

No more fakes

Hannibalina the ghost

I finished this girl a while ago I just didn’t get around to posting about her here. I post more frequently on my Facebook page ;).

She turned out so lovely I had to keep her myself. I may still change my mind, but she was obviously meant to stick around for a while at least <3.

Her eyelids are inspired by the moth from Silence of the lambs. I also plan to make her a straightjacket for fun, and I’m getting a Hannibal mask commissioned from Suitdrims Concepts :D. It will make her pretty creepy. For now she is fairly sweet.

IMG_1255

IMG_1262

IMG_1269

IMG_1250

IMG_1430

IMG_1468

Thank you for reading <3. Next week my kids are back in kindergarden after the holiday, and I will continue working on dolls again. I have some commissions, the first Blythe will be Samara from “The Ring”. And I’m nearly done with my Cinnamon girl who will be for sale :).

How to fix a broken Pure Neemo neck peg

I received this Pure Neemo a while ago with a broken neck peg. The seller kindly sent me a new one, but I decided to fix this one as well and use it on one of my forever girls. I wouldn’t want to sell a doll with this one :).

I used my dremel to drill a hole in both pieces of the neck peg, straight in. Very carefully and on the lowest setting obviously. You could easily slip and hurt yourself. If you have a tool to hold the pieces in place, in workshop for instance, that would limit the risk. I don’t have that kind of tools so I just held the bits in my hands away from my body. I have steady hands, and didn’t have any problems, but I figure I should recommend some safety precautions. Protection gloves are a good idea if you hold the pieces.

IMG_5699

I then cut off a piece of a toothpick, put glue in each hole and inserted the toothpick piece into the part of the peg attached to the body. Then I attached the top part of the peg, and put some glue around the break line. And that’s it really. I will just leave it to dry for 24 hours (that’s the time stated this glue needs to dry), and then use it on my Blythe girl. Time will show how durable this solution is. I reckon it’s best not to pull on the head ;).

IMG_5694

IMG_5695

IMG_5697

Thank you for reading <3. I will update again soon as I have some commissions incoming. I have had holiday with the kids so I haven’t been able to do much with my own projects.

ETA: My Sofie with the fixed body. She seems to be doing well for someone with a broken neck ;).

IMG_1541

Materials I use ^-^

I would like to tell you a bit about the materials I use :).

IMG_4644

IMG_4646

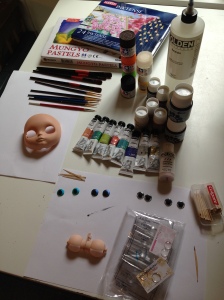
– I use different acrylic paints, Tamiya on the faceup and for gloss, and I have different Pebeo paints that I use a bit for eyelids or eyechips. I also have a bottle of Golden metallic violet paint that is awesome, I think I will get some more shades of those paints. I have ordered some Rembrandt paints as well, pearl shiny ones as I was missing some colours I really needed (I can never have too many art supplies).

– Golden retarder. Useful stuff as it keeps the paint from drying up too quickly. That bottle will last me forever as I only need a tiny amount each time :P.

– Mungyo pastel chalks. Although I have been able to make great faceups with these, I think some of the colours are not very cooperative. Especially the darker colours can be a bit troublesome as they just don’t have enough pigment. So I have ordered the biggest set of PanPastels (those are awesome quality) to make life easier for me ;). I can’t wait to get them :D.

-Toothpics, used for mixing paint and for eyechip painting.

– Lots of different brushes. Thin small ones for details, bigger ones for blushing. I use the biggest for cheeks. I had a big makeup brush, but ended up stealing it for my own “faceup” :P.

– Regular copy paper to test draw and paint on. I also use it to rub the chalks on and then use a brush to pick up the “dust”. I also tap off the excess on to the paper.

– Paper towels to wipe off paint or dry brushes on.

– Something to mix the paints in. I have a plastic mix plate with a bunch of holes along the side and a bigger hole in the middle for water. Sorry, bad explanation, I just forgot to put it in the pic.

– Vinyl gloves. I use them when I pick up the chalks. I don’t want chalk sticking to my fingers when I do faceups. You really don’t want fingerprints on the dolly. I always hold on the sides and try not to touch the face, but still, it’s easier than scrubbing my already overwashed and dryed out hands more ;).

– Magic eraser sponge, or the one I use from Scotch brite, same thing. I use it to wipe off excess blushing or if blushing has ended up where it shouldn’t. I also use it on the area I have painted freckles to make them lighter in places.

– Cute notebook I use to make notes of paint combos I think have worked well, and where I put my ideas for my designs. Ideas comes to me at the oddest times so making notes is very useful. Especially when I wake up at night from one of my inspiration dreams.

– Nice music. I love listening to music while I work. While making the last girl I listened to Vivaldi :).

Derwent Inktense pencils. Those are a type of watercolour pencils and I use them dry on faceups to draw tiny lines on mouths or to draw on eyelids. They do work great for watercolour art as well, very bright and strong colours when they are wet. I made this pic for my bf for valentines ;).

Then we have the sealants:

IMG_4652

I use the mask even when spraying outdoors. Never risk your health by inhaling these toxic gases. For tips on masks and respiratory protection check this: http://forums.dollymarket.net/showthread.php?tid=7255881

I use a glove if I spray anything while holding it.

I use Purity Seal for tan dolls as it doesn’t turn the skin tone lighter like MSC.

And I use MSC UV cut for everything not tan, UV protection is very useful and I have good results when using it ^-^.

I think that’s it for now, if you have any questions just ask. I will soon update about my next custom who will be Ice Rune. She will also be for adoption. I also ordered a Les Jeunette, Cadence Majorette and a Country Summer. The two first I plan to keep for myself though ;).

Thank you for reading, and have a lovely weekend <3.

Tan beauty ready ^-^

I am sorry I haven’t been updating much here, I am more active on the Facebook page and on Instagram ;). I am buzzingbumblebee on instagram so find me there if interested.

I am happy to say my tan fake girl is done and I have also managed to make her a dress on my new sewing machine. I am very happy about that as it has been a long time since I last used a sewing machine.

This gorgeous girl will be available in my etsy shop today at 9 pm Oslo/Norway time, GMT +1. Yes I have finally opened my etsy shop, and you can find some eyechips there currently :D. I also do custom orders for eyechips.

This is the shop: https://www.etsy.com/shop/BeesDreamland

Here the new girl is, I wish I could keep her ;).

IMG_1121 IMG_1083 IMG_1085 IMG_1089 IMG_1099 IMG_1108

Thank you for looking :). I will update soon with a list of materials I use and put info for commissions here on my blog.

The scalp struggles

I have been away for a bit and then I got ill, so my projects haven’t come along as much as I would have liked. But I will get there ;). 

I’m waiting for a pile of nice new brainworm eyechips, most of them clear so I can paint them. And I have ordered alpaca hair, light brown with some blond mixed in to get a natural highlight effect. This is for my Cinnamon girl. I have removed all the hair she had on her scalp, and crikey, that was a struggle. Her scalp was full of stiff glue that seemed to have merged together with the plastic. But I managed :P, no going back on this.
   I cut the hair off first.
  Then soaked the scalp. Doesn’t look creepy at all ;). I have soaked it a bunch of times, it didn’t help much on the glue.. But I had to try.

 I used small scissors and a tweezer to remove the hair. You can see how awful that glue is. I might not want to reroot any more EBLs in future :P. 

  All ready for new hair ^-^.

While I wait for the hair I will finish the fake girl, I will give you a update soon :).

How I carve Blythe faces ^-^

I will now give you a description of how I like to carve Blythe faces 🙂

Materials:

Magic sponge and hand sanitizer.

Set of different diamond files

Carving knife from Cool Cat

Wet or dry sandpaper p800 and p1200 from 3M

Dremel, but this is optional 😉

A Blythe face 😛

IMG_1974

First I use my carving knife to carve the basic shape between the lips. So I will carve a deeper line in whatever shape I have chosen. It can help to look at a pictures of Blythes who has a similar shape to what you are after. I also now carve in to the side of the mouth to raise a smile or maybe a pouty look. I really love pouty looking Blythes ;). I use a smaller cut off piece of the sponge with some hand sanitizer on to wipe off bits of plastic so I can see what I’m doing. Also you don’t want to blow the plastic dust into the air, not good to breath in. It’s a good idea to use a suitable mask to avoid this, especially if you are dry sanding (I can recommend this thread for advice on respiratory protection: http://forums.dollymarket.net/showthread.php?tid=7255881).

I will use the knife at different angles to carve in different places, you can just try and see what feel best for you. But I will show some pics of the angles I often use.

IMG_4225

Here I twist my wrist so I follow the shape downward to get that line underneath the mouth that I like.

IMG_4226

I usually use the tip to work on the line between the lips to get it deeper. Just remember to be careful if your Blythe is a RBL+ model as they have much thinner plastic and you don’t want to go through the plastic. I hold the faceplate up to the light to check, it’s easy to see then if you have some very light areas.

IMG_4223

I use the tip of the knife and swirl the very point in a sirkular movement to carve nostrils. I use the tip to get small nostrils. A wider angle will give wider nostrils.

IMG_4228

I use this side of the knife to dig out the angle of the mouth. Carefully so I don’t make uneccessary scratches in the area around.

IMG_4230

After I am happy with the general shape of the mouth and nose I will use different diamond files to work on different areas. I use the ball shaped ones to work on the philtrum and use sirklular movements over the mouth and nose. I also like the ball shaped files for making the lips a bit bigger sometimes, by shaping the lip upwards. I use pointed ones to get inside the nostrils, under the mouth and between the lips.

IMG_4243

And I use a small ball shaped one in the nostrils ^-^.

IMG_4252

Once I have evened out the bigger scratches and bumps with the files I will first use the p800 sandpaper to smooth out most of the scratches left. For a super smooth finish and removing any small scratches left, I use the p1200 sandpaper. I keep a bowl with water near and regularly dip the paper in to keep it wet. Doing it wet will avoid platic dust in the air and will give a smoother finish. I always use sirkular movements even with very fine sandpaper like this to make sure it will end up smooth. Just do this until you are happy :). I check in good light to see if any scratches are left. I also sand the backplate and eyelids in preparation for the next step.

IMG_4262

Here she is now :). I will still check again in the brighter daylight tomorrow to be sure she is really done ;).

Also before doing any faceup work I will sort out the eyelids so they don’t show when the eyes are open and scrape off a layer of plastic at the top of the eye hole to allow space for paint or decoupage (for those who would like to do that) on the eyelid. I already have a tutorial on flickr regarding opening a RBL, boggling, sleep eyes, and eyechip removal. I will post it here on the blog at some point :). But you can find it in my flickr albums.

IMG_1978

This is a pic I have taken previously :). Just scrape off some plastic carefully and wet sand it after. I also pop the eyelids back in to check if I have made enough space. You really don’t want to end up scraping off the eyelid paint you have been working hard on.

IMG_1980

If there are any more questions I am happy to help. I might have forgotten something as well ;).

Edit: Since making this tutorial I have begun to use a dremel. But I basically do the same as I did before, only with the diamond files attached to the dremel, and faster than I could do manually. It’s best to wait with the dremel until you feel quite confident carving manually. You can slip easily and make big damages quickly. So you need to have steady hands, be awake and focused to use one. Also always use a protection mask when using a dremel as the plastic dust flies around everywhere, and you can easily breathe it in. One of the girls I did mostly using a dremel:

11752464_898160160249364_4598734968474404698_n

Thank you for reading. Hugs to everyone :D.

My opinion on fakies and a small challenge with EBL ;)

Currently I have a few projects. I have faceups to do on a couple of BJD’s. But as the weather is still too cold over here to spray with MSC, I have started working on a TBL fake Blythe and my EBL Cinnamon Girl.

The fakie girl I’m currently working on has gorgeous soft blond hair. And though I will want to most of the time use real Blythes for customising and selling, there really something to be said about the hair of these fakies. I really like this girl, but as I already have a tan fake girl with a blonde alpaca reroot, I feel it will be better to let someone else enjoy her once she is done ;). My stance on the fake VS real is that what matters most is that the doll brings happiness to the owner. I own a few custom fakes myself and I love them just as much as the real Takara Blythes ^-^. I do wish Takara would improve the quality of the real Blythes hair, and that they would also improve the RBL+ mold. The plastic is too thin on the RBL+ so carving is a bit more risky. Maybe those improving would make more people want to buy real Blythes instead of fakes as well.

I do not mind owning fakies, or taking commissions on fakies. The reason I will try to mostly stick to real Takara when I customise to sell, is that my work can perhaps reach out to more people. I do know that there are many who would not like to own fake Blythes.

Here she is anyway :).

IMG_4127

My other girl going under the knife is my Cinnamon Girl. I got her MIB and she had rubs in her blush and eyeshadow on one side even though she was definetly not ever removed from her box before I got her. So I don’t feel bad about customising her :). I have soaked her in warm soapy water to loosen the scalp before trying to remove it. It was very stuck and there is a lot of glue so I had to soak 3 times before I could get that scalp off her. As her hair is stiff and not very nice I will do a alpaca reroot. This will be my second reroot. I really hope I won’t take as long this time ;). It’s my least favourite job, but oh how I love the look of a nice alpaca reroot.

IMG_4137 IMG_4133

I have removed the fake girls faceup and eyechips so I am ready to start carving her. I will finish that carving first as with Cinnamon Girl I will need to order alpaca hair. So there is no rush with her :).

That’s it for today. Thank you for reading. I will update again soon ^-^

Hello and welcome ^-^

I have started this blog as a way to share my work with anyone interested. I am a collector of My Little Pony, Pullip dolls, BJD and Blythe. I am known on forums like the MLP arena, Dolly Market, Dollchemy, Dukkehuset, and Den of Angels as Buzzingbumblebee. I have been a doll collector since 2011, but the amazing Blythe didn’t win me over until 2013 ;). Since then I have been forever hooked. On this blog I will mainly focus on posting updates of my work with Blythe customising. I will also continue working on my customising tutorial when I have time, and post it here.

I am very excited about starting this blog, I have wanted to for a while ^-^. I will post a update of my latest work soon. Thank you very much for stopping by and I hope to see you soon.

Mona/Bee


Bees dreamland1