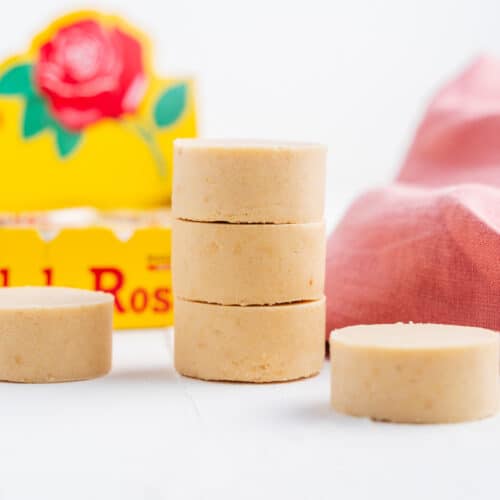
Tamarindo Candy

Tamarindo candy is a mouthwatering treat that only requires two ingredients and comes together in no time! Tamarind pods are combined with sugar before being rolled into your coating of choice. Each bite is packed with sweet, tangy flavors.

With a flavor combination like no other (okay, maybe not unlike chamoy candy), this treat is as fun to make as it is to eat! The preparation is surprisingly straightforward, requiring no fancy candy thermometers or other gadgets.
Why I love this recipe
Tamarind is one of my favorite flavors to make recipes with, from tamarind drinks to tamarindo candy. This homemade recipe packs a ton of flavor without any of the usual additives found in store-bought candies.
Whether you prefer a spicy kick with chile-lime seasoning or a decadent touch with cacao powder, you can easily tailor these candies to your liking. Plus, rolling and coating the candies is a fun kitchen activity that’s great for all ages.
These candies are perfect for snacking, gifting to friends and family, or even serving as a unique party favor. They’re always a hit with both kids and adults!
Ingredient notes
You don’t need much to make this tamarind candy! Find a full breakdown and suitable substitutes below.

Tamarind
With a similar texture to dates and prunes, tamarind makes a great candy base. It’s also an excellent source of calcium and magnesium. You can purchase it in pod or paste form, either at a Latin or Asian food market or online, but this recipe works best with whole pods.
Sugar
To balance out the tart and tangy flavors of tamarind. I prefer to use piloncillo in the candy mixture, but you can also use cane sugar or coconut sugar.
Coatings
The most common coating is granulated sugar, but you can get creative here! Try other options like chile-lime seasoning, cacao powder, coconut sugar, coconut shreds, chopped nuts, melted chocolate, or freeze-dried fruit powder.
For a complete ingredient list and step-by-step guide, scroll down to the recipe card.
How to make
Learn how easy it is to make tamarind candy with my step-by-step instructions. Look for the tips in green throughout this section for consistent and successful results! Also, you can watch my video tutorial down below!
Preparation
Remove the shells and as many veins as you can from the tamarind pods. Break them into pieces and add them to a bowl with hot water. Cut the seeds out of the pods before breaking them up. This step is optional but makes eating easier later on.
Combining the tamarind with hot water helps soften the pulp, making it easier to mix with the sugar and shape into balls.


Assembly
Step 1
Add grated piloncillo to the softened tamarind. Using your hands, mix both ingredients for about 10 minutes until they’re well incorporated and the texture is sticky yet manageable.
If the mix is too mushy or tangy, add in more piloncillo a little at a time until it reaches your desired taste and a rollable consistency.


Step 2
Roll pieces of the tamarind candy mix into bite-size balls. Using 2 spoons, roll the balls in a shallow bowl of chile-lime seasoning, granulated sugar, cacao powder, coconut shreds, etc. Continue this process until all of the mix is gone. Happy eating!
Coating the tamarind balls not only adds an extra layer of flavor but also prevents them from sticking together. Be gentle during this process to maintain the shape of the balls.

Expert tip
Be patient when soaking and mixing the tamarind pulp. It takes a while for it to soften into a workable texture, but it will get there eventually!
Choose fresh, pliable tamarind pods if possible. Fresh tamarind has a better flavor and texture than older, dried-out pods. Plus, it softens more quickly.
If the candy ball becomes too sticky, wear some kitchen gloves or dampen your hands to make it easier to work with.
Recipe tips
Gradually add sweetener: Add the piloncillo or sugar gradually, adjusting it based on the tartness level of the tamarind and your preferred sweetness level.
Use spoons: To help the tamarind candy coating stick, use two spoons instead of your hands to roll the balls in the coatings.
Let the candies chill: Give the balls enough time to chill in the fridge to help them set and firm up, making them easier to handle.

Frequently asked questions
No, you don’t have to remove the seeds from your tamarindo candy. It’s actually much easier to roll balls with the seeds in them.
If your tamarindo candy mixture is dry or not mixing well, add 1 tablespoon of water at a time until it reaches a moldable consistency.
If the mixture is too sticky, add a bit more sugar or let it firm up in the fridge for 30-60 minutes before rolling.
Storing
If you have leftover tamarind candy or are making a large batch as a gift, here are the best storage options.
Room temperature
If you enjoy a softer texture, you can keep your tamarind candy at room temperature in an airtight container for up to 2 weeks.
Fridge
Tamarind candies should really be stored in an airtight container in the refrigerator, which helps maintain their texture and flavor. They will last for up to 2-3 weeks this way.
Freezer
For longer storage periods, transfer the candies to the freezer in a freezer-safe container for up to a year. Let them thaw overnight in the fridge before serving again.
Watch how to make it

More candy recipes


Hungry for more?
If you enjoyed this recipe, please consider leaving a star rating and a comment down below! Your feedback not only helps others discover our blog but also gives us valuable insights from your experience.
Don’t forget to subscribe to our newsletter for the latest recipes, and check out our shop for our top kitchen recommendations. Thank you for supporting BBV!
Recipe

2-Ingredient Tamarindo Candy
Equipment
- Mixing bowls
- Paring knife
- Measuring cups
Ingredients
- ½ pound (shells removed) tamarind pods
- 2 tablespoons hot water
- ½ cup grated piloncillo
- ¼ – ½ cup granulated sugar
For rolling
- 2-3 tablespoons granulated sugar
- 2-3 tablespoons chile-lime seasoning (Tajin)
- 2-3 tablespoons cacao powder
Instructions
- Remove the shells and as many veins as you can from the tamarind pods. Break them into pieces and add them to a bowl with hot water. Optional: Using a small knife, cut the seeds out of the pods before breaking them up.
- Add in the sugar and incorporate with the pods using your hands for about 10 minutes (be warned it's very sticky, so gloves are handy).
- Note: If the mix is too mushy or tangy, add in sugar a little at a time until it reaches your desired taste and a consistency that’s able to be rolled.
Rolling
- Add any coatings you’ll be using to shallow bowls. Using your hands, roll a portion of the tamarind mixture until smooth. Using 2 spoons, coat the ball in either chile-lime seasoning, more granulated sugar, or cacao powder.
- Continue this process until all of the tamarind balls are formed. Transfer to your fridge for storage. Happy eating!
Notes
Nutrition
Note: I’ve updated this post to include new information and helpful tips about the recipe.

Mitch Chapman is a food writer, photographer, and one of the founders of Broke Bank Vegan. With a background in healthcare and the restaurant industry, he has a passion for sharing healthy yet flavorful plant-based food.