
AWS S3 저장소(버킷)을 사용하여 정적인 파일(이미지)들은 여기에 저장할 수 있다.
SpringBoot의 파일업로드/다운로드 작업은 이 AWS S3 저장소에서 이루어질 수 있다. 사용방법을 정리해본다.
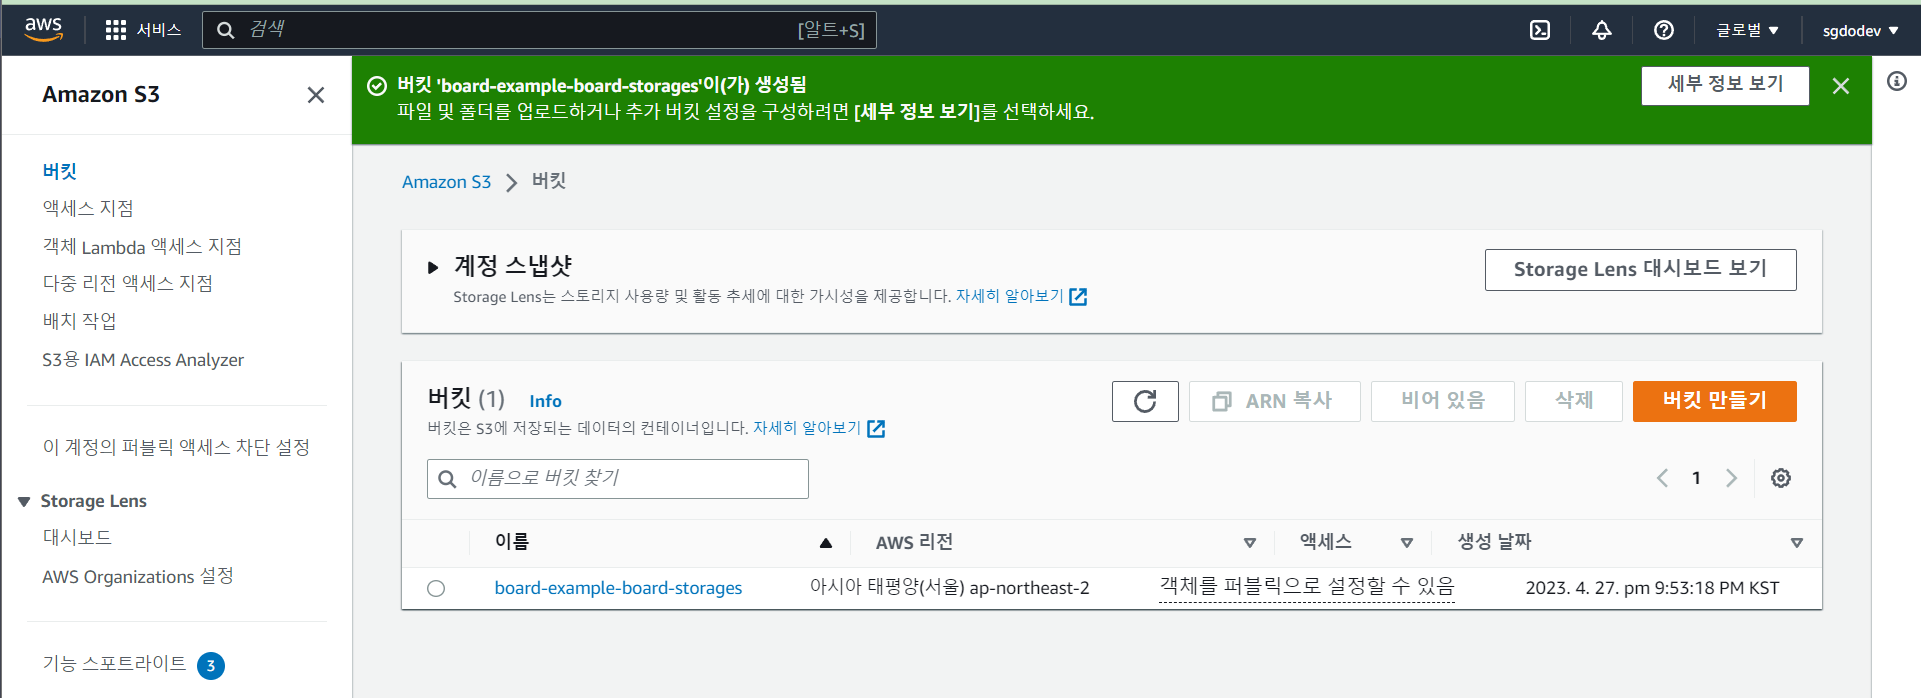
AWS S3 버킷 만들기
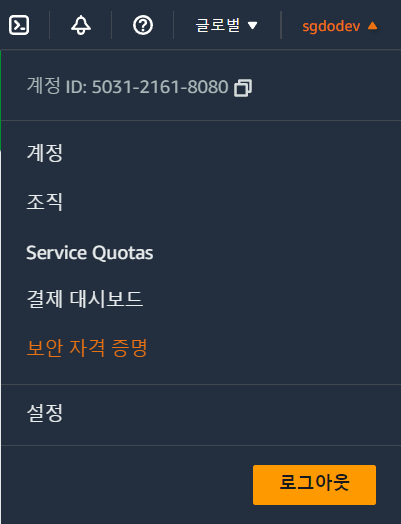
✅ 그전에 AWS Access key 설정!
s3 서비스를 이용할려면 Access key를 발급받아야 한다.
aws credentials
access-key, secret-key 을 확인할려면, 마이페이지 > 보안 자격 증명
IAM(보안 자격 증명) > 엑세스 키 만들기
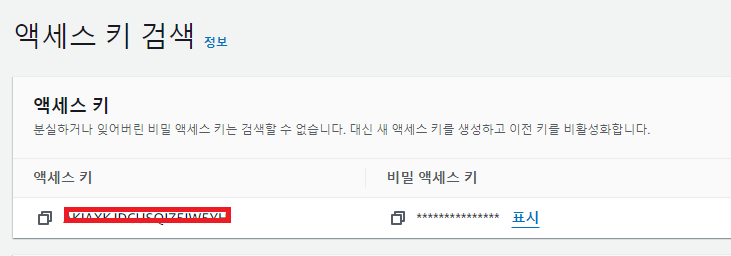
여기서, access-key, secret-key 를 잘 저장해두자! S3 뿐만 아니라 AWS 서비스를 사용하기 위한 보안키인 것이다!
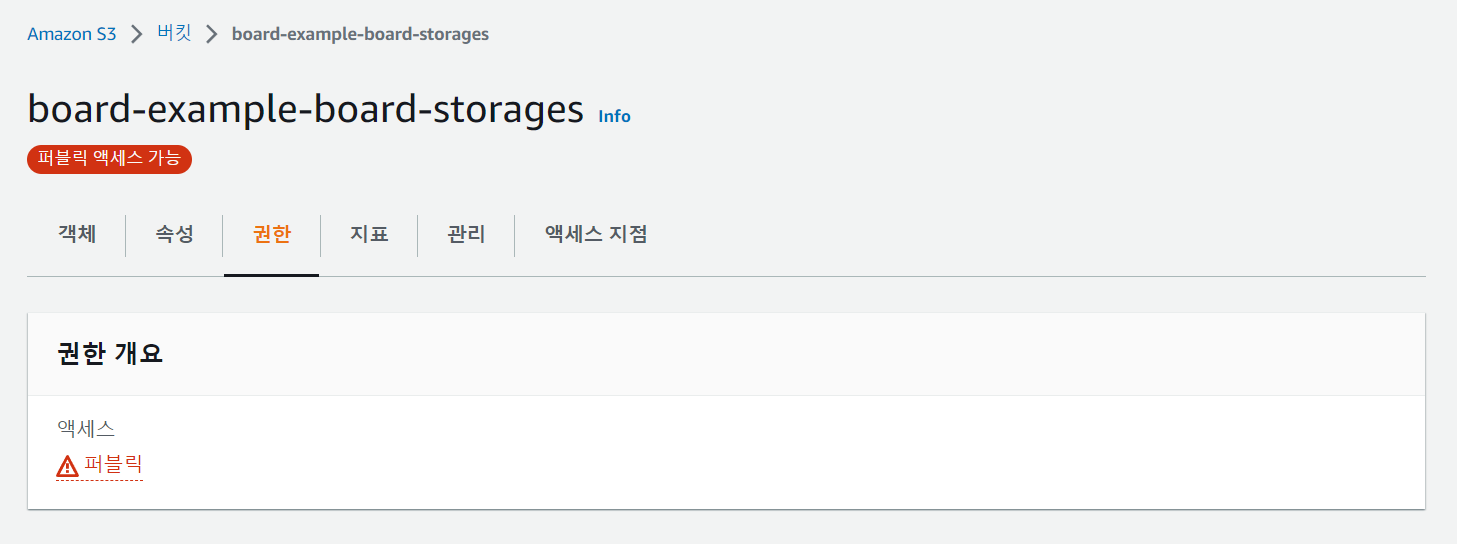
S3 버킷 퍼블릭 엑세스 > JSON 편집
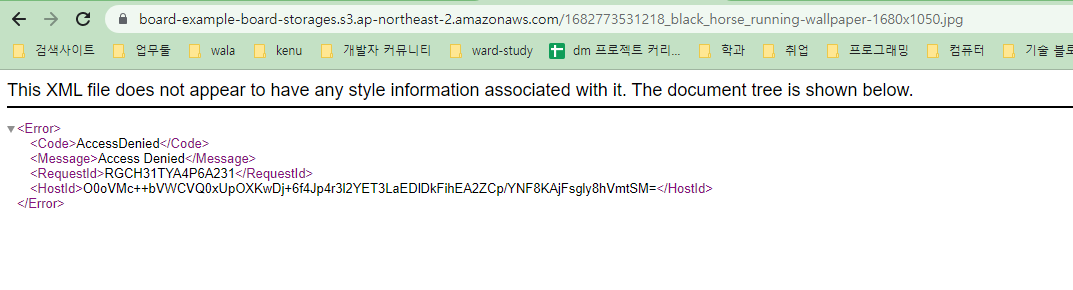
이런식으로 퍼블릭으로 설정이 안되어 있으면 브라우저에서 위 표시가 난다.
aws s3 버킷 이미지 URL이 브라우저에서 노출이 될려면, 퍼블릭 엑세스를 설정해주어야 한다!
aws s3 버킷 퍼블릭 엑세스는 버킷 정책 편집에서 진행해야 한다!
저장할 버킷 상세로 들어가기 그다음 권한 탭에 들어가기
0) ACL 편집 활성화 (안해도 상관x)
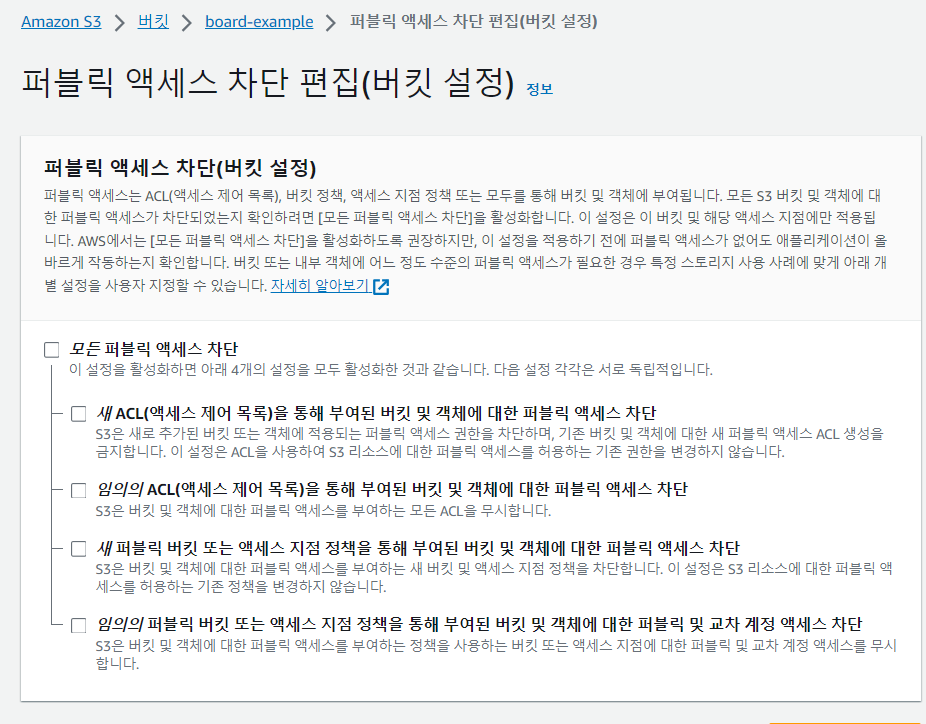
1) 퍼블릭 액세스 차단은 해제!
2) 버킷 정책 편집하기
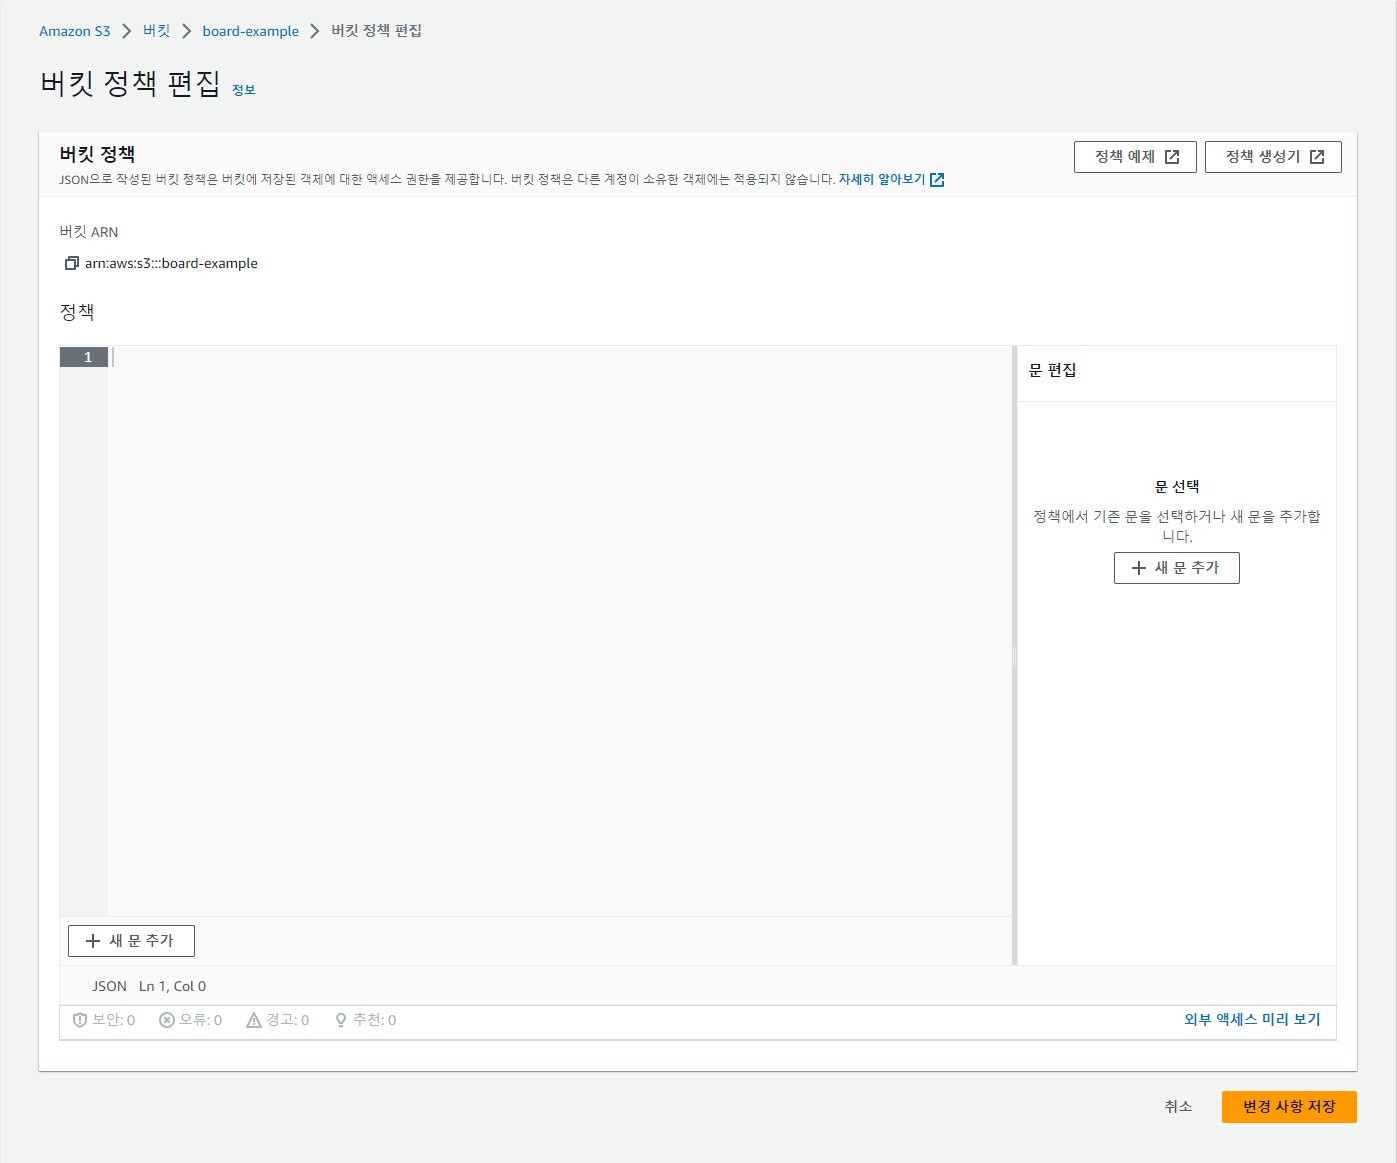
다음 페이지(Amazon S3 > 버킷 > {본인 버킷 저장소} > 버킷 정책 편집)로 들어가서 정책 생성기 버튼을 클릭해보자.
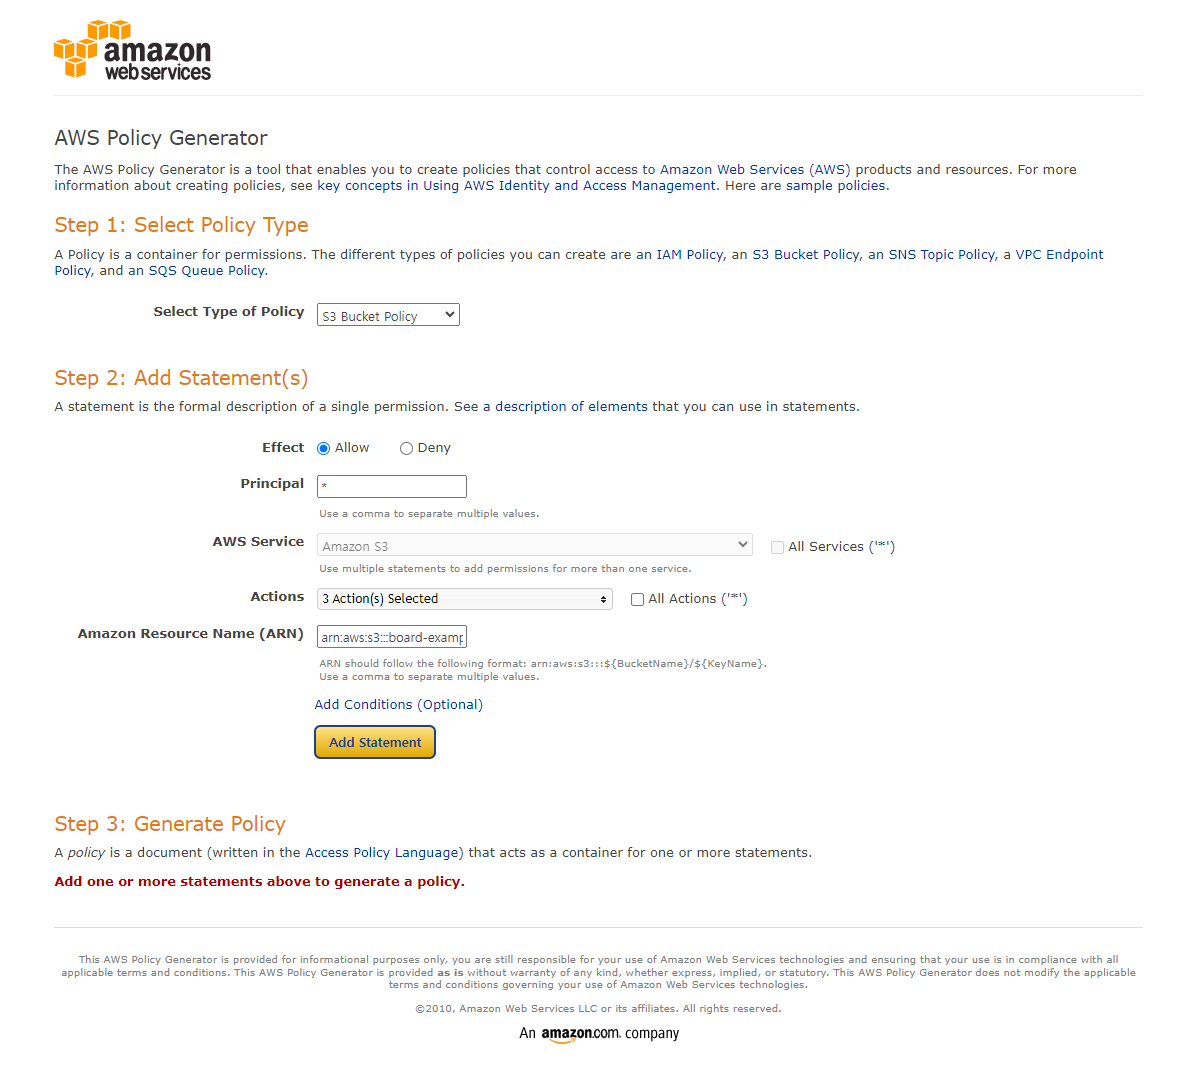
정책 생성기의 내용은 다음과 같이 적으면 된다.
- Principal : *
- Actions :
1) DeleteObject
2) GetObject
3) PutObject- ARN : arn:aws:s3:::{본인 버킷 저장소 이름}/*
다 적었으면,
Add Statment > Generate Policy 를 누르면 된다.
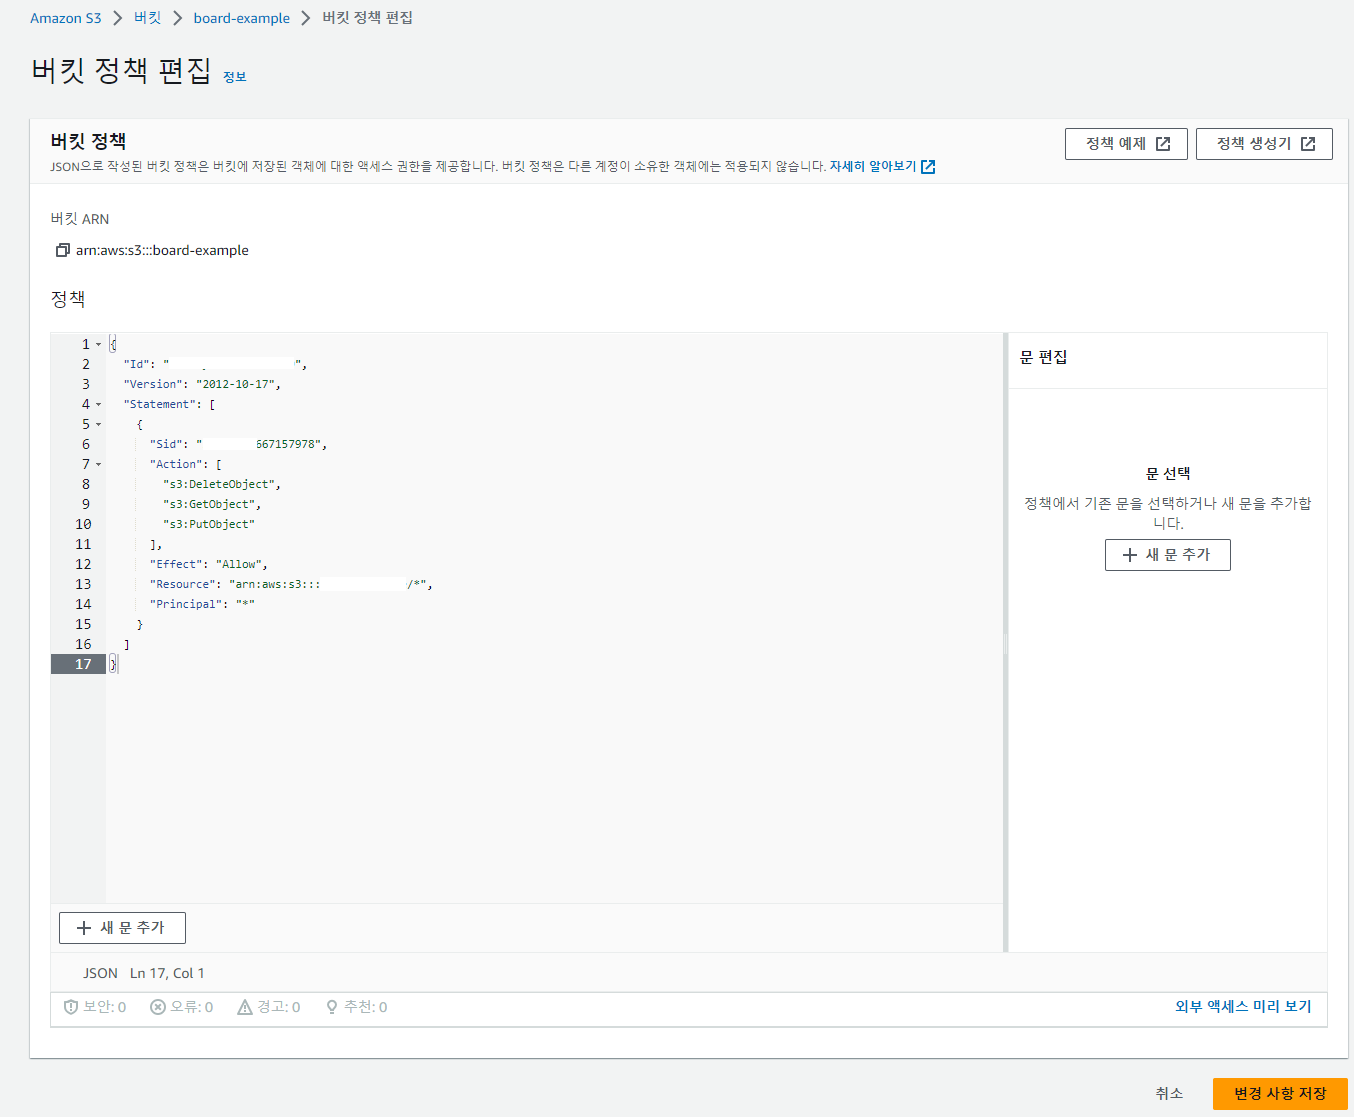
그럼 Json 내용을 주는데
{
  "Id": "XXXXXXX218549",
  "Version": "2012-10-17",
  "Statement": [
    {
      "Sid": "XXXXXX7157978",
      "Action": [
        "s3:DeleteObject",
        "s3:GetObject",
        "s3:PutObject"
      ],
      "Effect": "Allow",
      "Resource": "arn:aws:s3:::XXXXXXX/*",
      "Principal": "*"
    }
  ]
}
이 내용을 아까 처음 버킷 정책 편집 페이지 정책 안에 넣어주고
저장해주면 된다!
이렇게 빨간색으로 퍼블릭 표시가 나오면 끝!
참고)
https://blog.naver.com/PostView.nhn?blogId=rkdudwl&logNo=222220577129
구현 예시
build.gradle
    // aws 추가
    implementation 'org.springframework.cloud:spring-cloud-starter-aws:2.2.6.RELEASE'
application.yml
spring:
  servlet:
    multipart:
      enabled: true
      file-size-threshold: 2MB
      max-file-size: 5MB
      max-request-size: 10MB


cloud:
  aws:
    credentials:
      access-key: ㅌㅌㅌㅌㅌㅌㅌㅌㅌㅌㅌㅌㅌㅌ
      secret-key: ㅌㅌㅌㅌㅌㅌㅌㅌㅌㅌㅌㅌㅌㅌ
    region:
      static: ap-northeast-2
    stack:
      auto: false

application:
  bucket:
    name: fileupload221016
코드 구현
✳️코드 위치
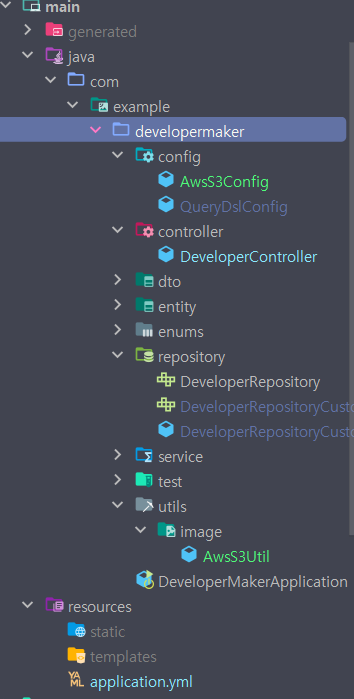
AwsS3Config
@Configuration
@RequiredArgsConstructor
public class AwsS3Config {

    @Value("${cloud.aws.credentials.access-key}")
    private String accessKey;

    @Value("${cloud.aws.credentials.secret-key}")
    private String accessSecret;
    @Value("${cloud.aws.region.static}")
    private String region;

    @Bean
    public AmazonS3 s3Client() {
        AWSCredentials credentials = new BasicAWSCredentials(accessKey, accessSecret);
        return AmazonS3ClientBuilder.standard()
                .withCredentials(new AWSStaticCredentialsProvider(credentials))
                .withRegion(region).build();
    }
}
AwsS3Util
@Slf4j
@Component
@RequiredArgsConstructor
public class AwsS3Util {

    @Value("${application.bucket.name}")
    private String bucketName;

    private final AmazonS3 s3Client;

    public String uploadFile(MultipartFile file) {

        if(file == null || file.isEmpty())
            return "";
        File fileObj = convertMultiPartFileToFile(file);
        String originalFilename = file.getOriginalFilename();
        String extension = getFileExtension(originalFilename);
        String fileName = UUID.randomUUID() + "." + extension;

        log.info("uploadFile fileName: {}", fileName);
        s3Client.putObject(new PutObjectRequest(bucketName, fileName, fileObj));
        fileObj.delete();
        return s3Client.getUrl(bucketName, fileName).toString();
    }

    public String uploadFiles(List<MultipartFile> files) {
        // 다중 업로드 && 리스트 ","을 기준으로 하나의 문자열 반환
        // files 갯수 0 이면 반환 ""
        if(files == null || files.size() == 0)
            return "";

        StringBuilder mergedUrl = new StringBuilder();
        for (int i = 0; i < files.size(); i++) {
            mergedUrl.append(uploadFile(files.get(i)));
            if(i < files.size() - 1) {
                mergedUrl.append(",");
            }
        }
        log.info("uploadFiles mergedUrl: {}", mergedUrl);
        return mergedUrl.toString();
    }


    public byte[] downloadFile(String image) {

        String filename = image.substring(image.lastIndexOf('/') + 1);

        S3Object s3Object = s3Client.getObject(bucketName, filename);
        S3ObjectInputStream inputStream = s3Object.getObjectContent();
        try {
            byte[] content = IOUtils.toByteArray(inputStream);
            return content;
        } catch (IOException e) {
            // e.printStackTrace();
            throw new IllegalStateException("aws s3 다운로드 error");
        }
    }


    public String deleteFile(String fileName) {
        s3Client.deleteObject(bucketName, fileName);
        return fileName + " removed ...";
    }


    private File convertMultiPartFileToFile(MultipartFile file) {
        File convertedFile = new File(file.getOriginalFilename());
        try (FileOutputStream fos = new FileOutputStream(convertedFile)) {
            fos.write(file.getBytes());
        } catch (IOException e) {
            log.error("Error converting multipartFile to file", e);
        }
        return convertedFile;
    }

    private static String getFileExtension(String originalFileName) {
        return originalFileName.substring(originalFileName.lastIndexOf(".") + 1);
    }

}
TestController
@Log4j2
@RestController
@RequestMapping("/test")
@RequiredArgsConstructor
public class TestController {

    private final AwsS3Util awsS3Util;

    @PostMapping("/upload")
    public ResponseEntity<?> uploadFile(
            @RequestParam(value = "file") MultipartFile file
    ) {
        return new ResponseEntity<>(awsS3Util.uploadFile(file), HttpStatus.OK);
    }


    // 다중 업로드
    @PostMapping("/uploads")
    public ResponseEntity<?> uploadFiles(
            @RequestParam(value = "files") List<MultipartFile> files
    ) {
        return new ResponseEntity<>(awsS3Util.uploadFiles(files), HttpStatus.OK);
    }

    // 다운로드
    @GetMapping("/download")
    public ResponseEntity<ByteArrayResource> downloadFile(@RequestParam(value = "image") String image) {

    //  ex. image=https://board-example.s3.ap-northeast-2.amazonaws.com/2b8359b2-de59-4765-8da0-51f5d4e556c3.jpg

        byte[] data = awsS3Util.downloadFile(image);
        ByteArrayResource resource = new ByteArrayResource(data);
        return ResponseEntity
                .ok()
                .contentLength(data.length)
                .header("Content-type", "application/octet-stream")
                .header("Content-disposition", "attachment; filename=\"" + image + "\"")
                .body(resource);
    }


 @DeleteMapping("/delete")
    public ResponseEntity<String> deleteFile(@RequestParam String image) {
        return new ResponseEntity<>(awsS3Util.deleteFile(image), HttpStatus.OK);
    }

}
실제 이미지 업로드 진행
    @PostMapping
    public ResponseEntity<?> createBoard(
            @Valid @RequestPart(value = "values") BoardCreateRequestDto requestDto,
            @RequestPart(value = "files", required = false) List<MultipartFile> files,
            @AuthenticationPrincipal PrincipalDetails principalDetails
    ) {
        log.info("createBoard principalDetails: {}", principalDetails);
        requestDto.setFiles(files);
        boardService.createBoard(requestDto);
        return new ResponseEntity<>(null, HttpStatus.CREATED);
    }
postman 확인
1) upload
✅ form-data 형식 && file 이름으로 File 타입으로 보내준다!
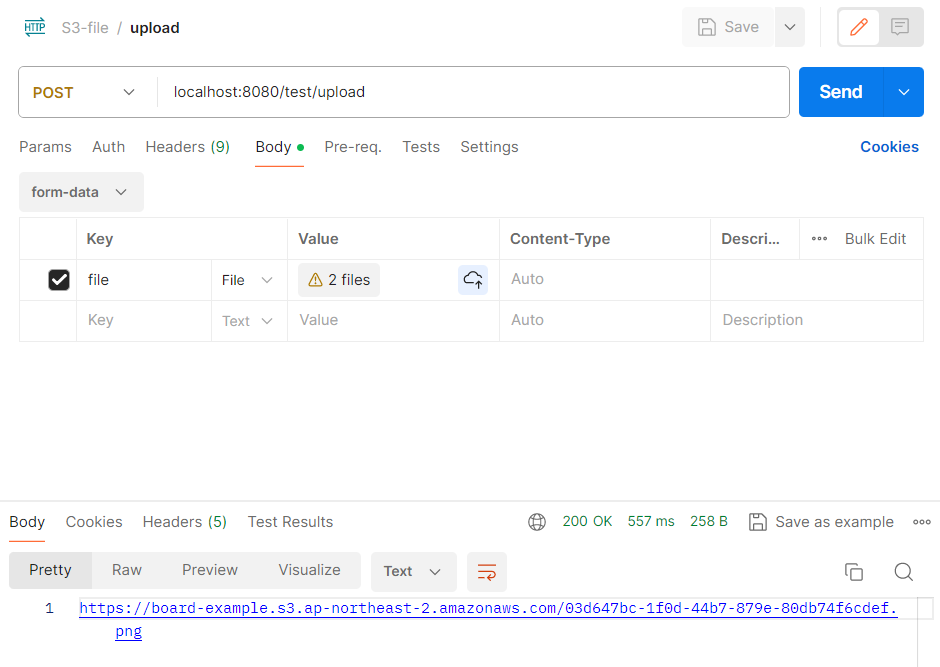
upload 완료시, AWS S3 버킷 내부 레코드가 쌓이게 되는 것을 볼 수 있다!
이름을 클릭하면 저장된 url 링크로 브라우저에서 확인할 수 있다!

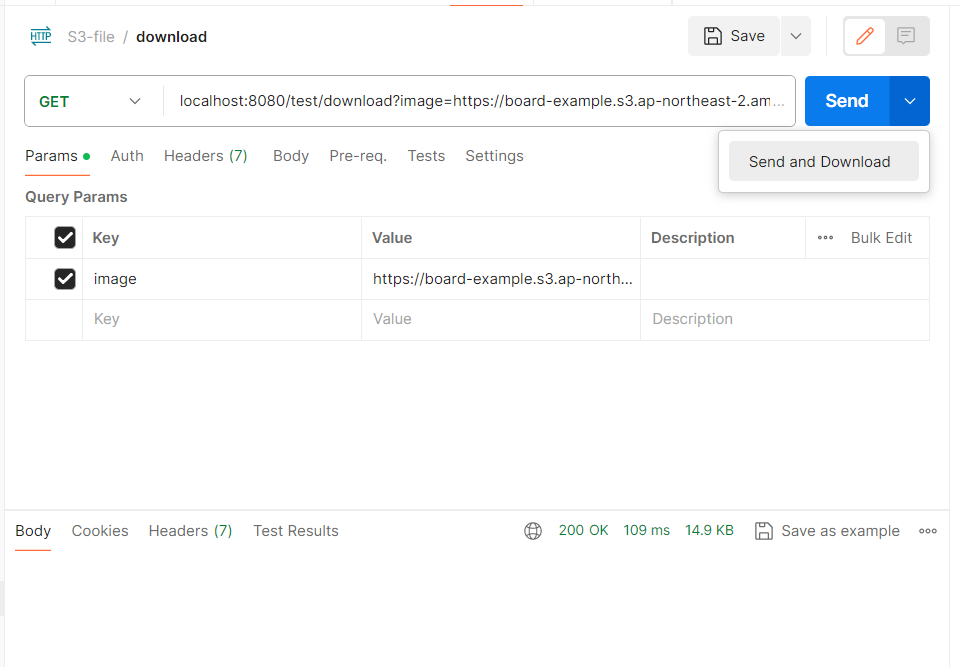
2) download
send 버튼 화살표 아래에 Send And Download 버튼으로 전송해야한다!
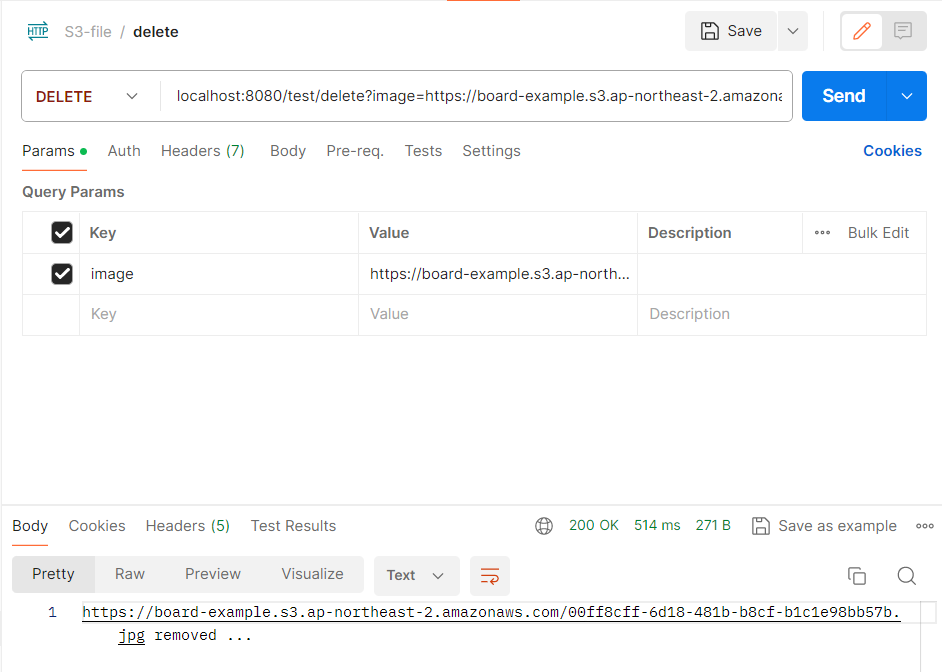
3) delete
참고