Table of Contents
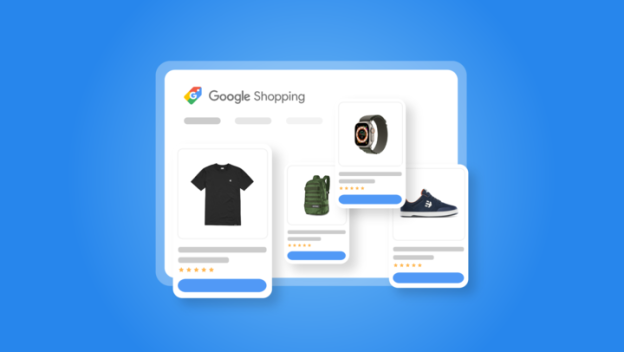
In this world of online shopping, Google Shopping Product Listing stands as a prominent stage for retailers. And you will be shocked to know that almost half of online shoppers in the US—47%— kick off their shopping adventures by searching on Google.
But to really make the most of it, you need to understand Google shopping product listing optimization properly. This doesn’t mean being seen – it’s about making your products look good, being relevant, and giving shoppers a great experience.
So in this guide, I’ll share everything you need to know about google product listing optimization. From understanding the basics of product listing to properly optimizing it on Google, you will get everything you need to know to boost your traffic and sales. Let’s Go!
What is Product Listing and Product Listing Optimization on Google Shopping?
Before we get into the main part, let’s get a clear understanding about product listing and product listing optimization for Google Shopping.
Simply put, your product listing is the in-depth information about the products you are offering for sale. So, it typically includes essential details such as
- The product’s name,
- description,
- price,
- images,
- specifications,
- and other relevant information.
So, what is product listing optimization?
Product Listing Optimization (PLO), involves optimizing every component of a product listing tailored for a designated sales channel, such as Amazon or Google Shopping.
So, Product Listing Optimization (PLO) for Google Shopping is the strategic process of enhancing and optimizing different aspects of a product listing to improve its visibility and performance on the Google Shopping platform.
How to upload a Product Listing on Google Shopping
Like I said earlier, Google Shopping is a powerful platform to showcase products in search results. And to show your products in the best way possible, a product listing is needed.
By creating product listings, you can increase the visibility of your products and reach potential customers who are actively searching for items like yours.
So, how do you do it?
- Create a Google Merchant Center Account
- Verifying your business
- Creating a Feed
- Submitting Product Data
Simple right? Well, it actually is. Lets dive into the in-depth details.
1. Create a Google Merchant Center Account
To do a product listing, a google merchant center account is a must. So, the first thing you need to do is go to Google Merchant Center Next website and create an account.
Yes, Merchant Center Next is the new updated version of Google Merchant Center.
You will need a valid email account in order to open up an account. So try to make sure you have that.
Now, After going to the page, hit the ‘start’ button. If you are an existing user remember to sign in.
In the following page, you will be required to give some additional information. Such as-
- Your legal business name.
- Your business country.
- The local time zone.
- Provide details about your eCommerce tools.
Hope you didn’t have any trouble till now. Next, you have to agree with the Google Merchant Center Next’s Terms of Service.
That’s pretty much it for this step. Click on the ‘Create Account’ Button and your account is ready to use.
2. Verifying Your Business
The next step concerns verifying your business. The verification can be done in two simple steps.
- Confirm your ownership of the website.
- Claiming your website on GMC
Now, there are multiple ways to verify, such as:
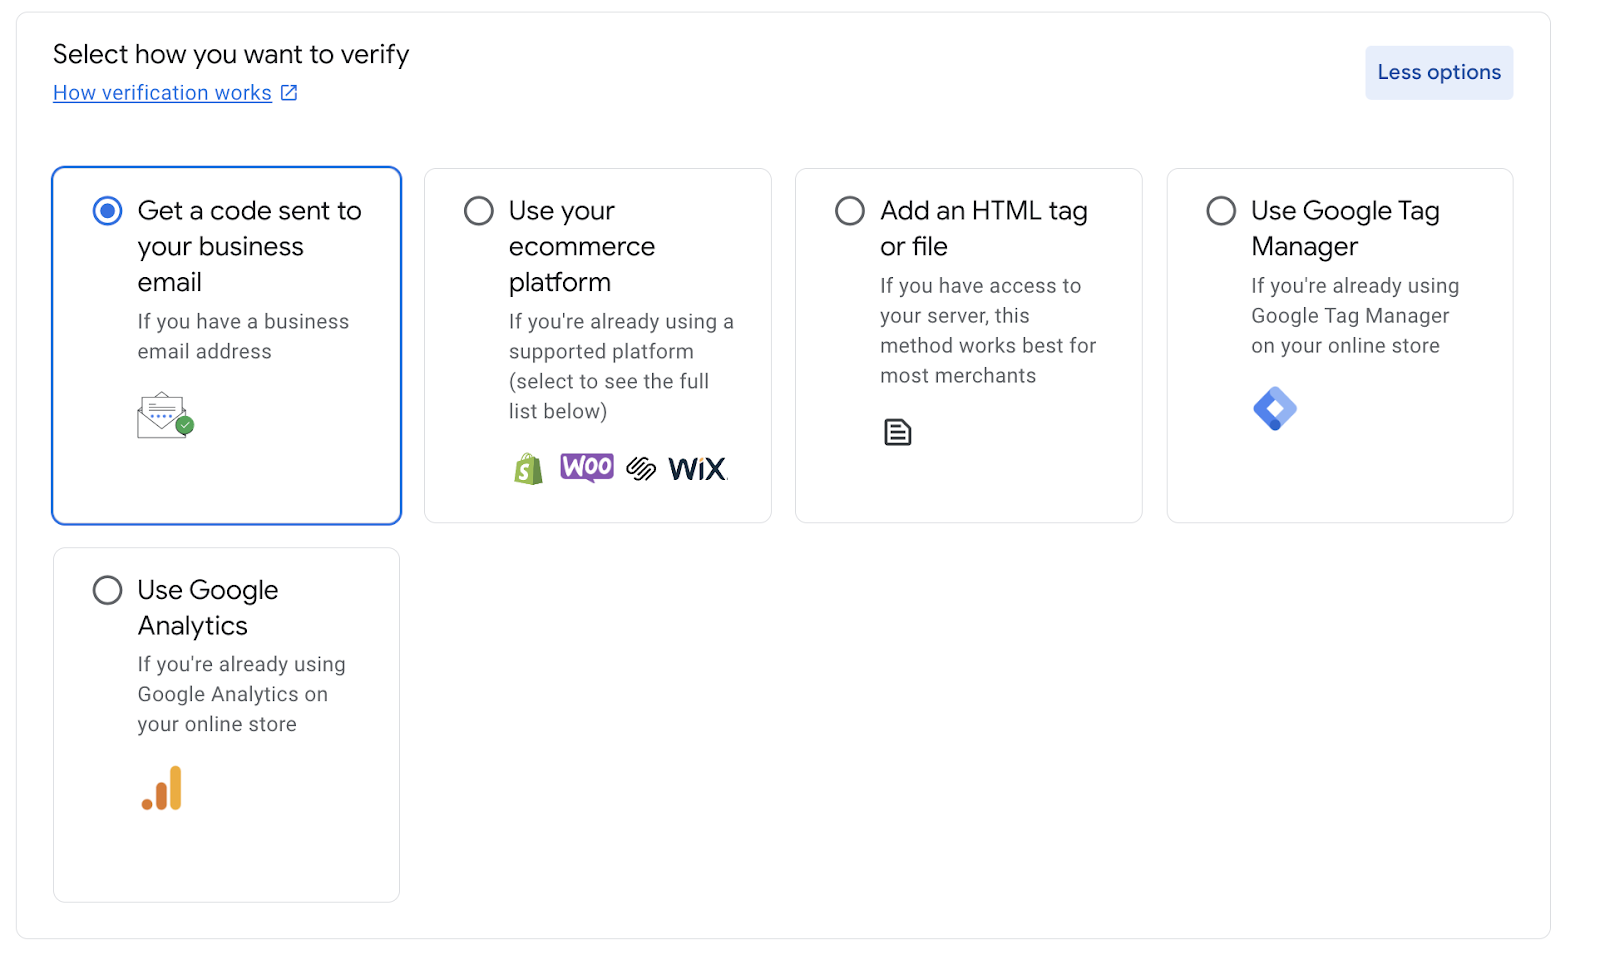
You can select any of them. Let me break out these verification methods in one line for you.
Business Code– Enter the code sent to your business email address.
Ecommerce Platform– Enter the code in your ecommerce platform.
HTML tag– Insert the HTML tag into the <head> section of your website’s homepage.
Using Google Tag Manager- Insert the Tag Manager code into the <head> section of your website’s homepage.
Google Analytics– Add the Google Analytics tracking code on the <head> section of the homepage.
Most of the people use business code and ecommerce platform methods. I personally use the ecommerce platform method as I use WooCommerce.
But, you should always choose the option that seems the most convenient and easiest to you.
3. Creating a Feed
Now that your GMC account is ready to serve and you have verified your business as well. Let’s get into the main point.
You can add products in two ways. Either from a source or one by one.
Now adding products one by one is really time-consuming.
When you are working with around 100 or more products it will kill a lot of your time to list all the products.
Also, it is highly likely that anyone can make a mistake.
So, I’d recommend you to create a product feed and then upload the products together. As I’ve mentioned that I use WooCommerce, so I will now show you how to create a WooCommerce Google Shopping Product Feed using a plugin.
The steps are really easy and beginner friendly. So have a look-
First, you have to go to the WordPress Dashboard and then search for ‘CTX Feed’. It is the best WooCommerce Google Shopping Feed Plugin out there. Now active and install the plugin.
Right now, you have to make a feed for Google shopping. Don’t worry, the CTX Feed plugin will really make the job easier for you.
Go to the CTX Feed Menu and click ‘Make Feed’.
What do you see? Yes, it is a feed window.
I’d advise you to fill out the required information. After selecting the country, try to select the ‘Google Shopping’ Template.
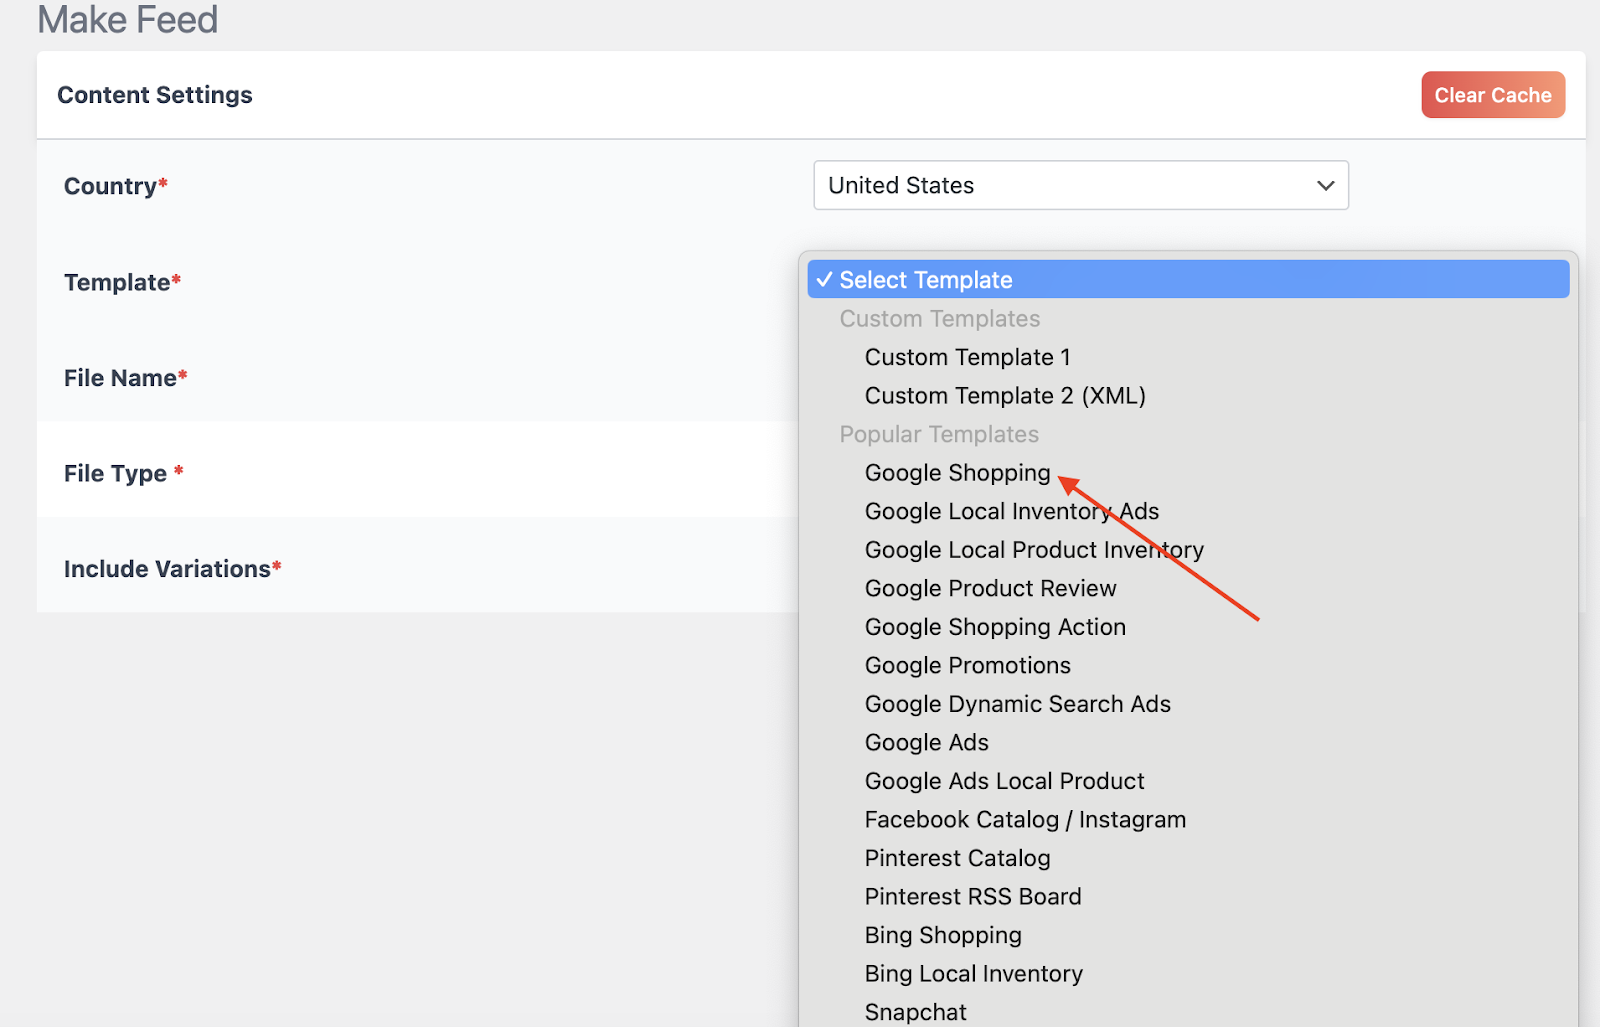
As you can see, if you are a WooCommerce user, you can also generate a feed for Facebook, Pinterest, Instagram etc as well aside from Google Shopping.
After selecting the Google Shopping template, you will be required to give a file name and select the file type.
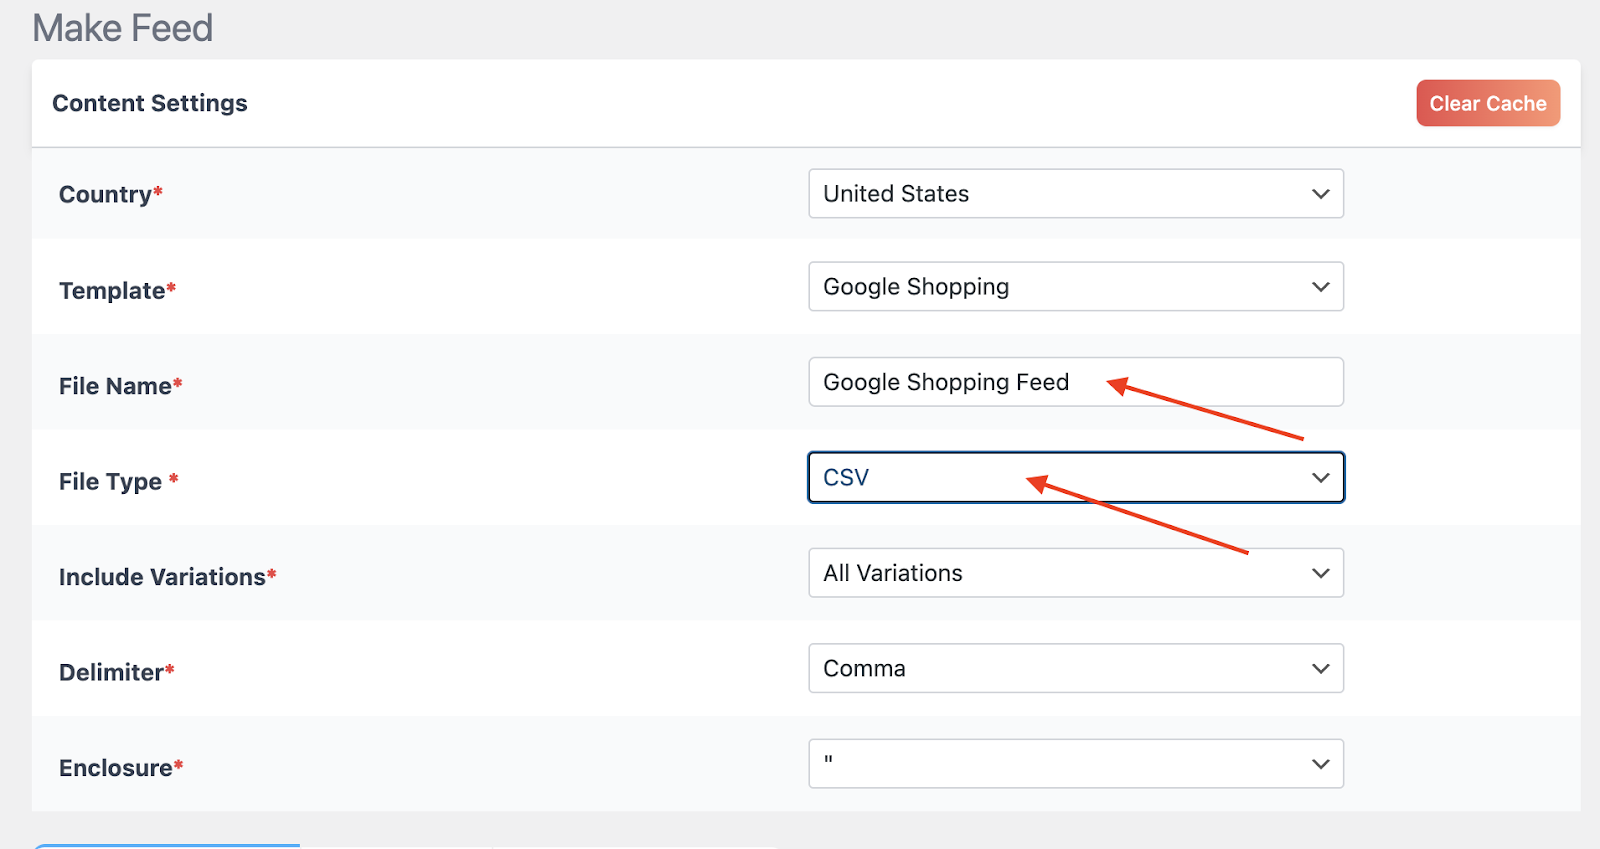
As you can see I have used the name ‘Google Shopping Feed’ for testing purposes. You get to select any of the supported file types –
- XML,
- CSV,
- TSV,
- TXT
Choosing a channel template automatically fills in the required attributes at the bottom through the plugin.
Sounds great right? Well, it is.

After you are done with the attributes, you need to go down below and select ‘Update and Generate Feed’.

Your job is pretty much done for this part. Clicking the ‘Update and Generate Feed’ button triggers the plugin to automatically gather your product data and generate the feed.
So, where will you find this feed now?
You need to simply go to the CTX Feed menu and click on ‘Manage Feeds’.
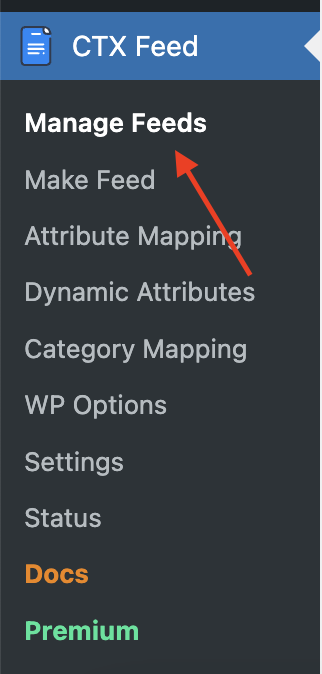
Locate the recently generated file in the Manage Feeds menu, you will get your recently generated feed file.

You get the option of directly copying the link through the ‘copy’ button.

One more thing! You can see the settings option below Action. It will give you the option to view, download or even delete the file. See? It comes with a lot of options.
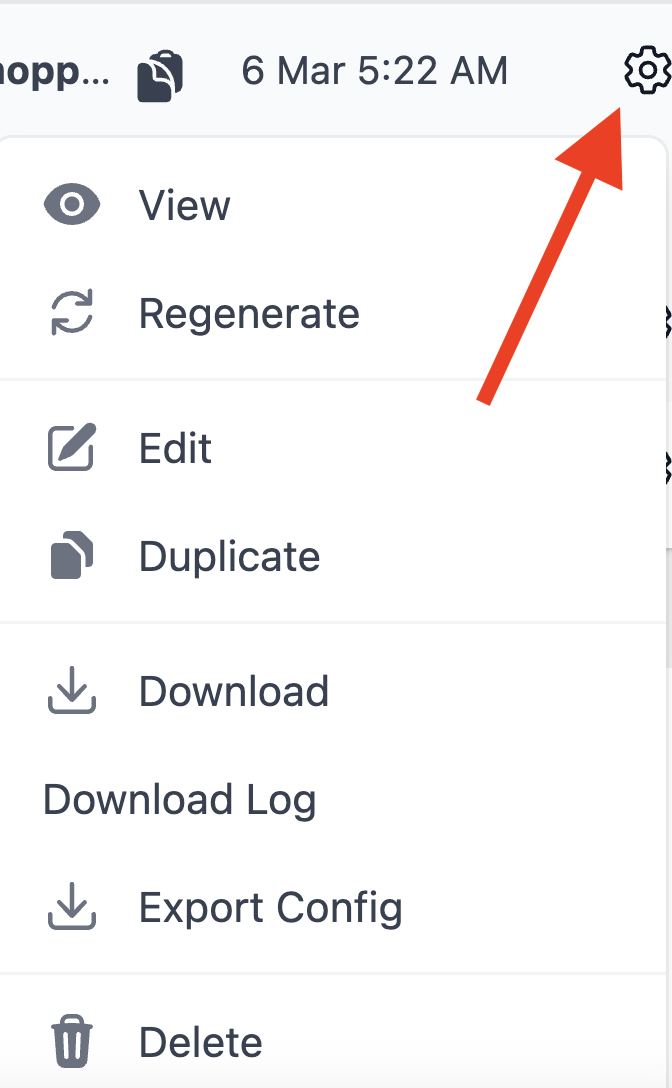

Here you can choose the auto-update interval time as well. So, select it according to the way you update your WooCommerce products.
Hope you got a good idea on generating WooCommerce Product listing feeds for Google Shopping. Next up, you need to head to Google Merchant Center and upload this feed to showcase and list your products on Google Shopping.
4. Submitting Product Data
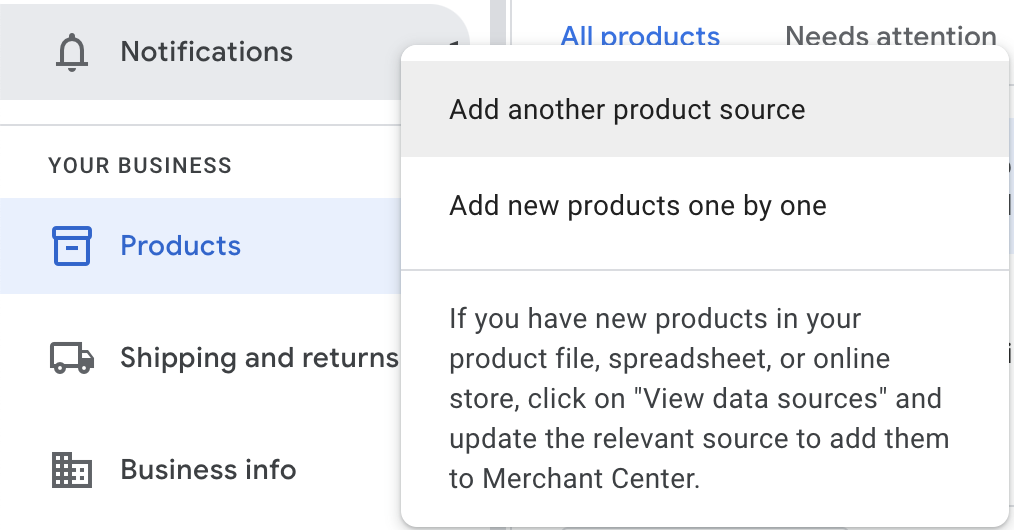
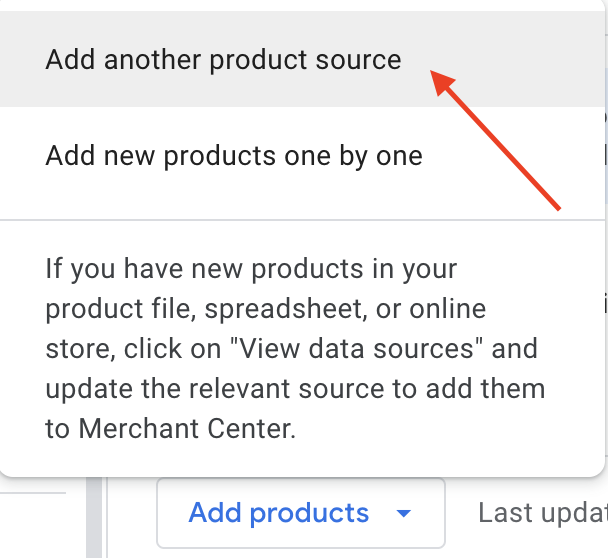
In your Google Merchant Center account, you will find the ‘products’ option on your left side. You have to click on it.

Select ‘Add Products’ and you will find two ways to upload your products as I’ve mentioned before. I’d always suggest you to go for the option ‘Add another product source’.
Now, you can upload your file from three options.

If you have generated the file in CSV format you can select the ‘Use a Google Sheets template’ option. Though it is up to you.
In the following page you will get the ‘use template’ option.
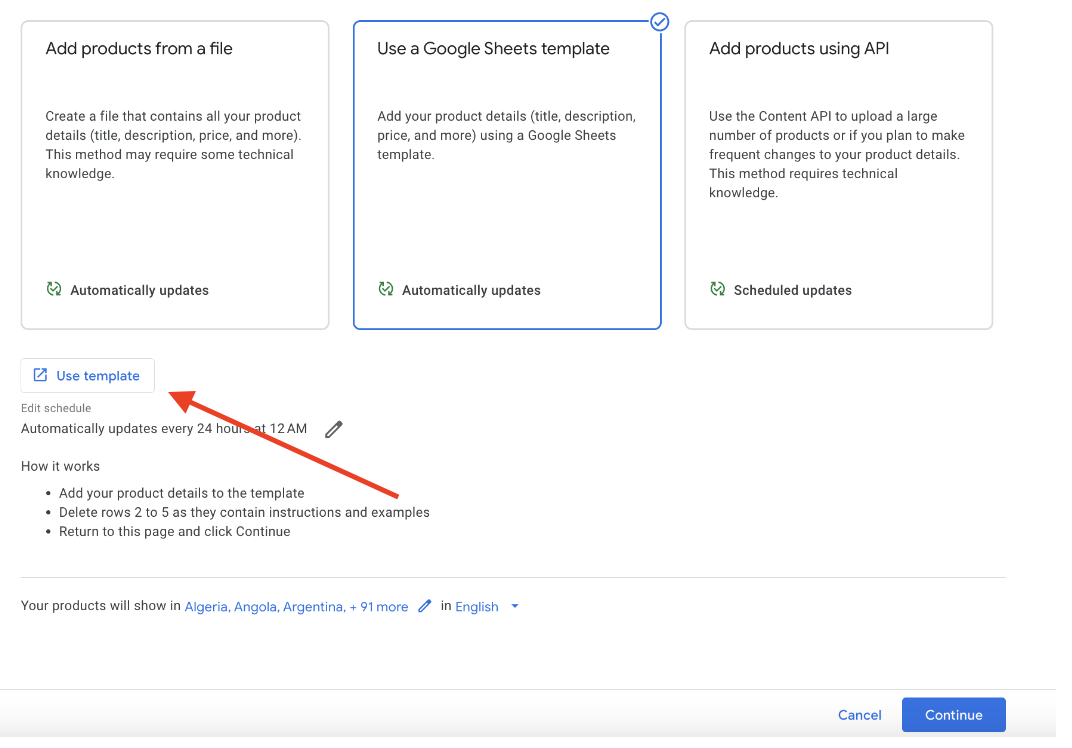
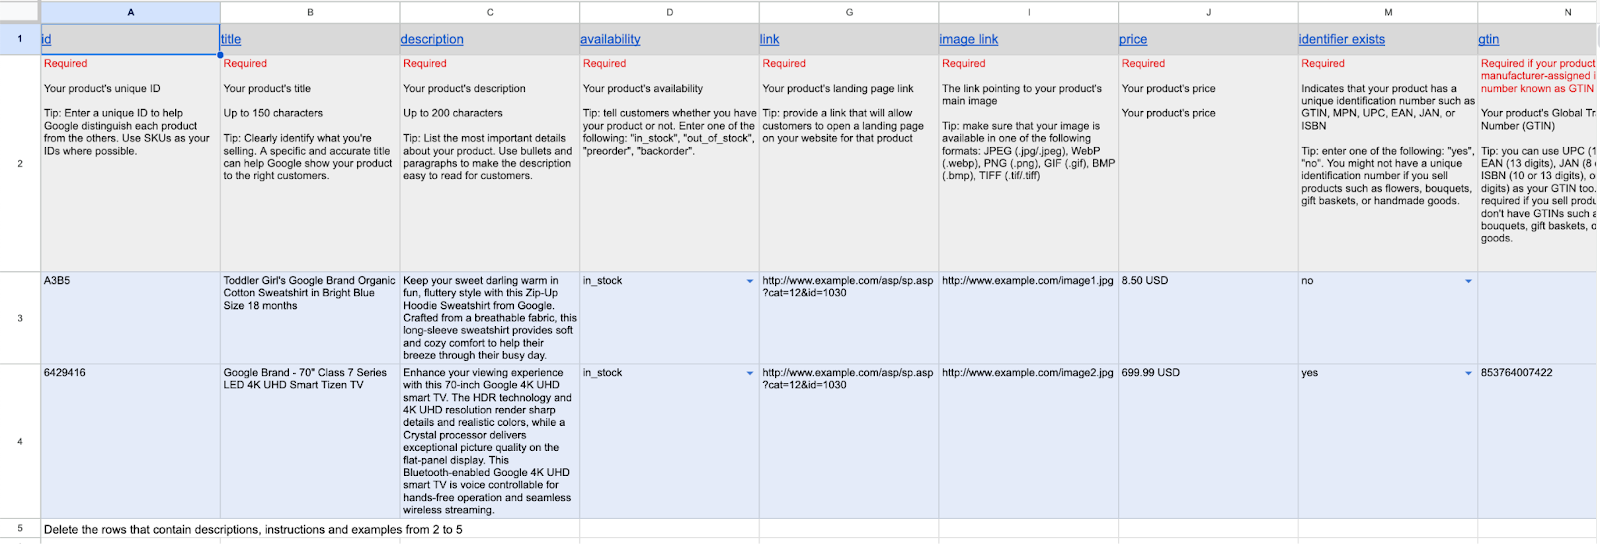
You will find two options: create a new Google spreadsheet from a template or select an existing one. If you choose a template, enter your product details like
- Id,
- Title, Description,
- Availability
- Image link
- Price etc
After providing your required information, you will need to Go back to the page and click “Continue.” Your products will be generated in a few seconds.

As you can see after putting my required data, I have generated a total of 10 products in just a couple of minutes.
Another easy way can be the ‘Add products from a file’ option.
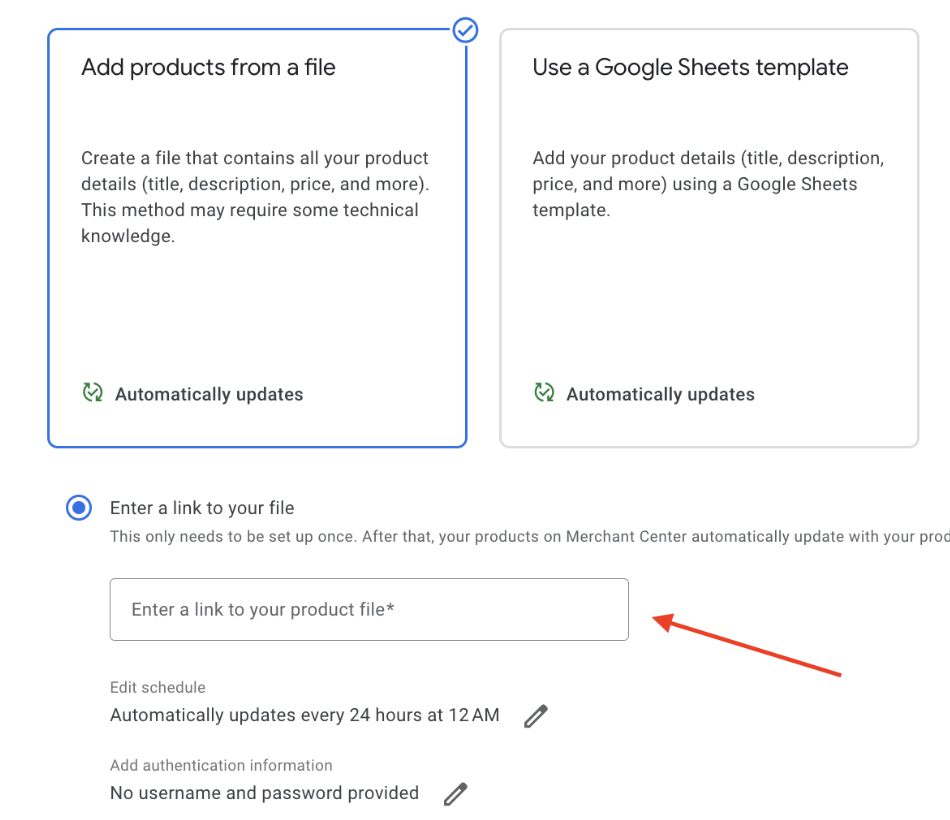
Just add the link to your file. However, the file must be in any of the following formats:
- .gz
- .txt
- .xml
- .zip
- .bz2

Then how will it work?
Google Merchant Center will get your WooCommerce product data from the feed URL hosted on your WordPress site.
But what if you want to make changes?
Well, the plugin will take care of this matter as well.
Any new changes made to your WooCommerce product pages are automatically collected and updated in the feed file by the CTX Feed plugin.
Then what, you ask?
Google Merchant Center then fetches these changes through the feed URL at the frequency you’ve set.
With WooCommerce connected to Google Shopping via the plugin, you can rest easy. The GMC and the plugin will handle your product listings on Google Shopping. It will keep on showing updated and accurate information.
I hope this process of ‘how to list products on Google shopping’ seems easy to you and you will be able to pull it off. However, you need to optimize your google shopping product listing. So, have a look at the following part too.
How to Optimize Your Google Shopping Product Listing
Before you run your Google shopping campaigns or show your products to the customers, it is really necessary to optimize the product listing.
And optimizing your product listings is like giving your products a spotlight. It helps more people see them and increases your chances of making sales.
So, check these 6 effective ways to perform a proper Google Product listing optimization:
1. Eye-Catchy Title
Optimizing the product’s title should be the first and foremost thing to do while optimizing Google Product listing.
Why, you ask?
It’s because Google relies on your product title to connect it with a user’s search. That is why your title needs to be eye-catchy and as detailed as possible.
You should always try to use less than 150 characters in your title. But at the same time it should include basic information like-
- Your Target Keyword( Try to keep it in the front of the title)
- Brand Name
- Color
- Size etc.
Try to keep it specific as much as you can. For example, You are doing a shoe business. And you want to sell Nike Pegasus 38.
So in the title, you should add its color, the specific purpose and size. So, the optimum title would be- ‘Nike Air Zoom Pegasus 38 Men’s Running Shoes – Black/White – Size 10’.
2. Engaging and Accurate Product Description
Your product’s description needs to be accurate as well.
Now, Google will give you a 5000 character limit for product descriptions. But, you have to remember that Google usually shortens them to around 150-200 characters for product ads. Customers can access the complete description by clicking on or hovering over the text. So, you have to write it up like that. So, try to keep the most important details between the 150-500 characters.
What should you include?
- Product title’s specific keyword
- It’s best usage
- Relevant features
- Product benefits
Remember to write the description in a tone that it seems to be engaging, accurate, and precise.
Bonus Tips:
- Have a broad idea about your target audience
- Don’t write in long paragraphs
- Let your target audience know why it’s special and exactly what makes it perfect for them.
3. Use of High-Quality Image

Did you know? Every 3 out of 4 online shoppers depend on product photos before making the optimum decision to buy a product.
And let’s face it. Imagine that you want to buy a T-shirt. Now, will you spend 10 minutes of your valuable time reading the entire product description if it’s too long?
No, I guess. You, like most people, will have a glance at the product title, have a go at the entire product description, and spend a significant amount of time looking at the t-shirt’s design in the images.
So, this is where images play their part. You should include high quality and clear images of your products. Fast decision making buyers will go away if they see poor quality pictures.
What else, you ask?
Well, you should definitely meet these requirements:
| Non-apparel images | Minimum size of 100 x 100 pixels |
| Image size limit | Not exceeding 64 megapixels |
| Image file size limit | Not exceeding 16MB |
| Apparel images | Minimum size of 250 x 250 pixels |
Also, I’d advise you to not include any of the following things in your images
- Water Marks
- Text on the Image
- Broken Links
- Generic Images
It will definitely help you to get products listed on google shopping.
Try your best to keep the background clean and make sure you get the whole product in your image. Make sure your product takes the spotlight by avoiding busy backgrounds or props that steal attention.
The main picture should be of your product on a plain white background. Google recommends your product should fill 75% to 90% of the picture.
If you’re creating the images, consider getting them retouched for a more professional look, ensuring a clear image on a white background. That should do it.
4. Product Category

It isn’t mandatory to categorize your products. You can list your products without categorizing them. However, you should not list them without making categories.
Why, you wonder?
Well, there are numerous benefits. Adding your products under different categories can directly lead up to increasing your sales and ROI. How?
Well, there are many buyers who know exactly what they want. So, it helps them a lot to get the exact product they desire.
Also, people often end up looking at different products in the category. If you can attract them with your products then these same people might end up buying multiple products from you. It increases the product listing visibility as well.
Wait up, that’s not it!
Based on the category, the correct tax rate and correct advertising policy is also applied to your products.
Google Suggests that you should select the best, most specific, and latest category for all types of products.
So, what to do?
First, go through all of your products and all the categories. It will help you to avoid mistakes and select the right category.
You can always have a look at your competitors to get an idea. Think about how customers might search for it and follow platform rules. Then select the specific and latest category for your product. At all times, think about using related sub-categories.
For example, let’s imagine you want to sell some LEGO City Sets. Then your product category would be: Toys & Games > Building Toys > LEGO > LEGO City Sets.
Bonus Tip:
You can always test things out. See in which category your products are getting the best sales and ROI. Try to test and explore different products in different categories to get the best from them.
5. Adding Product Reviews and Ratings
Another important thing is that you add the product reviews and ratings. Adding product reviews and ratings is like letting customers share their thoughts. It will help you a lot with Google Shopping product listing ads.
It’s a big deal because these reviews build trust, showing others what people really think about your product. Also, good reviews make your product look awesome, and they even help your product show up more in online searches.
So, what do you do?
You should make it easy for customers to leave reviews, and maybe give them a little something as a thank-you. Then show the positive reviews as much as you can.
Bonus Tip:
Here’s something that I do. I try to use CTAs or pop-up windows to ask my customers to leave a review. I’d suggest you do the same. I believe you will get a good result.
6. Applying Links Properly
Many people make the mistake of adding links of the homepage to the products. But, you need to add the product page link specifically.
If a customer goes to the homepage, there is a possibility that he or she might get out of the page without even seeing your product. So, why would you take the risk?
That is why you should take your time. Take some time and then apply the links properly.
Bonus Tip:
Make sure to use the mobile_link attribute if you’ve set up a page for mobile users. For your main product image, go with the image_link attribute. It would be awesome if you have multiple images. So, If you’ve got multiple images then employ the additional_image_link attribute.
Frequently Asked Questions
1. Why is Product Listing Important?
Answer: Product listing can be crucial for several reasons. Such as-
- Increasing CTR
- Enhancing visibility,
- creating brand awareness,
- Giving an edge over the competitors etc
2. What are the common mistakes to avoid in Google Shopping product listing optimization?
Answer: Common mistakes include using poor-quality images, neglecting customer reviews, overlooking mobile optimization, and failing to keep product information up-to-date. Avoiding these pitfalls is crucial for successful optimization.
3. Is Google Shopping Free?
Answer: Listing your products on Google Shopping is free – you can create a Google Merchant Center account and showcase your items without any charge.
However, if you want to make your products more visible through Google Shopping ads at the top of search results, that’s where you might need to spend some money.
4. What is the title limit for Google Shopping?
Answer: Up to 150 characters.
5. How long should a Google Shopping description be for optimal results?
Answer: I would suggest you keep the Google Shopping description between 500 to 1000 characters for optimal results.
Final Thought
That would be all for today. Hope you will be able to perform a proper Google Shopping product listing optimization.
If needed, you can go through the steps again and upload the products accurately. Remember to optimize the titles, descriptions, images etc properly. But always keep the requirements and bonus tips that I’ve mentioned in your mind. It will help you a lot to get sales and traffic I believe. Till then, may your online journey be filled with success and seamless adventures!