
March 5, 2024
Google Tag Manager Click Tracking with GA4
Updated: March 5th, 2024.
As a feature, click tracking in Google Tag Manager is the perfect bait for a beginner. It’s fairly easy to get started: read one or two blog posts, maybe watch a video, and done! You can track buttons, menu link clicks, etc.
However, I’ve noticed among GTM beginners that they do not fully realize the flow of click tracking configuration in Google Tag Manager and why it is necessary to complete one thing or another.
Moreover, intermediate Google Tag Manager users are not always aware of some more advanced click tracking techniques that open entirely new possibilities in tag management.
That’s why I’ve decided to publish this (once again) extended/definitive/you-name-it guide on Google Tag Manager click tracking, covering not only basics but some advanced stuff as well.
Learn how to track link clicks in the GTM Fundamentals course
If you’re just starting with Google Tag Manager, everything might look a bit overwhelming. I totally understand that. Most likely, everyone has been here at some point. For your convenience, I’ve created a free Google Tag Manager Fundamentals course that also gives an introduction to link click tracking.
So, if you find yourself being a “video-content” person, take a look at my course.

Table of Contents
– Here’s what you will learn in this article –
- #1. Why is click tracking so important?
- #2. Two types of click triggers
- #3. What’s the plan?
- #4. Google Tag Manager Link Click Tracking
- #5. Google Tag Manager button click tracking
- #6. Going deeper with Google Tag Manager click tracking
- Final Words
Video tutorial
If you prefer video content, take a look at this video on my YouTube channel.
#1. Why is click tracking so important?
I will not give you any statistics here but think about what are the most common interactions you do on any website. It’s page-loading, scrolling, and clicking. You click links and buttons to navigate from one page to another, to reach a particular goal.
That’s why it’s crucial to track such interactions – to understand user/visitor behavior better. Capture clicks, send their data to tools like Google Analytics, and analyze the data.
With Google Tag Manager, the most popular tracking use cases are:
- Button click tracking (say “Add to cart” button clicks)
- Outbound link clicks (track when a visitor clicks a link leading to an external resource (3rd party website))
- File link clicks (e.g. when someone clicks on a link that downloads/opens a PDF file)
- Menu link clicks
Unlike Universal Analytics (GA3), Google Analytics can track a bunch of events automatically. However, it does not cover all possible scenarios. Therefore, it’s still important to learn this topic.
GA4 can automatically track outbound link clicks and file downloads. Consequently, in this blog post, I will skip them and focus on other clicks.

#2. Two types of click triggers
There are two types of click triggers in Google Tag Manager: All elements and Just links.

As their titles imply, All elements trigger tracks clicks of any element (link, image, button, etc.), while Just links trigger tracks link clicks only.
#3. What’s the plan?
The best way to master Google Tag Manager click tracking is by doing. And that’s exactly what we are going to do in this guide.
Here is the process of a proper Google Tag Manager click tracking setup:
Step 0 is to decide what you want to track, links, or any elements. Then:
- Step 1. Have at least one click trigger enabled on the page (the type of a trigger depends on step 0).
- Step 2. Enable all click-related built-in variables
- Step 3. Create a tag (e.g., Google Analytics 4 event tag)
- Step 4. Update the click trigger to track only particular clicks and then assign the tag to it.
- Step 5. Test.
The same workflow applies to both Just links and All elements triggers. Let’s see it in action.
#4. Google Tag Manager Link Click Tracking
If you prefer video content, look at this tutorial from my Youtube channel.
By default, Google Tag Manager does not track clicks. You can check that by enabling the Preview and Debug mode and refreshing the web page that you’re working on. You’ll see five events in the debug panel, Consent Initialization, Initialization, Container Loaded, DOM Ready, and Window Loaded.

Now, click any element on your website (not in the GTM debug panel) and see what happens on the left side of the panel.
You will see nothing if you don’t have GA4 installed and this is your new Google Tag Manager container.
If you see some clicks, it means that you:
- have at least one Just Links or All Element Clicks GTM trigger activated on a page
- or have “File download” or “Outbound links” tracking enabled in your Enhanced Measurement Settings.
Anyway, I will presume you don’t see any information related to clicks in the preview mode. This happens because, by default, Google Tag Manager does not track clicks. You need to configure it yourself. Let’s start, shall we?
Remember that 5-step workflow from the previous chapter? Well, 6-step, if you count the step 0. In this guide, I’ll refer to it several times because I want you to memorize it. That workflow is crucial to master click tracking. It applies even to more triggers, e.g., Youtube.
OK, let’s think about which link clicks we should track first. How about menu link clicks?
#4.1. How to track menu link clicks
According to our Google Tag Manager click tracking workflow, step 0 is to decide what we want to track. This step is already complete because we chose the menu link click tracking. Let’s proceed to step 1.
Step 1. Enable a link click trigger in GTM
In order to enable link click tracking, we need to enable a thing called link click listener (a.k.a. link click auto-event listener). It’s a feature in GTM that listens to link clicks on a page. If it spots one, it will display that event in the GTM Preview and Debug (P&D) mode, and we’ll be able to use it as a condition to fire tags. To be more precise, the listener pushes the click data to the Data Layer.
In fact, there are many auto-event listeners in Google Tag Manager. Speaking of built-in listeners, there are Youtube listener, scroll listener, element visibility listener, etc. Also, there is a whole bunch of custom auto-event listeners, e.g., Vimeo listener, Mixcloud player listener, etc. Some of them are available in the GTM Recipe library.
How can we enable the link click auto-event listener? – you may ask. The answer is by having at least one link click trigger enabled on a page.
In Google Tag Manager, go to Triggers > Trigger Configuration > New > Just Links. Leave all the settings as they are and name the trigger All Link Clicks (or anything else).

Speaking of two checkboxes, here is a quick overview:
Wait for tags is useful if the link opens in the same browser tab. If you have any tags linked to the link click trigger and Wait for tags is enabled (say for 2000 milliseconds); Google Tag Manager will put the redirection temporarily on hold (for up to 2000 milliseconds) to give tags a chance to properly fire. Once the tags have properly fired or 2000 milliseconds have passed, the user will continue navigation to another page. You can change the duration of that pause, not limited to 2000 milliseconds.
Check Validation checks if the click was actually valid. This setting is mentioned in two guides by Simo Ahava. Pretty often, I leave this checkbox unchecked.
===
Back to our generic link click trigger. Save it and refresh the preview and debug mode (by clicking the Preview button in the GTM interface again). Go to the page where you wish to track links. Click any link on a page.
Take a closer look at the Preview and Debug panel’s left side. You’ll see a new event, Link Click. That’s what our link click auto-event listener did. It was listening to link clicks on a page, and once it spotted one, it pushed a Link Click event to the Data Layer, and, therefore, it became visible in the debug console.

If you don’t see this event, make sure you have refreshed the Preview and Debug mode (by clicking the Preview button in the GTM interface).
To sum up, we created a generic link click trigger to enable the link click auto-event listener on a page. If at least one link click trigger is enabled on a page (not activated but just waiting for a moment to fire), the link click listener becomes enabled in the background.
Thanks to this, we are able to see link click events in the P&D mode and inspect what data is available with each click.
Step 2. Enable built-in Click Variables
To create more precise triggers, we need one more ingredient: variables. What are those?
They are little pieces of information that can be used both in Tags and Triggers (and, in fact, in other variables too). For example, Click ID. You can use it as a trigger condition (e.g., fire the Google Analytics Event code when the ID of the clicked link equals to “main-cta-link”).
Thanks to GTM Preview and Debug mode, we can see what variables are available at every event. Click Link Click event and go to the Variables tab of the Preview mode. Keep looking for anything related to clicks. If you’re working on a new container, you probably won’t find anything.
Don’t worry, that’s expected. Now go to the Data Layer tab o the preview mode (while the Link Click event is still chosen). There, you’ll see some link-click-related parameters, like gtm.elementId or gtm.elementClasses, for example:
Even though the click data is tracked by Google Tag Manager, it is not available in the Variables tab of the P&D console. Why? Because built-in click variables are not enabled in the Google Tag Manager interface. So what? If some data is not available as a variable in GTM, you cannot use it in your triggers.
Let’s activate them.
In your GTM account, go to Variables, and in the Built-in Variables section click Configure. A panel will appear on the left side. Scroll down until you find click variables and enable ALL of them one-by-one, including Click ID, Click URL, etc.

After that, refresh the preview mode (by clicking the Preview button once again).

Then go to your website and click any of the menu links. Actually, click at least two of them. Return to the preview mode and you should see Link Click events in the preview mode. Click the first Link Click event, and go to the Variables tab of the preview mode.

Then click on the second Link Click event. I am currently looking for some variable that I could use to distinguish a menu link click. I don’t want to fire my GA4 event tag on any link click. I want to fire it precisely on a menu link click.
After taking a closer look, I see that both menu links contain the same Click Classes value, site-nav__link site-nav__link–main. By the way, nav means “navigation” in this context. Great! I will use this in my Just Links trigger.

Important: in your case, the classes might be different. Maybe you won’t even have any classes at all. Then you should be looking for other variables (or go more advanced with CSS selectors).
Step 3. Create a tag
Now, it’s time to pass the information to Google Analytics 4.
In this blog post, I presume that you have already installed Google Analytics 4 with Google Tag Manager. If not, please read this article first.
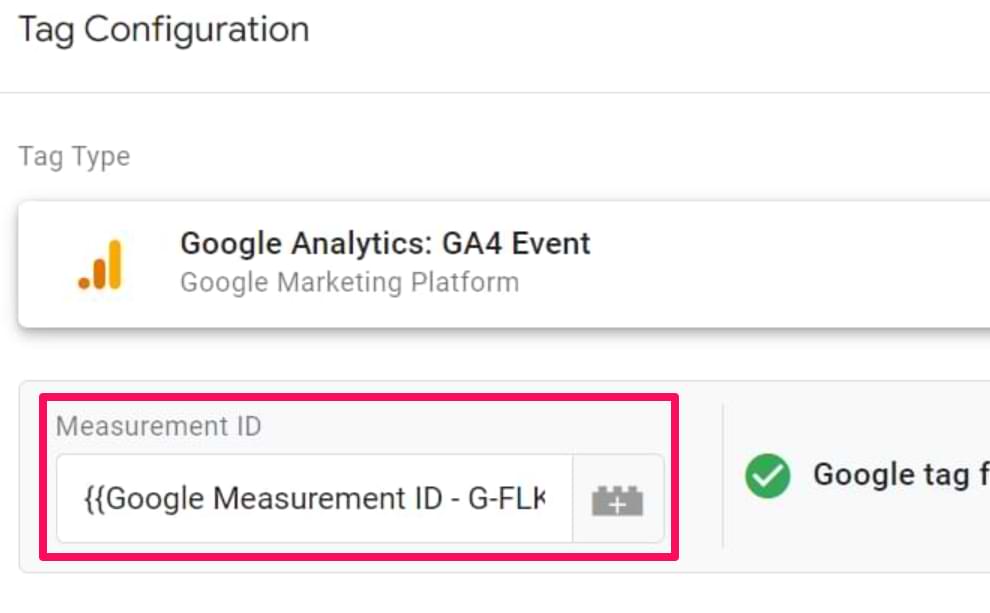
Navigate to Tags > New > Google Analytics > Google Analytics: GA4 Event. Enter the measurement ID of your GA4 data stream (or, even better, enter your measurement ID as a constant variable).
Then, enter the event name. Its value is up to you. Any of the following options are perfectly fine:
- menu_click
- menu
- menu_item_click
- menu click
- etc.
These are just some of the examples. Since we are working with a custom event, we can name it whatever we want (as long as we follow the limitations of name length, for example).
In my case, I used the menu_click event name. But this time, sending just the event name is not very useful. You’d probably want to know which exact menu items are clicked more often. How about we also send the name of the menu item and the URL?
We could do that by sending additional event parameters. Even though you could use parameters that are already mentioned in the documentation of the Enhanced Measurement (like link_url and link_text), let’s create two custom parameters (because I just want to show you how to configure them).
I am going to pass two parameters, menu_item_url and menu_item_name. I made these parameter names up, and you can do it too. That’s what the flexibility of the data model offers.
To send custom parameters, you must expand the Event Parameters section in the Google Analytics 4 event tag and then click Add Row.

Enter the name of the first parameter. In my case, that is menu_item_url. In the Value field, I will insert a variable that returns a clicked URL. Luckily, GTM already offers such a variable, it’s called Click URL. Click the Insert Variable button and then select the {{Click URL}} variable.
Let’s add another parameter, menu_item_name. For that purpose, GTM offers another built-in variable, {{Click Text}}. Insert it as well. Since visitors of your website can translate your page, {{Click Text}} value will also change. Hence, you will see a more diverse list of collected values in your GA4 reports.

If you want to send more parameters, you are free to do that. You can send up to 25 parameters with a single event.

Step 4. Update the click trigger
The next step in this workflow is to update our trigger and then assign it to the Google Analytics tag. We want our tag to fire not on all clicks, but only those that are menu links.
In Step 2, we have already identified the main characteristic of the menu link. Its Click Classes value is site-nav__link site-nav__link–main.
In Google Tag Manager, go to Triggers and find the trigger that you have created in Step 1. We’ll edit it and add a condition: Click Classes contains site-nav__link–main

Also, change its name. Save the trigger. Assign it to the GA4 tag. You can do that by clicking anywhere on the Triggering section of the tag and then selecting that Just Links trigger.
Save the tag.
Step 5. Test
Refresh the GTM Preview mode (by clicking the Preview button in the GTM interface) and click a couple of your menu items. Go back to the Preview mode and click those Link Click events. Check if the GA4 event tags for Menu Link Clicks have fired.

Now, you will need to go to Google Analytics 4 and check the DebugView. You will learn more about that in this blog post.
IMPORTANT: even though you will see your custom parameters in Real-time reports and DebugView in GA4, you will not be able to see them in other GA4 reports, unless you register those parameters as custom dimensions in Google Analytics.
In GA4, you will need to go to Admin (on the left sidebar) > Custom Definitions > Create Custom Dimension. Here you will need to register both parameters (menu_item_name and menu_item_url). Here’s one example:
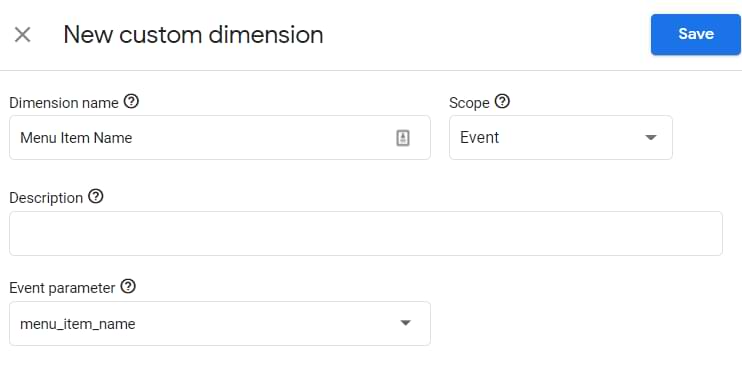
It’s important that the scope of both dimensions is “event”. After you register these dimensions, you will start seeing them in the reports (within 24 hours). Learn more about custom dimensions in GA4 here.
After everything is tested, publish your GTM container by clicking the SUBMIT button in the top-right corner of the Google Tag Manager interface.
#4.2. Create a Google Analytics conversion based on a click event
Some clicks might be more important to your business than others. Thus, they should be configured in Google Analytics 4 as conversions. If you want to learn more about conversions (previously known as “goals”), here is a blog post (+ video) on how to do that.
#5. Google Tag Manager Button Click Tracking
You probably think that we’ll be using All Elements trigger in this case. And you’re right. But that does not mean that buttons always require this trigger. Many buttons are just links that are coded to look visually like buttons. So you can always try to use the Just Links trigger first before trying the All Element trigger.
However, I want to show you the All Elements click trigger and why it differs from the Just Links.
As you can guess from its title, All Elements tracks the clicks of all elements on a web page (including links). If you click on a page title, image, or background, all clicks will be tracked by the click listener, and you’ll see those events in the GTM Preview and Debug mode.
So, how do you track a click of a button?
If you prefer video content, here’s a tutorial from my Youtube channel:
Step 1. Create an All Elements Click trigger in GTM
Just like with the Just Links trigger, you need to have at least one All Elements trigger enabled on a page in order to see click events in the P&D console. You can try it for yourself. If you have enabled only Just links trigger and try to click an image on a page, you’ll get nothing in the debug console.
That’s why we need to follow the same workflow (just as we did with the link click tracking). Go to GTM interface > Triggers > New > All Elements. Leave all the settings as they are and save the trigger. Refresh the Preview and Debug mode, then to a web page you’re trying to work on. Start clicking anything (except the P&D console) and behold: you’ll start seeing Click events in the GTM preview console.

This means that the All elements click auto-event listener has been enabled and all clicks are now being tracked.
Step 2. Enable click variables in GTM
If you click on any of these click events in the Preview console and go to the Data Layer tab, you’ll see what click-related data is available with that particular click. We could definitely make use of some parameters here, for example, gtm.elementId (which stands for Click ID). If we want to use it in the GTM tag, trigger, or another variable, we need to turn this data point (gtm.elementId) into a variable.

Luckily, all the built-in click variables were already enabled in one of the previous chapters (about menu link clicks). Just links and All elements triggers share the same set of click variables.

Step 3. Create a Tag
Let’s track some element (non-link) as an example, shall we?
I’ve got something useful, an Add To Cart button. Every time a visitor adds a product to a cart, we can send an event to Google Analytics.
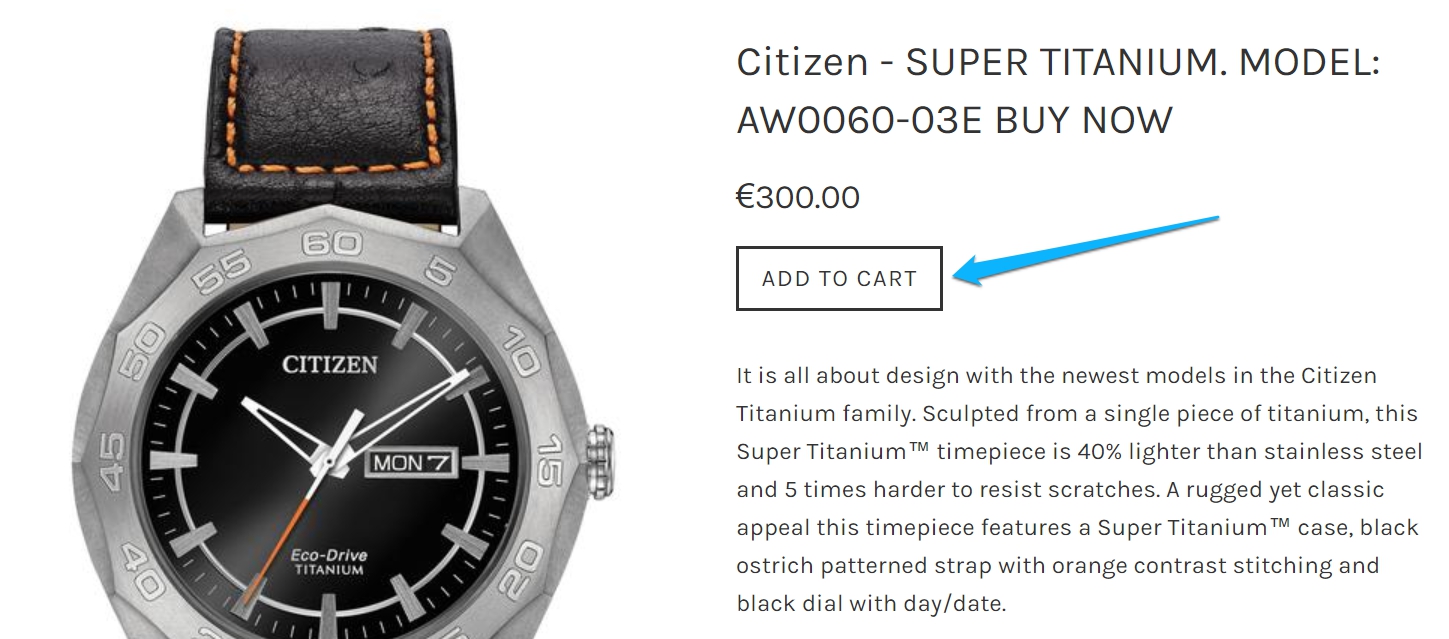
This button has no link, therefore, Just Links trigger will not help. We’ll have to use an All Elements trigger.

But before we create/update a click trigger for the Add To Cart button, let’s create a Google Analytics event that will send the click data over to GA. In GTM, go to Tags > New > Tag Configuration > Google Analytics and choose GA4 event.
Enter the following settings:

Note: if you using an Event Settings Variable in your container, then it’s fine. You can use it in this tag too.
For now, save this tag without a trigger. Let’s move on.
Step 4. Update the click trigger
In order to create a precise trigger that tracks clicks of only the Add To Cart button, first, we need to click that button and inspect what kind of data is available in the Preview and Debug mode. Based on that data (variables), we’ll create (or update) the click trigger.
So, let’s click the button and open the Variables tab in the P&D console. Scroll down and keep looking for all the click-related variables.
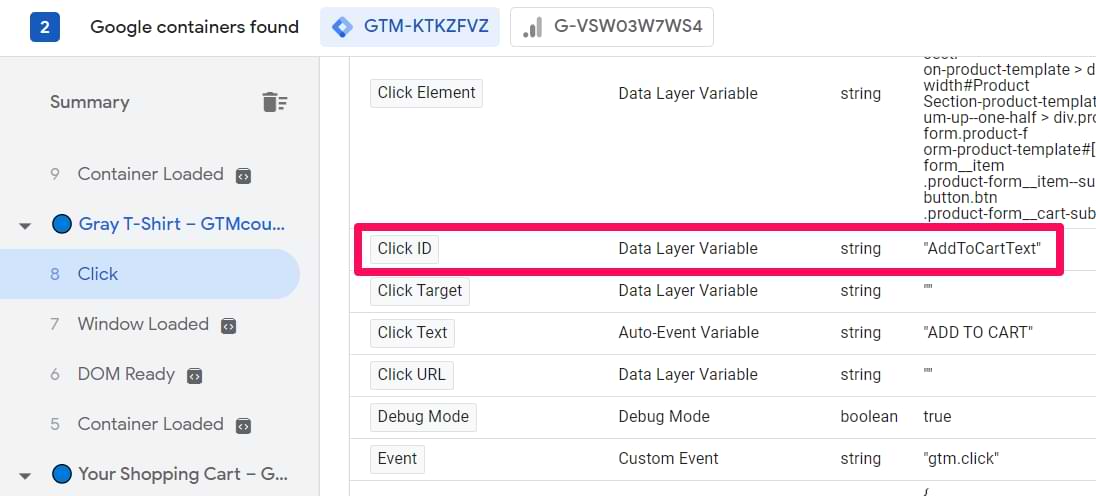
Cool, that button has an ID! We can use that in our trigger. However, don’t rush too soon. There’s one more thing you need to know. In the screenshot above, I click on a button text. Therefore, the Click ID is AddToCartText. But if I clicked somewhere on the background of the button (not on a text), the Click ID would be different, AddToCart.

Why?
It’s because this button is not developed as a single element. Actually, it consists of two elements, text and the button shape/block.

That is also visible in the screenshot below:

All elements click trigger works pretty straightforward here. It tracks the click of the actual element, regardless of whether that element is a part of some bigger element. If you click on a background, the listener will track the click of a background. If you click a text, it will track the click of a text.
As a result, in this case, there are actually two elements of which clicks we need to track in order to precisely capture Add To Cart clicks.
So what should we do now? The button has no link; thus, the Just Links trigger will not help us. The button consists of two elements; therefore, we need to track them both, preferably with a single trigger.
What do those elements (button text and the button background) have in common? Their Click IDs are pretty similar. They both start with the AddToCart. That could be our click trigger condition.
Let’s do exactly that. In GTM, go to Triggers > New > All Elements and enter the following settings:
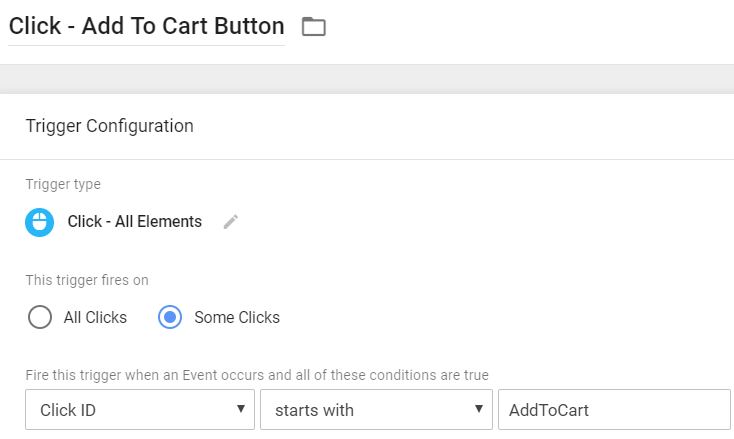
Keep in mind that this rule is not universal and will probably not apply to your project/websites. You’ll need to find a way how to create a unifying trigger on your own.
In fact, there is another way to track clicks of several elements with a single trigger rule (that I personally use as well) but it’s more advanced. I’ll explain it a bit later. Spoiler alert: two words, “CSS Selectors”.
Back to our AddToCart click trigger. Save it. Then open the Google Analytics event tag that you’ve previously created and assign this trigger.
Step 5. Test
Enable (or refresh) the Preview and Debug mode, go to your website, and refresh the page. Here are the scenarios you should test:
- Click the Add To Cart button text. The GA tag must fire.
- Click the Add To Cart button background. The GA tag must fire as well.
- Click any random elements on your website, the GA tag must not fire.
Then go to the DebugView of GA4 and check if you see the incoming data.
#6. Going deeper with Google Tag Manager click tracking
Cool, now you know the basics of Google Tag Manager click tracking and how to use it in your tag management stack. But the journey just begins here. There are still some techniques you should master (and I have covered them in the Intermediate Google Tag Manager course).

#6.1. Get additional click data with the Auto-event variable
Auto-Event Variables are used to access the target element of an auto-event action (e.g. Click). For example, when you click a link, you can access the link’s text.
So what’s the deal?
The thing is that in GTM, you can create custom auto-event variables and use them in tags, triggers, and/or other variables. Let’s say that you want to track the clicks of a particular image. That image contains some additional parameter (e.g. “alt”) that you can see by inspecting it with the browser’s developer tools (e.g. in Chrome, right-click on an image and choose Inspect Element).

What if you wanted to use the value of the “alt” parameter in your tags, triggers, and/or variables? You’d need to fetch it somehow.
That’s where an auto-event variable becomes very handy. With it, you could read the value of the “alt” parameter when a user interacts with an HTML element (in this case, that interaction could be a click).
How do you create that variable? Go to GTM > Variables > New > User-defined Variables and choose Auto-event Variable. Enter the settings as I’ve displayed them in the screenshot below.

That’s it. Now, you can use this variable in your tags, triggers, and other variables. Just remember that the value of that parameter is accessed when a user interacts with a particular web element.
How do we test if the variable was created correctly? Save the variable, then refresh the Preview and Debug mode, and finally, click the element of which “alt” parameter you wish to access. Now, go to Preview and Debug mode’s Variables tab and check if the value is actually fetched correctly.
If you want to learn more about the Auto-event Variable, read this guide. To give you more inspiration, Bounteous have also posted a guide on how to use so-called “data-” attributes in links and how to track them.
#6.2. Using CSS selectors in click triggers
If you’re just starting with Google Tag Manager click tracking, soon you’ll start seeing the limitation of a beginner’s skill set. Soon, your triggers where Click Classes contains XXXXX will not be enough. You’ll want more.
You’ll want to track a particular set of elements that don’t have any classes or other parameters in common. Let’s go back to our Add To Cart button tracking example. Turned out that one button actually consists of two elements: button text and button background/rectangle.
We were lucky and were able to create a trigger with a single condition (Click ID starts with “AddToCart”). However, sometimes, things might get more complicated when no IDs or useful Click Classes (read: CSS Classes) are available. What if a page element actually consisted of 5 or more elements?
You could create multiple variables for each element and assign those triggers to a single tag but that’s not the way you should do. Your container must be as optimal as possible, and that’s why we should cope with that by creating a click trigger and using CSS Selectors.
CSS Selectors are patterns that you can use to check for in any given HTML element. In CSS, selectors allow developers to select one or many website elements and assign them a particular style/design. For example, a developer can set that all HTML elements that belong to the class “red-button” should be of red color. This is a very simplified explanation, but that’s generally the idea behind it.
CSS selectors can be pretty complex, and we can use them in our GTM triggers. To do that, you’ll need to choose a special operator in your trigger conditions. Usually, you probably use contains, equals, matches Regex (ignore case) operators. But this time, we’ll use Matches CSS Selector (or Does not match CSS Selector).
Let’s see how this works in action. We’ll apply CSS selectors to track Add To Cart button clicks (from Chapter No. 5 of this guide). Take a look at the code of that button (in the screenshot below).
The button is created with an HTML element called button (with the ID AddToCart), and its direct child is a <span> element that contains the button text. With a single CSS Selector, we could instruct Google Tag Manager that we want to track clicks of an element of which ID is AddToCart and also track clicks of all its children (descendants).
In GTM, go to Triggers > New > Clicks > All Elements and enter the following settings:

Take note that we’re using Click Element as a variable because we are checking the entire clicked HTML element against our CSS Selector.
#AddToCart CSS selector means that we are interested in clicks of ALL elements that have AddToCart ID (exact match).
A comma means “OR”.
#AddToCart * CSS selector means that we are interested in clicks of ALL the descendants of elements that have AddToCart ID (exact match). In our case, the button text is a direct descendant of the button that has an ID AddToCart. Simo Ahava has published a guide explaining the technique of Wildcard CSS Selectors so go check it out.
It will be quite a challenge to master CSS Selectors for a non-developer, but it’s pretty simple to get started and learn at least some very basics. Here are additional guides for you to dig in:
Do CSS Selectors in Google Tag Manager look confusing? Here’s an idea
I have prepared an Intermediate Google Tag Manager course that gives an introduction to CSS selectors, what role do they play in GTM, and how to use them. Additionally, I share a quicker way of how to learn CSS Selectors.
Google Tag Manager Click Tracking: Final Words
In this pretty lengthy guide, I’ve explained the very basics of Google Tag Manager click tracking and what workflow you should follow in order to track clicks properly (complete all the following steps):
- Have at least one particular trigger enabled on a page. If you plan to track link clicks, then have at least one Just Links trigger enabled on a page (regardless of what are the conditions of that trigger). If you plan to track any element, then All Elements is the way to go.
- Enable built-in click variables. After the trigger and variables are intact, click the element you wish to track and inspect that event in the GTM Preview and Debug mode. You’ll need to think about what variables and conditions you will be using in a click trigger.
- Create a tag that you want to fire when a user clicks a link/ another element.
- Update the click trigger (if you created a generic click trigger in the first step of the flow) or create a new trigger with the precise conditions and assign it to the trigger(s) you want.
If you want to take your Google Tag Manager, click tracking to the next level and consider learning to use Auto-event Variable and CSS Selectors in GTM. You can do that in my Intermediate Google Tag Manager course.
Did I miss something about the Google Tag Manager click tracking? Do you have any additional questions? Let me know in the comments.
20 COMMENTS
Very useful article, thank you for that.
One quick question, how can i track a button click but i want gtm to capture the click only if the page loads?
Forexample, someone fills in a form but does not fill in all mandatory fields and so when he clicks on “submit” the page does not laod because he jas to fill in all mandatory fields. If he does fill in all mandatory fields then the page laods after clicking the submit button. I want to track the button only when the page actually laods because then i know that all mandatory fields have been filled in.
Thanks
Hey, you should better check my guide that explains how to specifically track forms with GTM (because it looks like exactly what you're trying to achieve)
https://www.analyticsmania.com/post/google-tag-manager-form-tracking/
Hi I have a slightly different problem. I have set up multiple event button click tags on a page and they are only firing in a random order. For example the first button of five will never fire first the fourth and final buttton has to be clicked first. Is there aything you can think that would cause this. I haven't done anything different to other times I have done button clicks tracking there are just four similar buttons.
Could it be that the click ids are not different enough. To clarify they are different but have similar elements and have set them as click Id equals.
Could you share trigger configuration for your buttons?
Hi Alex the trigger configuration for my buttons is Click all elements, some clicks, click Id, equals, and I placed the clickid in here.
You should share a preview and debug mode and provide more information on exact buttons that you are tracking. Such a case can mean that your triggers are not configured well enough of maybe each button consists of multiple html elements that have different IDs and classes.
Hi there, I am somewhat new to using GA/GTM as a key function of my current job. A lot of room to learn, and I'm finding your site very useful.
Quick question: I noticed in GTM Preview console, every click is being captured. In left column it just say "Click", and it's any time anyone clicks anywhere on the page.
I'm inheriting the GA/GTM work of other people, so I'm not sure what was setup and why. Is it normal to have every single click anywhere on the page to be reported in preview mode? I think it is also impacting the GA reporting. There's a huge count of the "click" event, and it's just not helpful data.
So, first, is this normal behavior? Second, is there an easy way to find an erroneous / less specific tag or trigger that may be the culprit if this is not desired behavior?
Thank you!
Yes, this is a normal behavior of click triggers. However, the fact that Click is displayed in the preview mode does not mean that the tag will fire because trigger conditions (like Click ID, Page URL, etc. might not be met).
There is no way to see only those clicks that you want to see.
P.S. If you are just getting started with GTM and want to cut some corners to learn it faster, you can get some good deals here https://www.analyticsmania.com/courses/
i have one major problem. how do i shorten affiliate links with GTM and then send this data to google analytic?
I know there are thirdparty plugins like a wordpress that shorten affiate links to something custom e.g
example.com/go/affiliate or example.com/recommend/affiliate
but what if you use a framework that does not have plugins like wordpress
to shorten affiliate links?
How will you shorten the affiliate links with GTM and track them with GA?
thanks again
GTM is not built for that. Ifnyou want to shorten links and you use custom platform, ask the developer of that platform to build a solution for you.
URL shortening happens in the backend. GTM has no power in the backend. It is a client-side tool.
Hi, love your article, very helpful
just need to ask some random question
can we track specific user id that click the buttton ?
I already implement user id from your other article
Yes, just include the usrr id variable in your click trigger.
Hi Julius,
Thanks for sharing the article
When there are 100's of click IDs in the website. Is there any way to test them in an automated or easy way to test all the Click IDs.
Please suggest to improve the efficiency
Best Regards,
Chandu Aki
Thank you Julius, really helpful article in my learning journey with GTM :)
do i needs to create multiple tag/trigger for this type of buttons to track?:
Product Overview
Add item To Chart
Buy Product
and
Product Overview
also should I choose class id or elements id ?
sorry comments made it weird for these code:
do i needs to create multiple tag/trigger for this type of buttons to track?:
Product Overview
Add item To Chart
Buy Product
and
Product Overview
also should I choose class id or elements id ?
sorry comments made it weird for these code, i will just add some space:
do i needs to create multiple tag/trigger for this type of buttons to track?:
Product Overview
Add item To Chart
Buy Product
and
Product Overview
also should I choose class id or elements id ?
this is 4th time editing html code. sorry comments remove these code, i will just add some space and comma:
do i needs to create multiple tag/trigger for this type of buttons to track?:
Product Overview
Add item To Chart
Buy Product
and
Product Overview
also should I choose class id or elements id ?
this is 5th time editing code. sorry comments remove these code, i will just add some space and comma , you can delete previous comments:
do i needs to create multiple tag/trigger for this type of buttons to track?:
button id="view_item Product Overview
button id="add_to_cart Add item To Chart
button id="begin_checkout Buy Product
and
a id="view_item" href="#"
span id="view_item" Product Overview
also should I choose class id or elements id ?
Hello,
Thank you for the fantastic guides that are very helpful! However, I have an issue. We use Stripe as a payment solution, and I'm trying to track outbound clicks from our website to Stripe. I want to track when someone clicks on "pay now" and is directed to Stripe immediately. However, I can't get these clicks to work; they are not triggering in GTM. I've tested with other outbound links like Instagram, and it works. Do you have any helpful tips on what might be causing this issue?
Best, Louise