Want to make powerful, immersive tracks that surround the listener with deep, detailed sound? The secret is a wide stereo image. But simply hard panning instruments left and right won't create the desired effect. Instead, you'll need to carefully place instruments throughout the stereo spectrum, and use a few plug-ins to help enhance the illusion.
In this blog, you'll learn how to dial in a balanced stereo image in any session to help you create immersive soundscapes. But first, let's talk about how our ears perceive stereo sound.

What Is Stereo Image
Stereo image is the perceived spatial location of sound sources within a track. It's essentially the "room" in which your track is playing. Some rooms sound small and deadened. Other rooms sound large and reverberant.
Each instrument takes up space in the room, depending on the panning position, frequency response and overall level. The size of the room is defined by the amount of reverb or delay on each track, which helps your ear identify how close to the "walls" of the room each instrument is.
However, music exists in a three-dimensional space (four, if you count time), which means multiple factors contribute to the stereo image of a track.
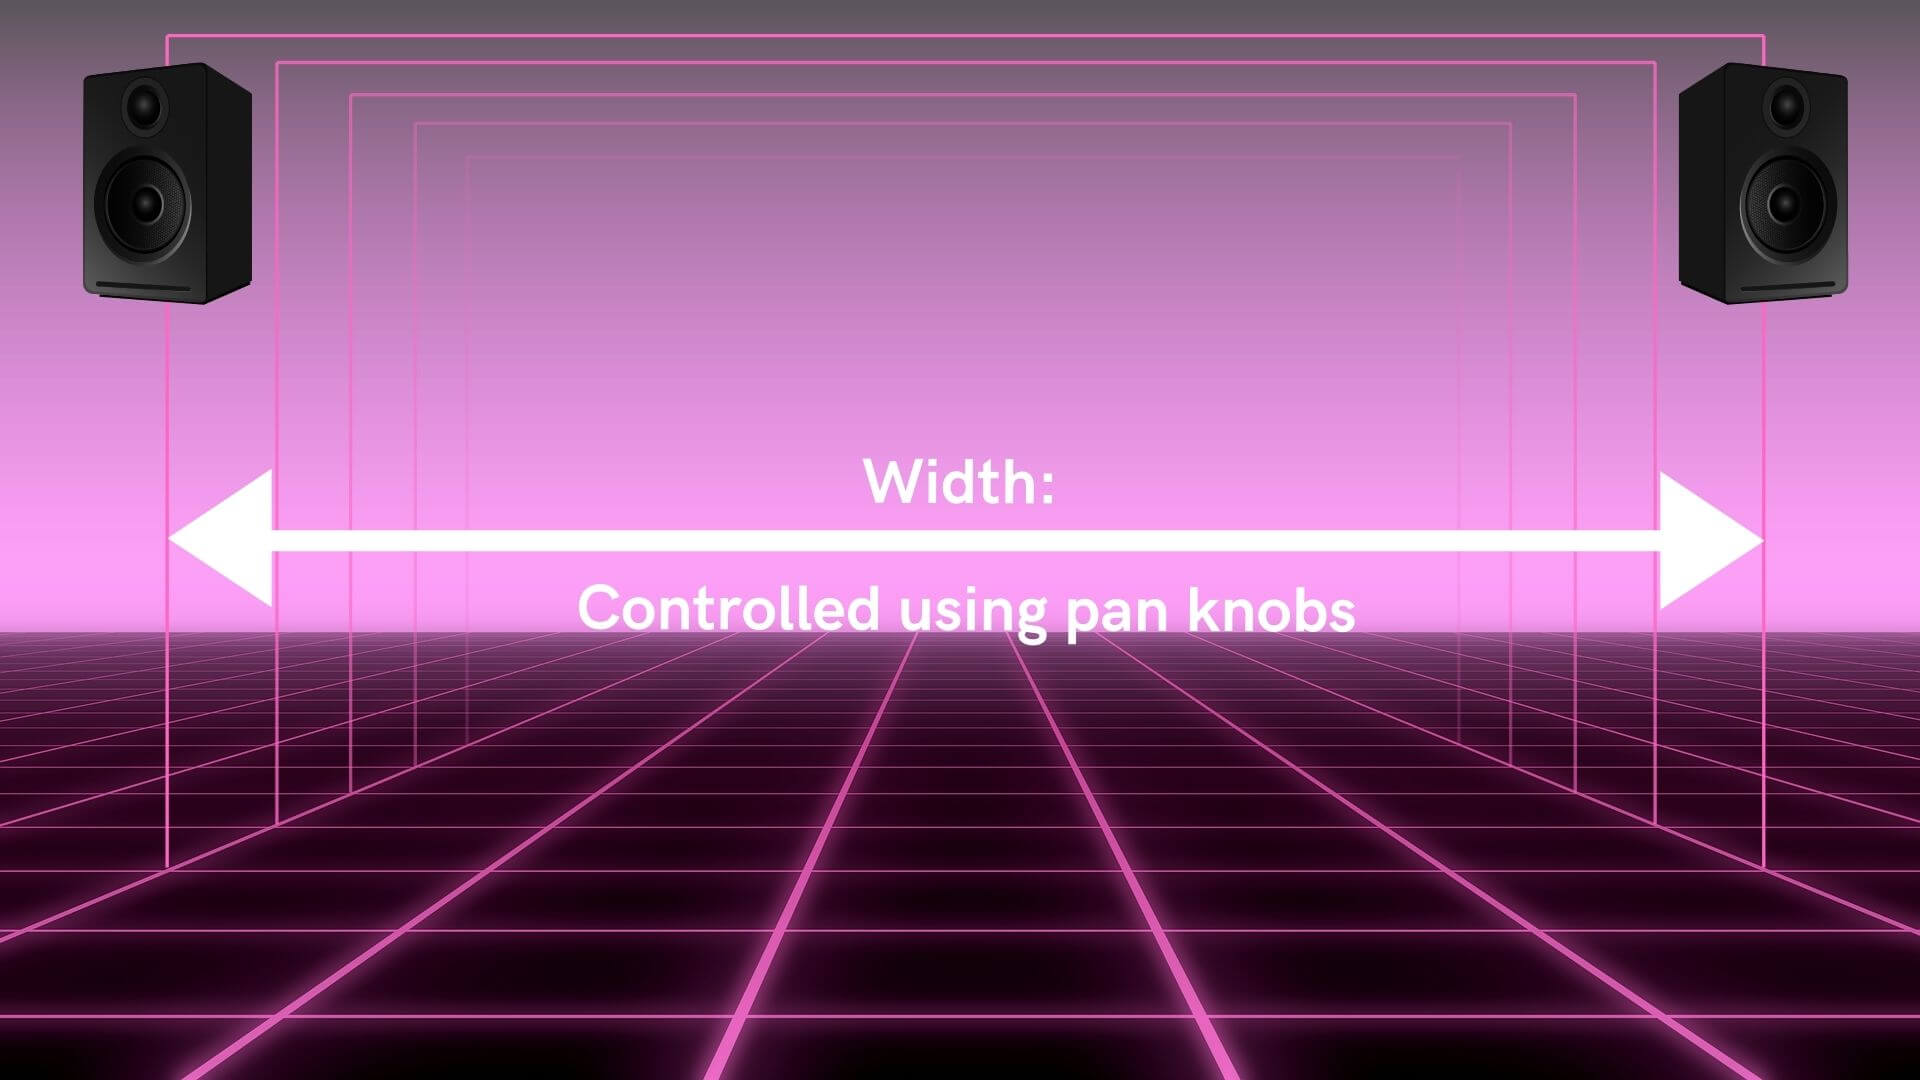
Width is the perceived distance between sounds in the left and right speakers. It is the easiest dimension to manipulate and is controlled using the pan knobs on each track. This represents the "left and right walls" of the mix.
Depth is the perceived distance between the listener and the "back wall" of the mix. It is controlled using volume levels, reverb, and other time-based effects.

Height is the perceived distance from the top to the bottom of the track. It represents the "floor and ceiling" of the mix, with bass frequencies perceived as closer to the floor, and high-pitched frequencies perceived as closer to the ceiling.
A well-balanced track will sound rich and full throughout the entire frequency spectrum.

When sculpting the stereo image of a track, try to visualize each instrument in a three-dimensional space. A stereo instrument might stretch all the way from the left side of the room to the right side, while a mono instrument will sit neatly in the center.
A bass instrument will sit closer to the floor, while a high-pitched instrument will be closer to the ceiling.
A dry track with no reverb will sound like it’s at the front of the room, while a heavily reverberant percussion instrument will sit farther away at the back of the room.

David Gibson does a great job of explaining this concept in his book, The Art of Mixing—although the audio and visual references are a bit dated. Visualizing a variety of different mixes in unique genres helped me to understand the relationship between each instrument and how to place each of them within the stereo image.
Now that you understand the basics of stereo imaging, let's take a look at some of the tools you can use to dial in the width, depth and height of your track.
Panning
Panning is your most powerful tool for sculpting the stereo image. It allows you to place instruments from left to right, effectively determining where the left and right walls of your mix are, and how close each instrument is to them.
Traditionally, the kick, snare, bass and vocal tracks are panned directly in the center, as it is the focal point of your mix.
The kick and snare provide the beat of the song, so it's important to keep them centered. Due to the way our ears perceive sound, it’s difficult to detect where bass frequencies are coming from. That's why we typically leave any bass-heavy tracks panned in the center. Finally, the lead vocal is the most important element of the mix, and needs to be front and center to keep the listener's attention.
With a strong center channel, you can use the other instruments in the mix to help sculpt your stereo image. As a general rule, it's best to keep low-frequency instruments (like kick and bass) panned closer to the center, and high-frequency instruments (like guitars, keyboards and overheads) panned to the sides.
One exception to this rule is the drum kit. It might be easier to think of the drum kit as one stereo instrument, rather than multiple individual tracks. For instance, the kick and snare are both panned center, but the hi-hat and toms are often panned to opposite sides.

While pan knobs allow you to place tracks anywhere within the stereo spectrum, using the "LCR" panning technique will provide a wider soundstage. With LCR panning, you only pan instruments to the left, center or right channels, providing plenty of space between instruments and helping to create a wide-sounding mix.
Many engineers use a modified form of LCR panning, with the most important tracks panned to the center and sides of the mix, and less-used instruments panned throughout the stereo field to add a sense of separation. This can be incredibly helpful when working with particularly busy tracks.
Use the Right Perspective
One thing to consider when panning instruments around your mix is which perspective to use. Generally speaking, there are three options:
Performer's perspective pans instruments based on where they would be placed on stage when performing live from the performer's perspective. This is most commonly used when panning drums to determine where to place the hi-hat and toms. With this approach, the hi-hat would be panned to the left, assuming the drummer is using a right-handed kit.

Audience perspective pans instruments based on where they would be placed on stage if you were watching the performance from the crowd. With this approach, the hi-hat would be panned to the right.

The third option is to place instruments around the stereo field however you see fit, regardless of how they might be laid out on stage.
Mixing in Mono
One more note on panning—while it may seem counterintuitive, it's best to decide on pan placement while monitoring your mix in mono. One of the hardest parts of dialing in a wide stereo image is frequency balance issues. Mixing in mono helps you balance frequencies and avoid masking.

Obviously, you won't be able to hear instruments move around the stereo field as you pan them while monitoring in mono, but you can hear a difference in the track. The pan position of each instrument affects the sound quality and balance of the overall mix.
Just remember, if it sounds good in mono, it will sound great in stereo! Now that we've covered the basics of sculpting your stereo field, let's take a look at some tips and tricks to help you dial in wider, more immersive mixes.
The Haas Effect
One quick and easy way to make your tracks sound wider is to duplicate a track and pan them hard left and right. Of course, listening to the same exact signal come out of the left and right speakers is essentially the same as listening in mono. But, by applying time-based processing like a delay to one of the tracks, you can create a psychoacoustic effect that causes the listener to think they are two different signals, making the track sound significantly wider. This is known as the Haas Effect or the precedence effect.

One sure-fire way to increase the stereo width of your mix is to use a stereo enhancement plug-in. GROW is one of four modules in our plugin ANIMATE and it makes it easy to increase the width of the selected frequencies using the precedence effect. Best of all, GROW can be applied dynamically, so only certain signals will be enhanced.

For instance, you can use the filter to focus on one specific frequency range. This allows you to boost the highs in your mix without affecting the lows, keeping your mix clean and free of mud. Or adjust the threshold controls so that only the loudest transient spikes are enhanced, creating a rhythmic pumping effect that's perfect for synth stabs and lead lines.

However, this technique is known to cause phase issues, so it's important to leave a third version of the track panned in the center (at a lower volume) to help retain mono compatibility. Use LEVELS to check for phase problems before printing your final mix.

Microshifting
For an even more pronounced stereo widening effect, use a pitch shifter to adjust the pitch of each track by a few cents. The difference in tonality should be just enough to catch the listener's ear without sounding dissonant.
Another option is to add a chorus effect to both tracks, which effectively combines delay and pitch shifting to make it sound like multiple instruments are playing at once. Just add enough chorus to help create separation between the tracks - too much and it sounds like your mix is underwater.

Doubletracking
You won't always have the opportunity to double-track a performance, but when you can, it almost always provides the great separation and a wide stereo image. Doubletracking is when you record a second, identical performance and layer it on top of the original, often panned hard left and right.
Techniques like the Haas Effect and micro shifting help separate the duplicate recording from the original by altering the timing, but doubletracking actually uses a second recording to capture even more differences, creating more separation.
Of course, you should still try to re-record the doubled take as close to the original as possible. Naturally, you'll capture a slightly different timing, intonation and pitch, helping to create a more pronounced separation between the original. The part still needs to be on time and in tune, after all.
If you're unable to double-track the part, there are dedicated plug-ins like the Wave Doubler or Abbey Road or Reel Artificial Double Tracking (ADT), which can help.

It's also important to consider the height and depth dimensions when trying to increase your stereo image. Make sure your mix is balanced both in terms of the individual instruments and the overall frequency spectrum. Use reverb and other time-based effects to add a sense of depth. By making your mix sound taller and wider, it will inherently add more depth as well.
Use these techniques while working on your next mix to create an immersive soundscape with a wide stereo image that draws the listener in!


