 Photo: Dennis J Wilkins
Follow one SOS reader on his quest to transform a box room into a studio worthy of the name!
Studio SOS articles are typically hosted by Paul White and Hugh Robjohns, who travel to the far corners of England in search of chocolate Hob-Nobs and studio spaces needing help. Alas, however, I couldn't talk them into driving to Colorado when I was embarking on a home studio upgrade. Instead, I had to read a number of their columns, search for some online advice, and carry out my own experiments with room modes, acoustic treatment and speaker settings. And the results were well worth the effort!
The Room
As many of you may find yourself in a similar situation, I'll describe the room I had to work with, show initial measurements I made before any treatment, and then the final (at least, the most recent) results. I started with a basic 'box' room, about the worst possible shape, with equal width and length and a height only slightly shorter. This is the kind of space that many feel cannot yield good acoustics, but there are a number of techniques to alleviate the potential issues that such a room promotes. My room is approximately 3.6 metres (12 feet) on each side and about 2.6 metres (8.5 feet) tall. The walls and ceiling are plasterboard, and the hardwood floor is carpeted.
Originally the room was used for video editing, and acoustics were not a concern since I was using headphones when working on video. These days I use the studio primarily for mixing and mastering, with some audio recording, such as vocals and guitar. For mixing and mastering I want absolute clarity, a smooth monitoring frequency response, and minimal contribution of reverberation from the room.
The original upgrade project was started about six years ago, and for this article I wanted to illustrate how the room sounded before I added any acoustic treatment, but it took considerable time searching through my audio PC to find my original test files! I found a 20Hz-20kHz test result that shows rather wide swings with peaks and dips that span over 20dB within a single octave. In Screen 1 you can see a plot I made from this data using Voxengo SPAN (a wonderful free spectrum analyser that you hopefully already have). While a 1dB change is difficult to detect by ear in most cases, and 3dB is detectable but mild, a 20dB change (a 100:1 change in power) is extreme!
Basics
There is a lot of excellent information on acoustics and treatment available on the Internet (and in Sound On Sound, such as 'Choosing & Using Porous Absorbers', July 2015, by Trevor Cox; 'When Are Diffusers A Good Idea?' by Paul White and Hugh Robjohns, May 2015; 'A Beginner's Guide To Acoustic Treatment', December 2009, by Chris Mayes-Wright; as well as the many Studio SOS articles over the years). As Paul and Hugh have pointed out (many times!), there are a few basic principles to consider. For one thing, symmetry is good (left-to-right that is, not necessarily front-to-back!). Monitors should be placed equally distant from the left and right walls, and preferably spaced some distance from the wall behind them. The listening position should also be equidistant from the left and right walls, but not equidistant from the front and rear walls, the centre of a room often being a worst-case location! Rooms that are strongly asymmetrical side-to-side will be difficult to tame, though not impossible to improve. Asymmetry front‑to‑back can actually be helpful by scattering sound more randomly, but most of us with home studios need to deal with a basic rectangular box shape.
Even if you have a nice symmetrical room, there is still need for acoustic treatment. And it's good to start with a few critical positions: the so-called mirror points. These are the spots on the walls and ceiling (and possibly the floor) where sound is reflected once on its way from a speaker to your ears. This sound will arrive slightly later than the direct sound from the speakers, and will combine with it to give undesirable comb filtering.
The delay depends on the size of the room, and can be estimated by considering the speed of sound (at 20 degrees Celsius it's 1125 feet per second, or 343 metres per second for you metric folks). In the case of my room, the side mirror points are about 1.2 metres (4 feet) from the closest speaker on each side, and 1.8 metres (6 feet) from my head, with a total travel distance of about 3 metres (10 feet), while the direct distance is about a metre (3.5 feet). So the delay is equal to the difference in path lengths (two metres or 6.5 feet) divided by the speed of sound. This works out at about 5.8ms, which is not enough for the reflected sound to be heard as a discrete echo; instead, it recombines with the direct sound to introduce filtering and coloration. The ceiling mirror point is about 1.2 metres (4 feet) above my head when seated, with a total travel distance of about 2.4 metres (8 feet), for a path length difference of about 1.4 metres and a 4.1ms delay, causing more audio confusion. And the cross-speaker mirror points (left speaker to right wall, and right speaker to left wall) yield another confusing reflection delayed by about 9ms. If these reflections are not treated, they will significantly degrade clarity and stereo imaging.
However, because low frequencies have longer wavelengths than high frequencies, LF reflections from mirror points won't be a significant issue in a typical project studio: the wavelengths are so long and the room dimensions so small that the time‑of‑arrival delays don't cause comb filtering. Instead, the direct and reflected waves are only slightly phase-shifted with respect to one another, so tend to add constructively, rather than create destructive notches (although the room modes still do that, of course, because the path‑length differences involved are much greater). This is why you've seen Paul and Hugh make significant audible improvements by placing simple acoustic foam on the walls, even though such foam has a decreasing effect below 500Hz and almost no effect below 200Hz.
I decided to use absorbers with a broader range of absorption than just foam, and built a number of these using dense Rockwool covered with an open‑weave cloth, and faced with commercial acoustic foam. This saved considerable money over buying commercial units, and worked very well. Note that the wooden frame spaces the back of the Rockwool a few centimetres from the wall, an arrangement that actually improves low‑frequency absorption a little. My basic units are 61cm (two feet) square.
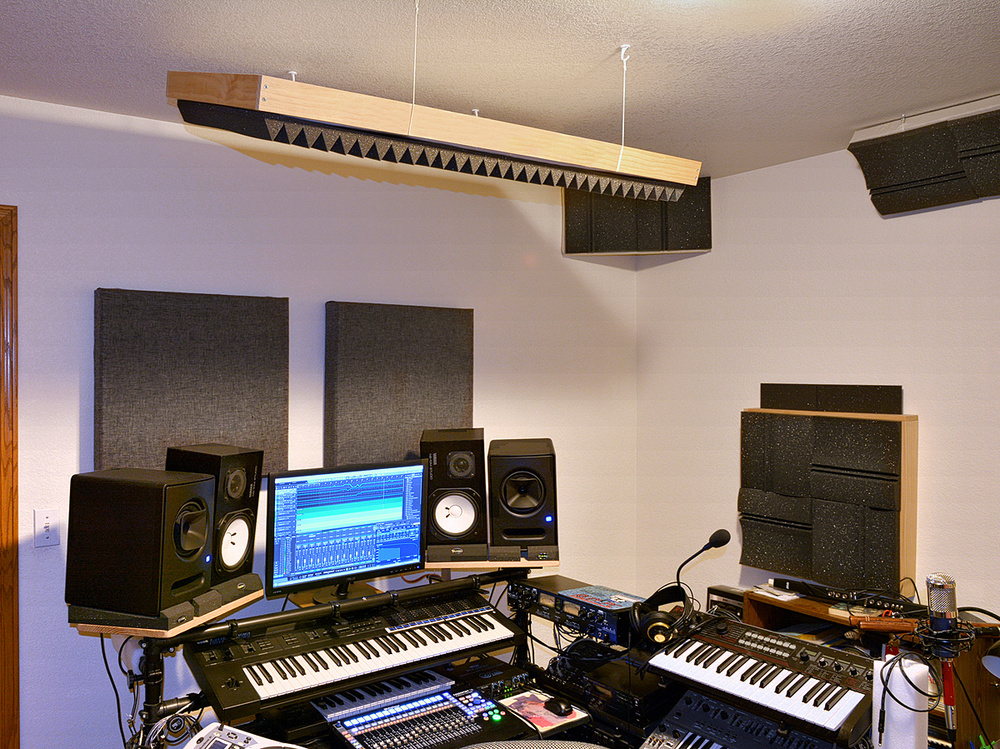
I placed the side absorbers directly on the walls, but the ceiling unit required some thought. I ended up using sturdy screw-in hooks (screwed into the joists, not just the plasterboard!) and nylon cord. This enabled me to angle the unit (which is 2x4 feet, or 61x122 cm), which looks nice and also provides additional spacing from the ceiling which, again, helps trap low frequencies.
Deeper Issues
 Screen 1: The response at the listening position, prior to treatment.
As Screen 1 shows, the room effects below 1kHz were severe, so I bought some commercial corner 'bass traps' made of dense acoustic foam to use in the rear corners (the front corners include a door that precluded large blocks of foam). Such absorbers are not very effective below 200Hz, but still help in the low mids. You can make your own corner traps simply by placing tall, open-backed panels with Rockwool across the corners at 45 degrees to each wall — again, having an open space behind will increase the effectiveness at low frequencies.
 Absorbers were hung from the ceiling, a short distance away from the walls to increase their efficacy at low frequencies.I wanted even more bass trapping at the rear of the room than the corner traps provided, but with a large double window and another desk where I have my video/image editing system, how could I accomplish this? Years before, I had blocked the windows with fibreglass panels to shut out the light (for video and image editing). This had the added advantage of reducing external noise, but the aluminum‑faced panels reflect sound within the room very effectively! Since my imaging computer and printer desks are still at the rear of the room, I couldn't support panels with floor stands, so I decided to hang two panels, each identical to the cloud panel, from the ceiling using the same type of hooks I had used for the ceiling absorber. Again, I spaced them from the window wells by about 10cm (4 inches) to increase their effectiveness as mentioned earlier. This design approach led to another bonus (see the 'Vocal Booth' box).
Over several months I added another 1.5 square metres (16 square feet) of panels to corners, ceiling-wall junctures, and areas on the side and front walls. These panels were dense Rockwool covered with fabric, mostly without wood frames. The results showed good improvement above 200Hz; the lower frequencies still had some large swings due to standing waves, but these variations were only about half the magnitude they had been before treatment (see Screen 2).
 Screen 2: The room response, post-treatment but before applying IK Multimedia's ARC room correction.
Another Trick
It's no secret that I also use electronic correction to help tune my room (see my SOS January 2018 review of IK Multimedia's ARC 2.5: https://sosm.ag/arc25), and this kind of system works wonders for the lowest frequencies. As I indicated in my review article, this room correction system not only adjusts frequency equalisation, but also does something (proprietary) to clean up phase/timing issues. Of course, it cannot eliminate really bad ringing or very long reverberation tails, so it works best in a well-damped room.
Over the past few years I've changed my primary monitors twice and added a subwoofer, each change requiring new measurements and new ARC correction curves. I've also changed the measurement process from using a manual swept sine wave analysed with a spectrum plug-in to a procedure using Room EQ Wizard (www.roomeqwizard.com), an excellent donationware program that can measure not only frequency response, but phase response, harmonic distortion, sound energy decay characteristics and other valuable measurements for understanding room acoustics. I used it to plot the frequency response (this time up to 24kHz) of six locations around the monitoring sweet spot, and as you can see in Screen 3, there are minor variations — ±3dB or so, up to 20kHz — but no large bumps or dips (note the vertical scale is 5dB per line in this case).
 Screen 3: The room's frequency response, as measured at a number of different locations.
The results are impressive, especially for a small box room. Of course the low‑frequency response far to one side, towards the rear or in a corner of the room is not this flat due to residual standing waves, which brings us back to bass traps. Install as many as you can fit in the room before you try mixing! An electronic correction system can help at the listening position but the overall room will benefit more from any electronic method if you can tame the low end first. As Phil Ward noted in his SOS October 2018 review of Sonarworks Reference 4 Studio Edition, another electronic room correction system, "It's really important to consider when configuring Sonarworks just how much it asks of the monitors at low frequencies... this issue will be particularly important with small monitors, where significant equalising gain, especially around and below any port tuning frequency, might well result in nothing but distortion, noise, wasted amplifier power..." So pile on all the bass trapping you can!
Good News, Bad News
 The author, Dennis J Wilkins, in his studio.
The good news is that with the changes I made, stereo imaging is spot-on, with a clear and stable phantom centre, and a smooth response over the entire audio frequency range. The bad news is that commercial recordings — CDs that I've used as references for years — now clearly exhibit audio defects that I never detected playing them in my car or home stereo system: sounds like piano stools squeaking, lip smacking, odd buzzes and other noises you wouldn't expect in a professional production. To be honest, I can hear these defects in my AKG studio headphones, but until I cleaned up my room, some of these anomalies were masked by reflections and room modes. These are the kinds of subtle defects that a mix or mastering engineer needs to hear.
Another thing one might consider a 'minus' is that the best results are only at my 'engineering' position, and not all over the room, as I noted earlier. But as Carl Tatz indicated in his article, 'The Elephant In The Control Room' (SOS November 2015): "All you should be concerned about is the listening position; to hell with the rest of the room. This is as true in a bedroom as it is in a well‑designed commercial studio control room... there is only one position that can be accurate and that's your position in front of the monitors." As my most recent results show, I've attained about as fine a response as possible in my small room.
I want to thank Paul and Hugh for publishing many good pointers in Sound On Sound over the years, and the many SOS authors who have provided valuable information on room treatment and recording technology. And my thanks to all the Sound On Sound staff for producing such a fine publication.
Vocal Booth
 A temporary vocal booth can be created by relocating two of the hanging wall absorbers.My studio is small enough that a typical vocal booth isn't practical, and since I'm never recording a full live band I don't need the isolation. With the treatment in place I found the room quiet enough to record vocals and small acoustic instruments (guitar, bass or harmonica). Positioning a musician and/or singer in the rear corner of the room allows a cardioid or figure-8 mic to be oriented to minimise pick-up of computer noise, but in the default room configuration, this arrangement introduces some boxiness into the recorded sound.
I actually have a reflection shield that fits on a mic stand, but have not been happy with the tonal changes it imparts, so I came up with my 'non-booth' using the same absorbers that normally hang in front of the rear windows, simply moving them to an additional set of ceiling hooks. As you can see in the photo, this corner placement blocks my equipment closet somewhat, so I don't want a permanent pair of absorbers hanging at this location, but it's easy to move the hanging absorbers when needed. The recorded sound using this arrangement is not totally dry and has a short reverberation time with good tonal quality, and is very usable.
Room EQ Wizard
The Room EQ Wizard program is free (although the author will accept donations, and if you use the program, you'll likely feel he deserves any spare cash you have!) and is available for PC, Mac and Linux systems. With this software and a reasonably flat measurement mic, you can measure how your space is performing, and gain insight into the effects of changing room treatment, altering speaker placement, and other adjustments.
Room EQ Wizard can measure not only room response, but also help you identify the sound character of speakers, microphones, preamps, amplifiers, and even software audio processors.