The subject for the 29th day of the #30DayMapChallenge 2020 event was a Globe! I wanted to participate to the event at that day and I was searching for ideas.
Of course I could have designed a virtual globe with a variety of tools, including ArcGIS Pro, ArcGIS Earth, ArcGIS API for JavaScript, or other technologies like Google Earth Studio or the GlobeBuilder of QGIS. Any of these would do, but I was not really sure if I wanted to replicate once more a virtual globe.
I remembered page 74 of the Map Use book by Esri Press where there is a whole paragraph about the Transverse Mercator projection and how it has been used by globe makers for centuries. I had also experimented a lot with globe gore production back in the ArcMap epoch, somewhere in between 2017 and 2018. I thought that reviving the technique of gore design and production, in order to participate at the 30DayMapChallenge event, would be the coolest idea I could find.
So, instead of a virtual Globe, I decided to design the stripes (gores) which if printed and stitched together will reproduce a paper Globe! The classic old-school method!
At the following paragraphs I describe every step I made to produce this crazy thing, I posted on my Twitter and LinkedIn accounts that day.
Collect the Data
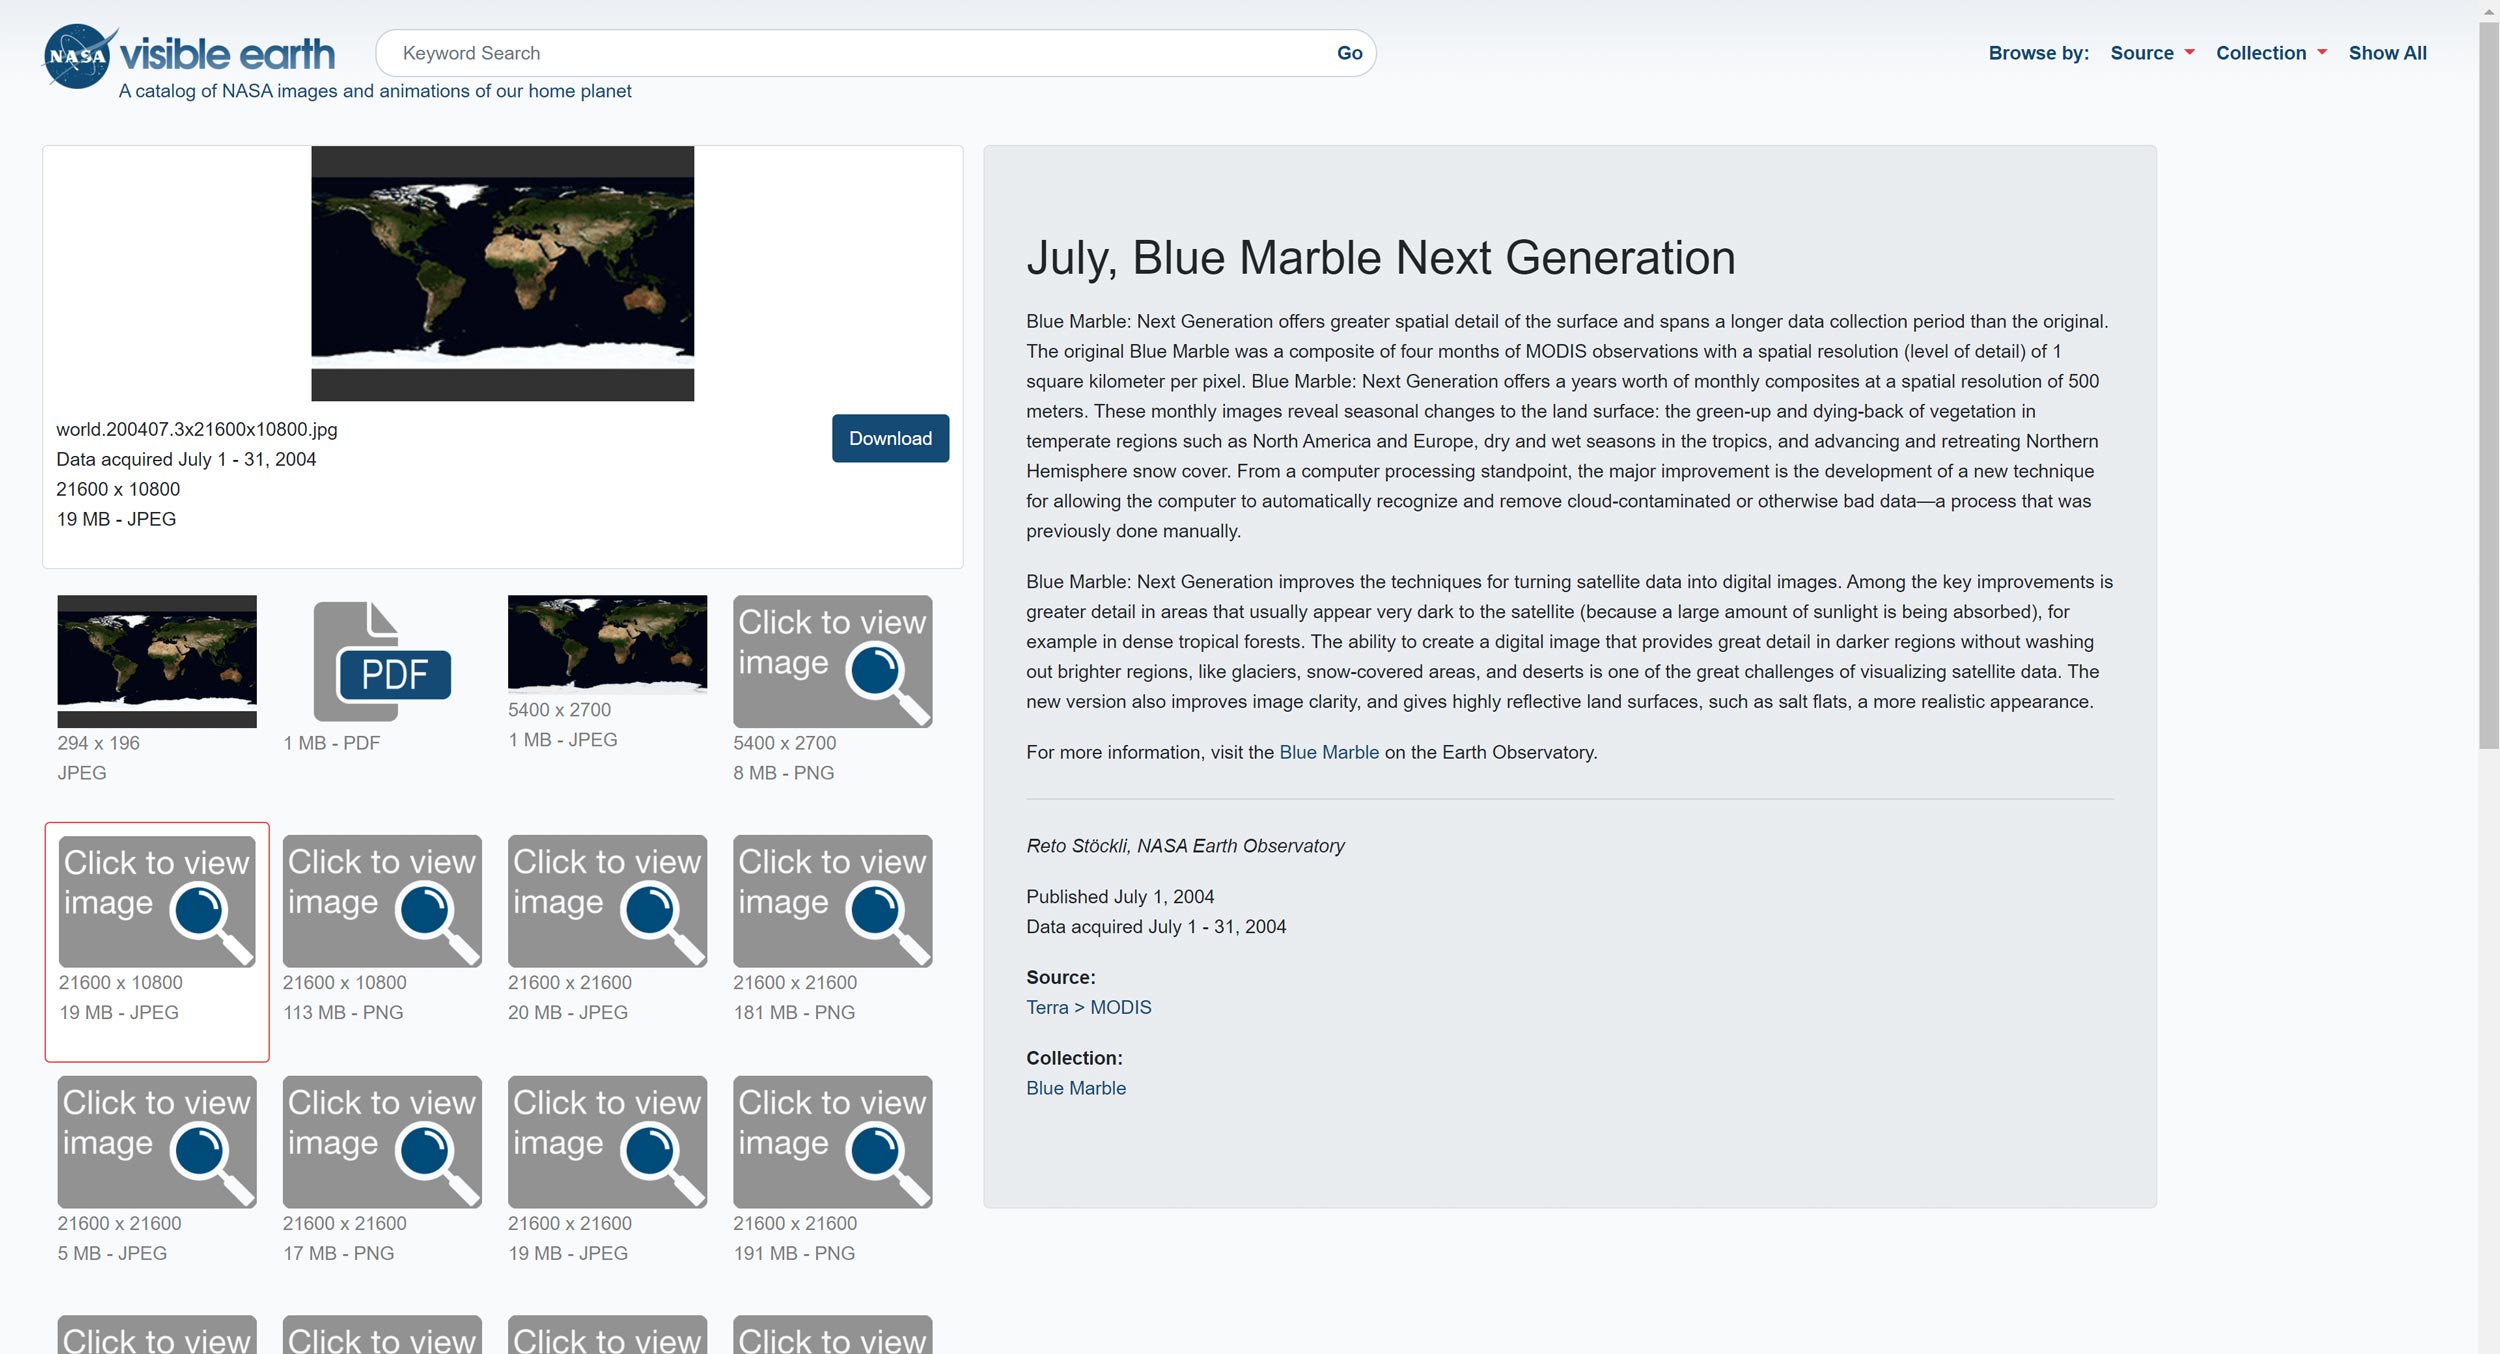
NASA Blue Marble
NASA maintains visible earth, a catalog of images and animations of our home planet, as they state on their headline. Among the various and numerous collections, they provide Blue Marble, a series of small scale satellite imagery of the whole World, categorized by month and by context. More on the taxonomy and context here.

For the purposes of my map, I selected and downloaded the July, Blue Marble Next Generation and specifically the already stitched image of the whole World (21600 x 10800 /19 MB – JPEG), since I was about to produce a very small scale map (1:42,000.000). I could have also downloaded the eight different tiles and stitch them myself, in case I wanted to produce a larger scale map.
Natural Earth
I then visited the precious Natural Earth website. From the 1:50m Raster Data collection, I downloaded the 1:50m Manual Shaded Relief, one of my most favourite global scale datasets, and from the 1:50m Physical Vectors I downloaded the Graticules (the Grids dataset that contains all degrees), as well as the World Bounding Box.


Prepare the Data
In ArcGIS Pro I create a new map which I rename to GLOBE_STRIPES. It will serve as the environment where I will prepare, process and create all necessary data. I turn the map projection to World Geodetic System 1984 (epsg:4326) and I load the World Bounding Box.
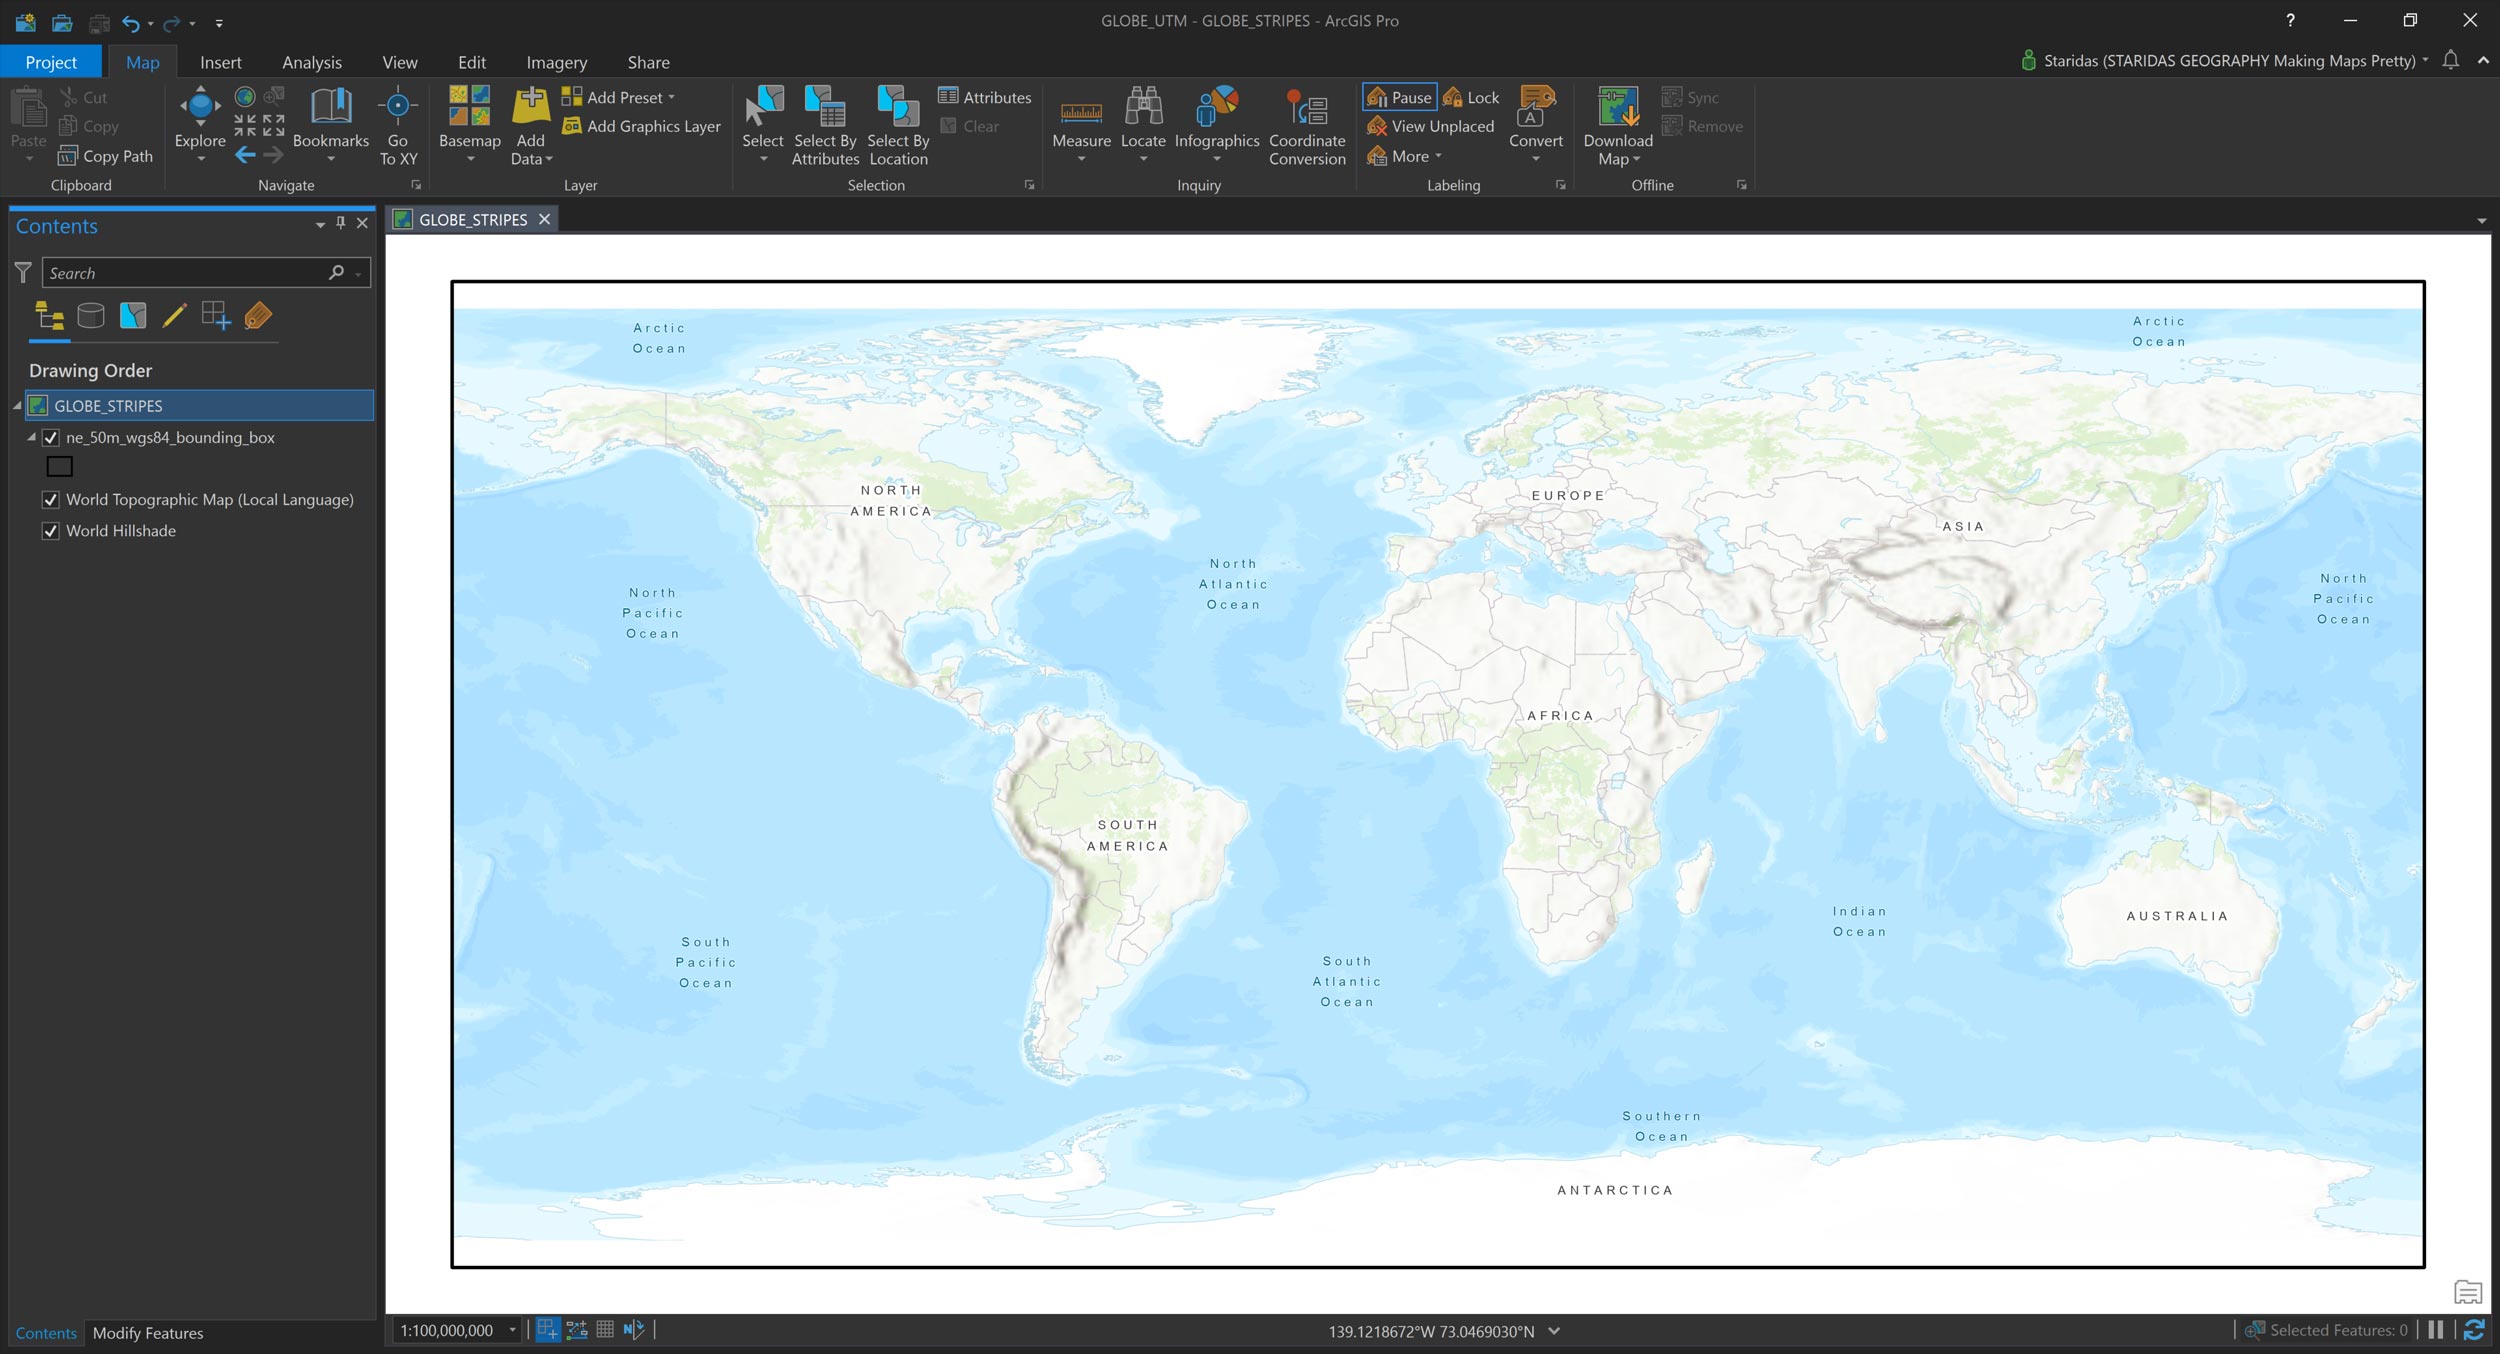
The Shaded Relief
I remove the default basemap layers and I add the Manual Shaded Relief layer, which thankfully comes with its associated projection files, therefore it perfectly fits the World extent. This layer is about to participate at the basemap, so I need to style it appropriately.

At the Appearance tab I open the Symbology dialog and I select the Minimum – Maximum Stretch Type, I leave the pre-defined Gamma value as it is and I change the Color Scheme. For Color Scheme I select brown opaque values for the shader areas and fully transparent values of the same hue for the brighter areas. I want the transparency, since this is going to be on top of the forthcoming imagery layer.
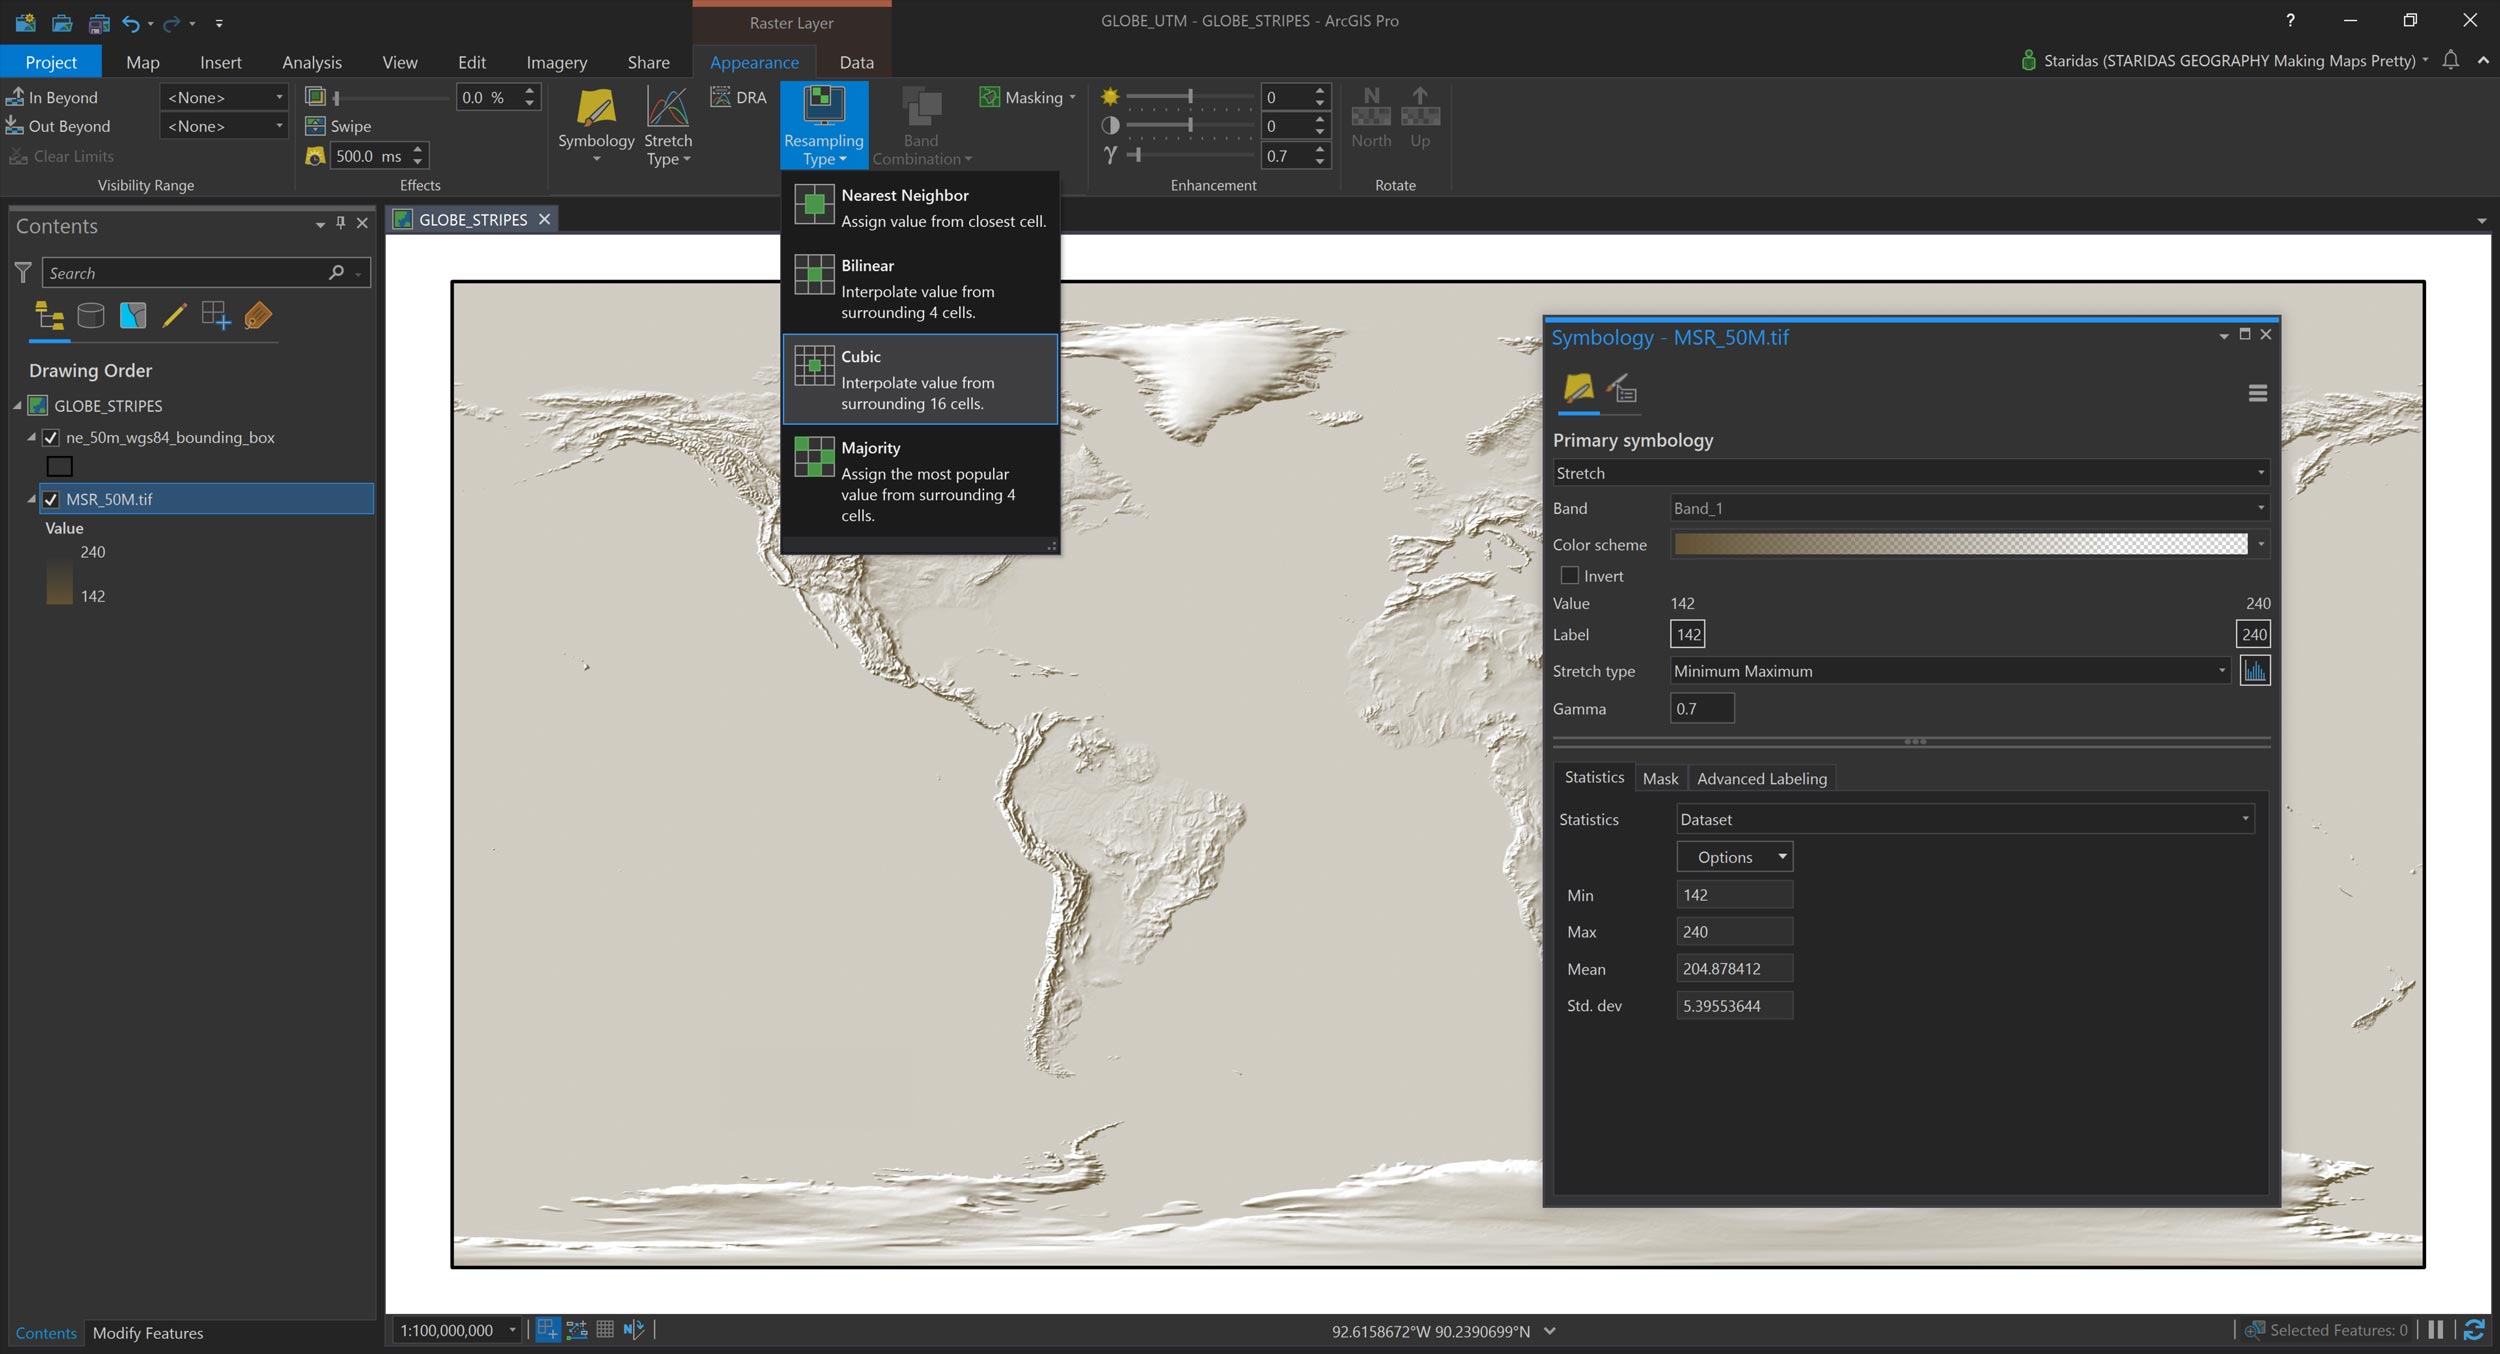
The Color scheme recipe is:
| Color (CMYK) | Transparency | Position |
|---|---|---|
| 42, 48, 60, 20 | 0 | 0 |
| 42, 48, 60, 20 | 100 | 78 |
| 42, 48, 60, 20 | 100 | 100 |
Georeference the Imagery
The nasa imagery layer does not come with an associated projection file, so I have to produce it myself. One way is to georeference the image by using the World Bounding Box. Each of its four corners can snap to the bounding box corners and I am done. But I prefer a more accurate approach, that of hard coding the World file.
So, I open a code editor (I work with Visual Studio) and I create a new empty document, which I save as a .jgw file at the same folder where I have saved the image and with the same name (for instance, if I name the image layer as nasa.jpg I need to save the new document as nasa.jgw).
The World file (the .jgw) has only six rows. The first and the fourth row represent the cell size (width and height, respectively) of the image, at the given coordinate system (in my case the WGS84), the second and the third represent the rotation and the fifth and sixth represent the coordinates of the top-left corner of the image, again at the same coordinate system.
Since the image extends to the whole World, I know that the coordinates of the top-left corner are -180 (degrees of longitude) and 90 (degrees of latitude), so I go and fill these values at the code editor. I also write zeros for the rotation.
Now for the cell size. The dataset I downloaded has a width of 21600 pixels and a height of 10800 pixels. I want these pixels to fit to the World extent which, in WGS 84, has a total width of 360 degrees (the overall longitude) and a total height of 180 degrees (the overall latitude). Hence, each pixel (the raster cell) must have dimensions:
Width: 360 / 21600 = 0.0166666666666667 pixels
Height 180 / 10800 = 0.0166666666666667 pixels
In the first and fourth row of my World file I write these values. The final .jgw file is:
0.0166666666666667
0.0000000000000000
0.0000000000000000
-0.0166666666666667
-180.00
90.00
Note that at the fourth row I give a negative sign. The reason for this is very well explained at the specification of the World file: […] “The y-scale is negative because the origins of an image and a geographic coordinate system are different. The origin of an image is located in the upper left corner, whereas the origin of the map coordinate system is located in the lower left corner. Row values in the image increase from the origin downward, while y-coordinate values in the map increase from the origin upward.” […]

I now drag the image from its folder and drop it on the map in Pro. It fits perfectly to the World extent. Pro notifies me that its reference system is unknown, so I have to define it. To do this I simply open the Define Projection geoprocessing tool and I select the WGS84 from the drop down list of the available coordinate systems.

Style the Imagery
From the Appearance tab I open the Symbology panel for the NASA image. I select Stretch rendering instead of the default RGB, I select Minimum – Maximum for the Stretch type, I give a value of 2 for the Gamma parameter and I select a Discrete Color Scheme. I leave the default color scheme which includes five equally distributed discrete colors on the color ramp.
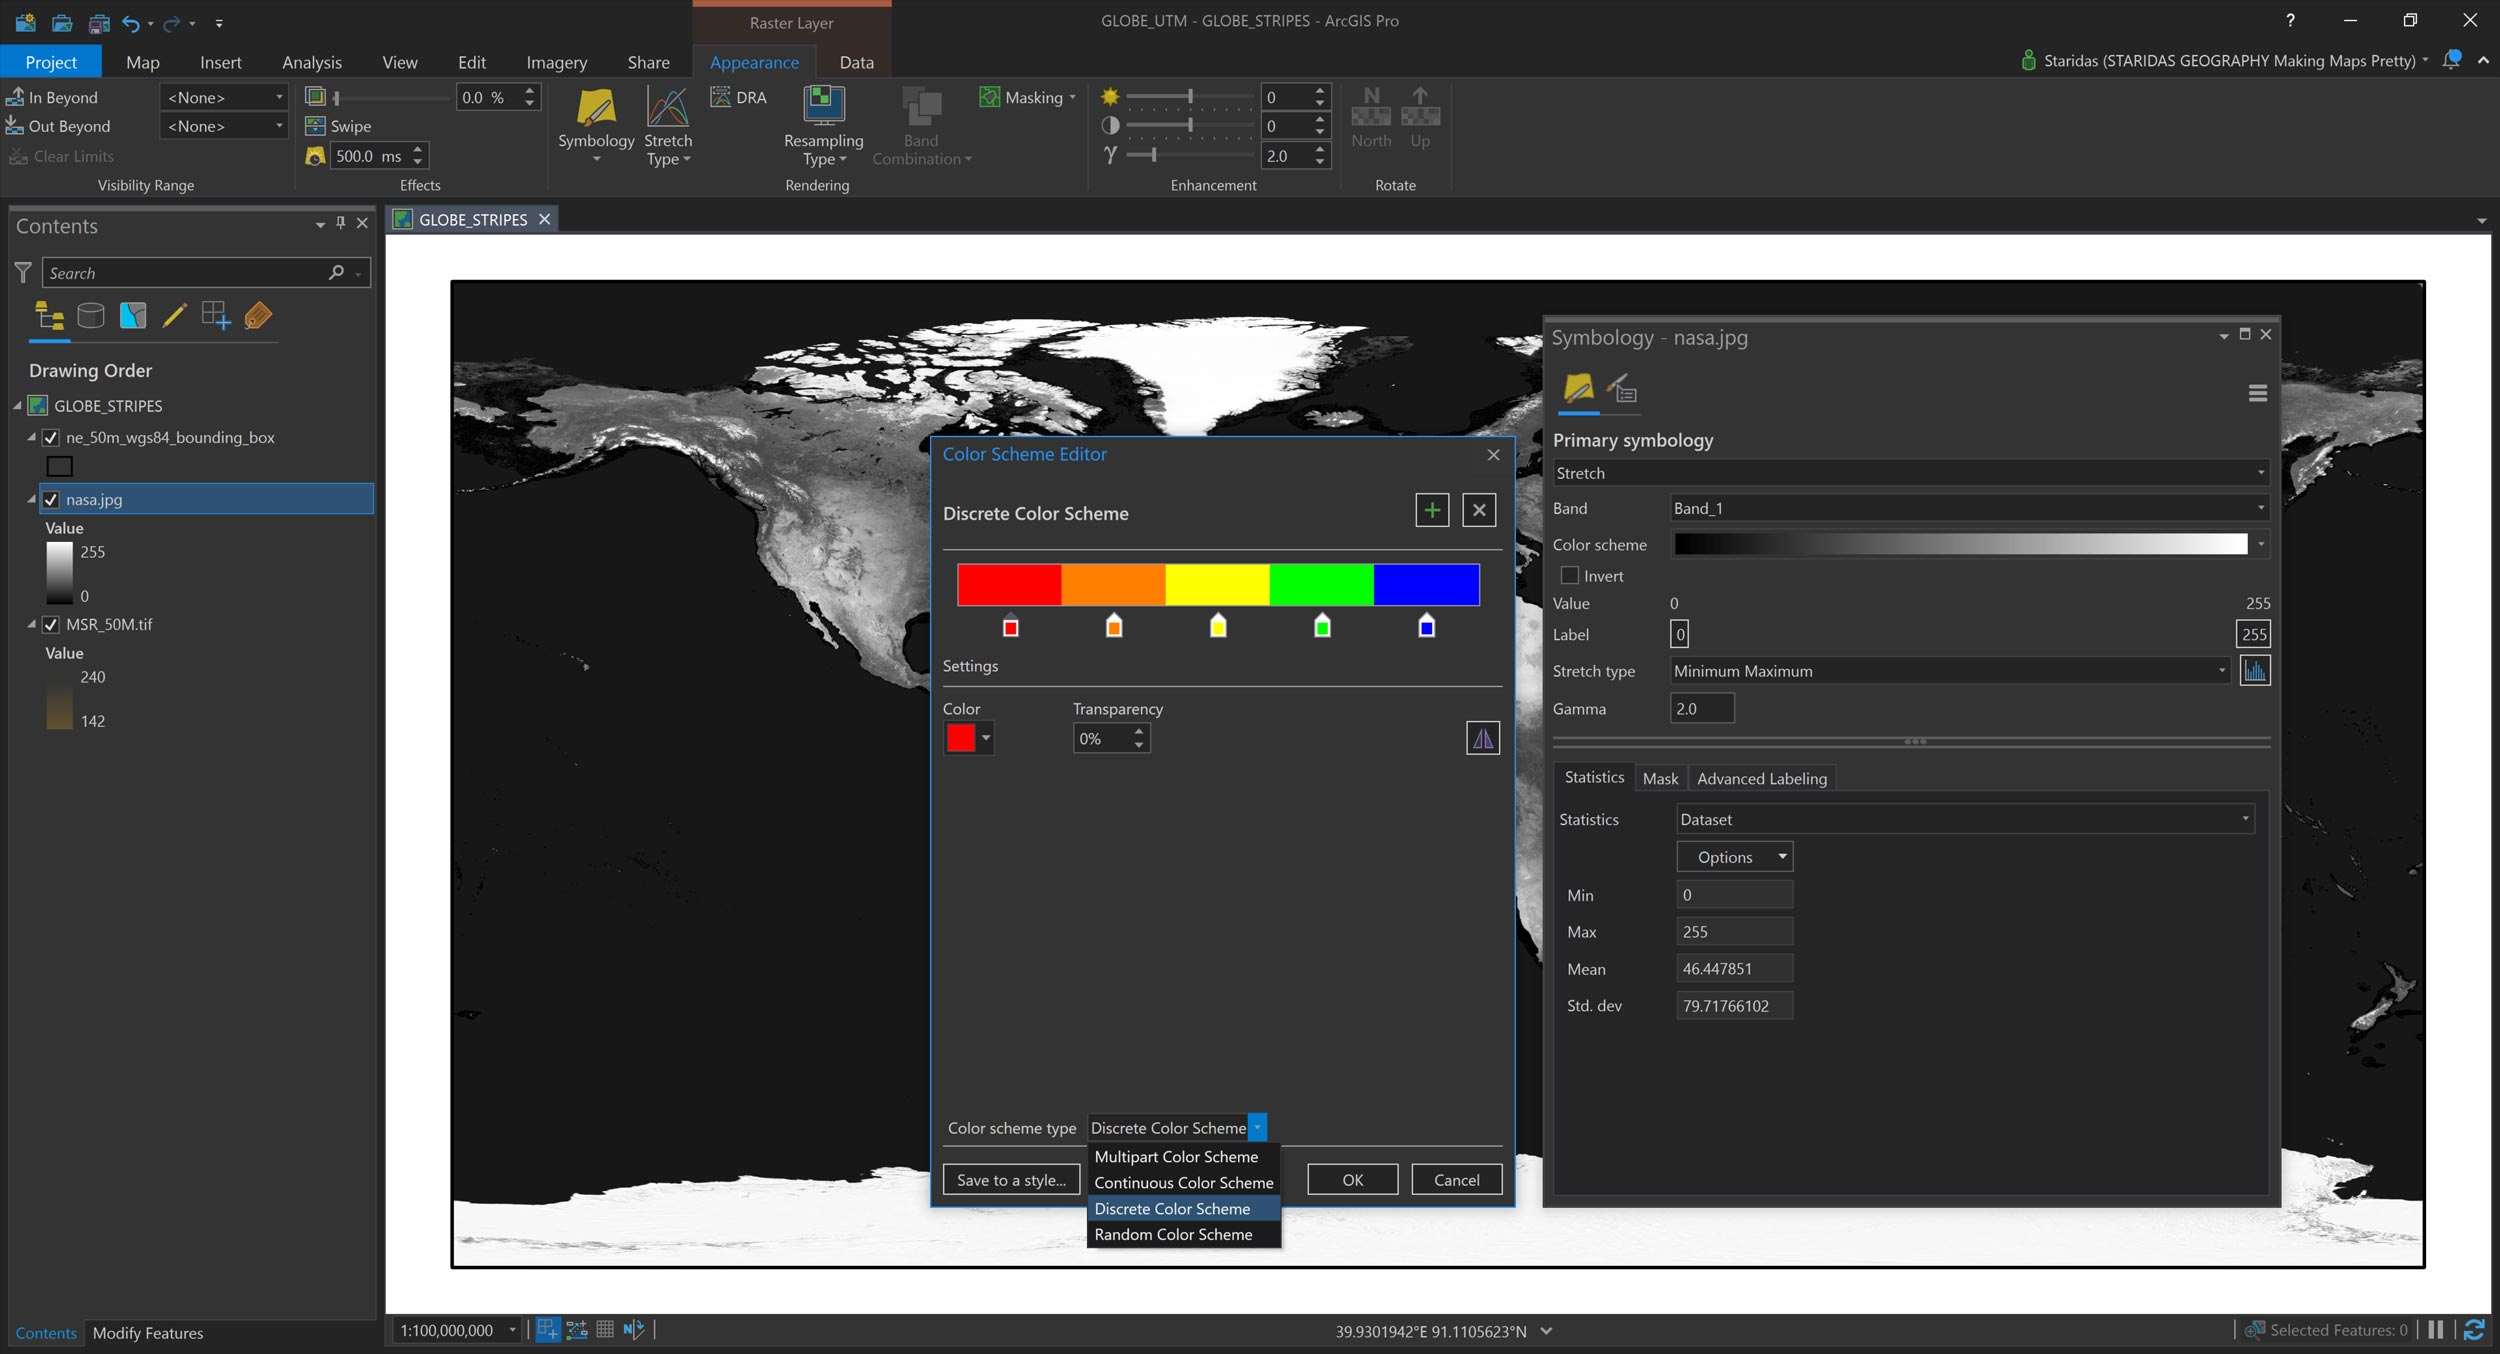
This is a rapid, pseudo-unsupervised classification of the image. I say pseudo because it does not produce a new classified raster file, but it simulates an unsupervised classification method by clustering the image pixels in terms of their pixel value (the color).
So, I see that all water bodies have been clustered to red color, all forests and other green areas have been clustered to orange and yellow, mountainous and hilly areas have been clustered to green and snow covered areas or others with very bright tones have been clustered to blue.
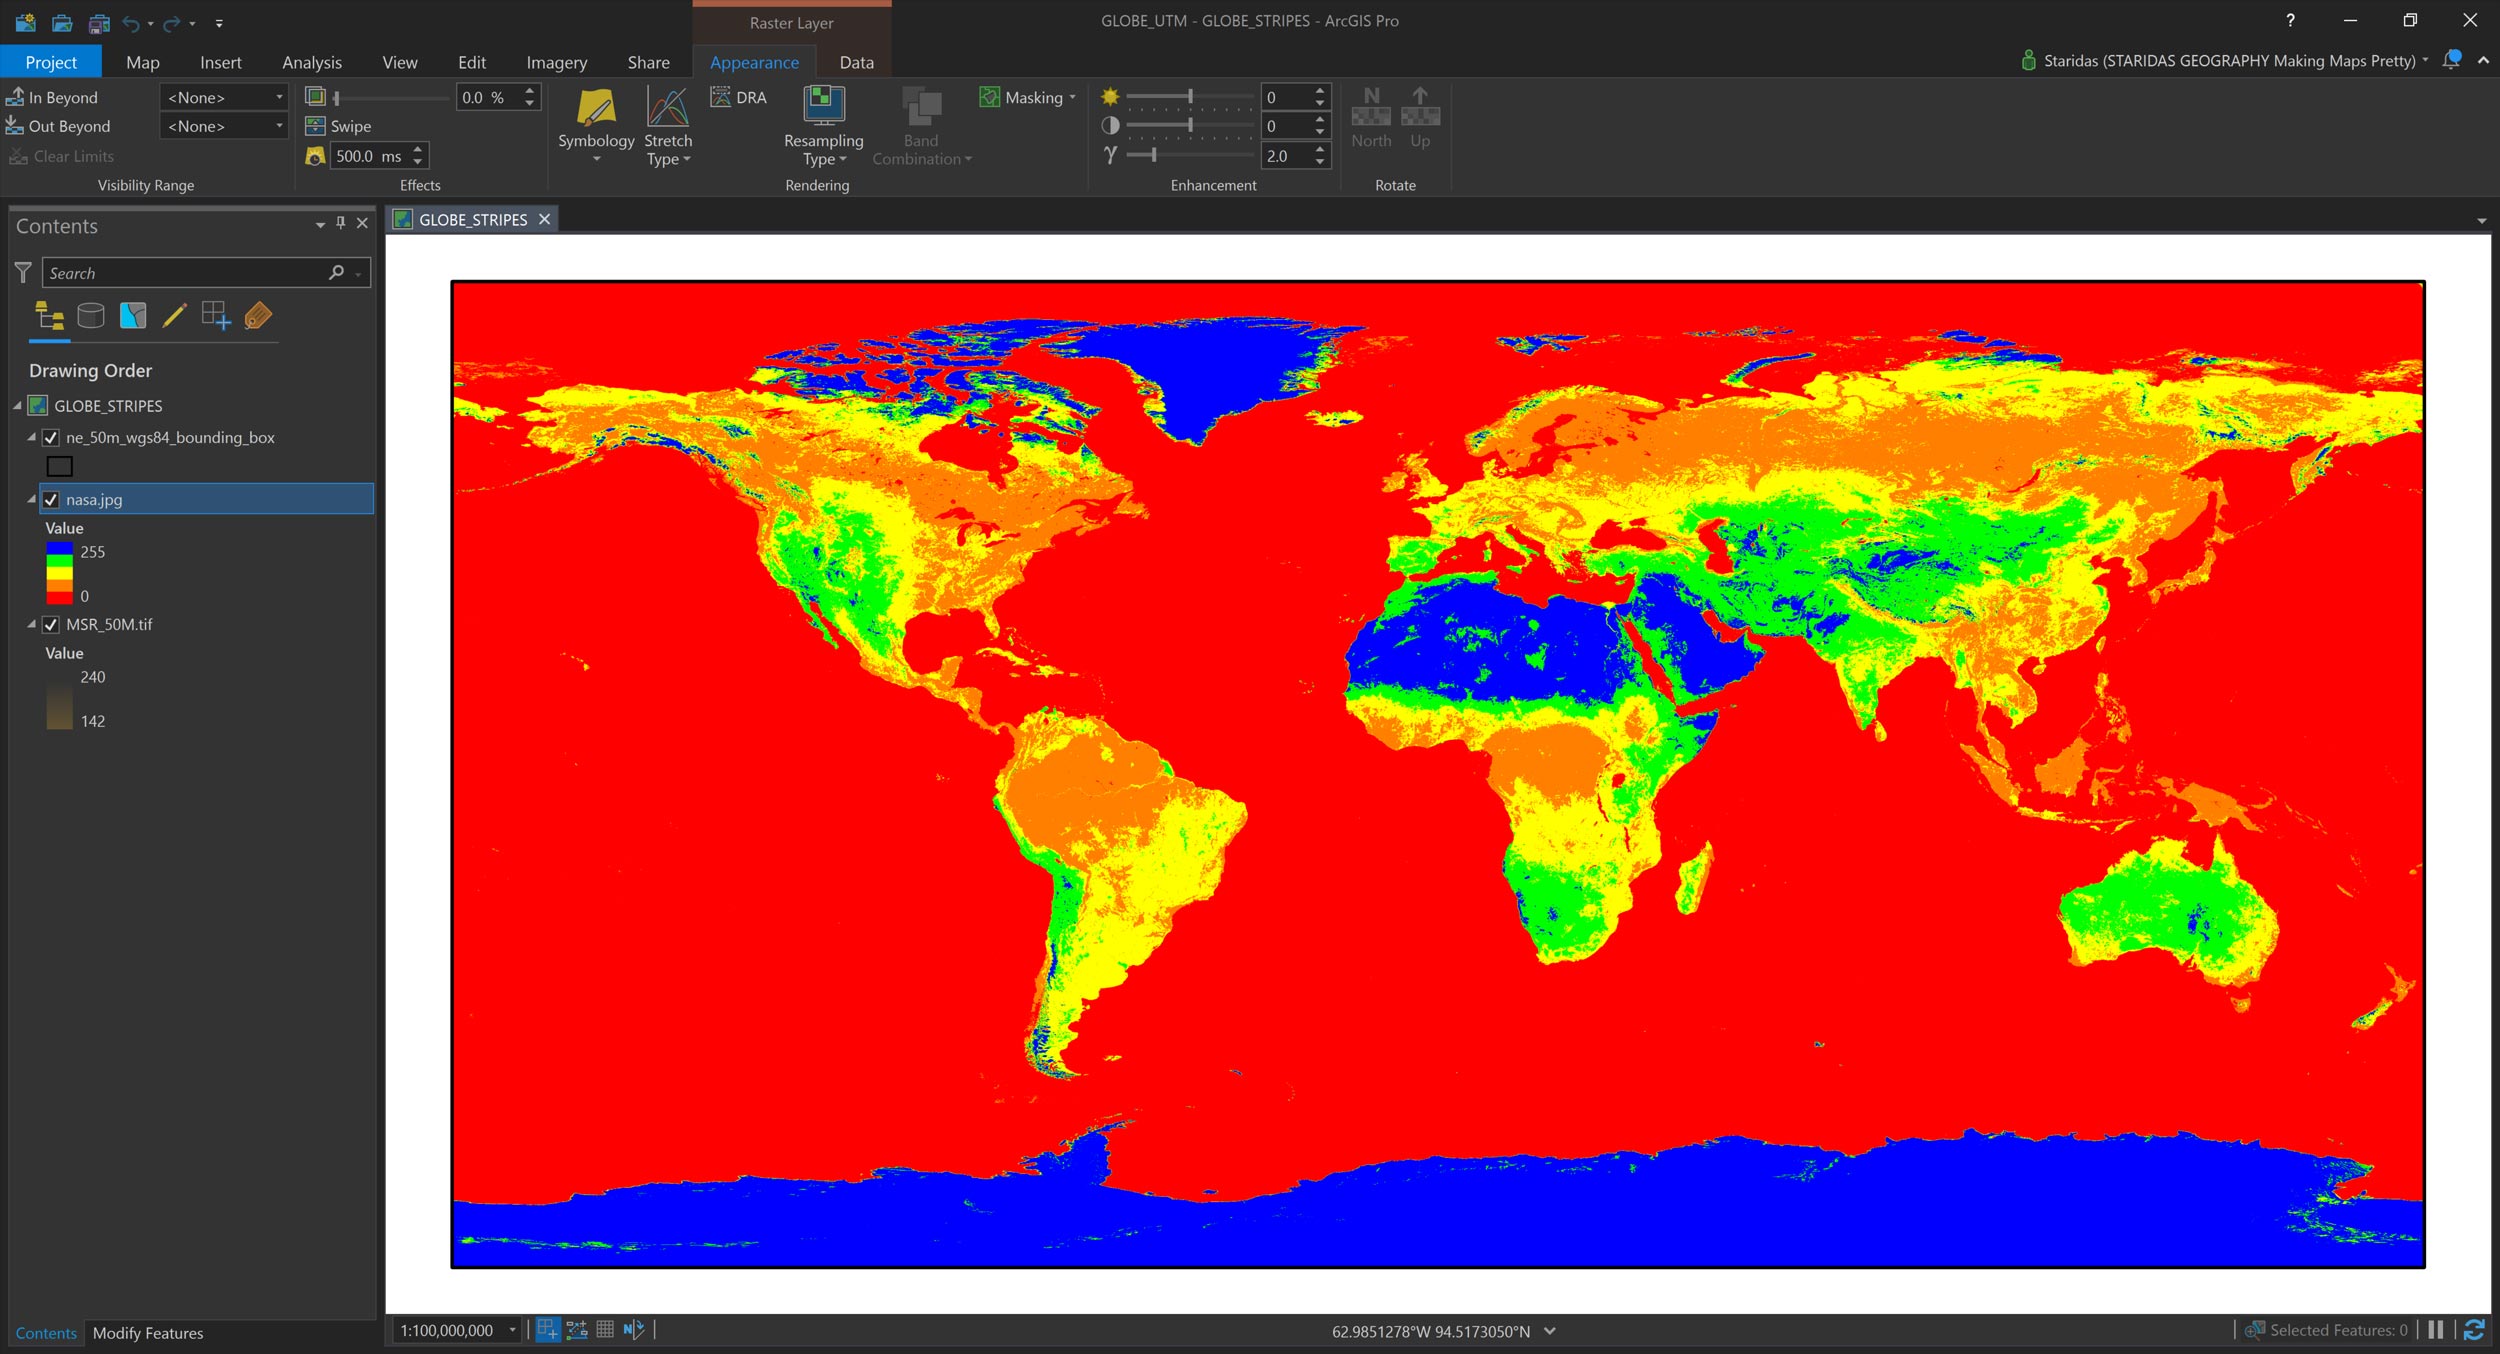
These observations help me to chart the areas on the coloramp, hence to produce a meaningful image after I change the palette. Eventually, I turn back to a continuous color ramp and I assign pale yellows at the beginning, which will represent the water bodies, greenish tones for Earth’s green areas, brownish tones for desert and mountainous/hilly areas and finally pure white tones for snow covered areas.

The Color scheme recipe is:
| Color (CMYK) | Transparency | Position |
|---|---|---|
| 00, 00, 10, 00 | 0 | 0 |
| 00, 00, 15, 00 | 0 | 10 |
| 30, 00, 45, 20 | 0 | 20 |
| 20, 00, 35, 10 | 0 | 40 |
| 20, 35, 50, 00 | 0 | 60 |
| 10, 25, 50, 00 | 0 | 85 |
| 00, 00, 00, 00 | 0 | 95 |
| 00, 00, 00, 00 | 0 | 100 |

All colors mentioned above are simply a matter of taste. I can do all sorts of crazy combinations, like coloring the ocean pink for instance. The most important here is to understand which parts of the World correspond to which parts of the color ramp. The rest is art.
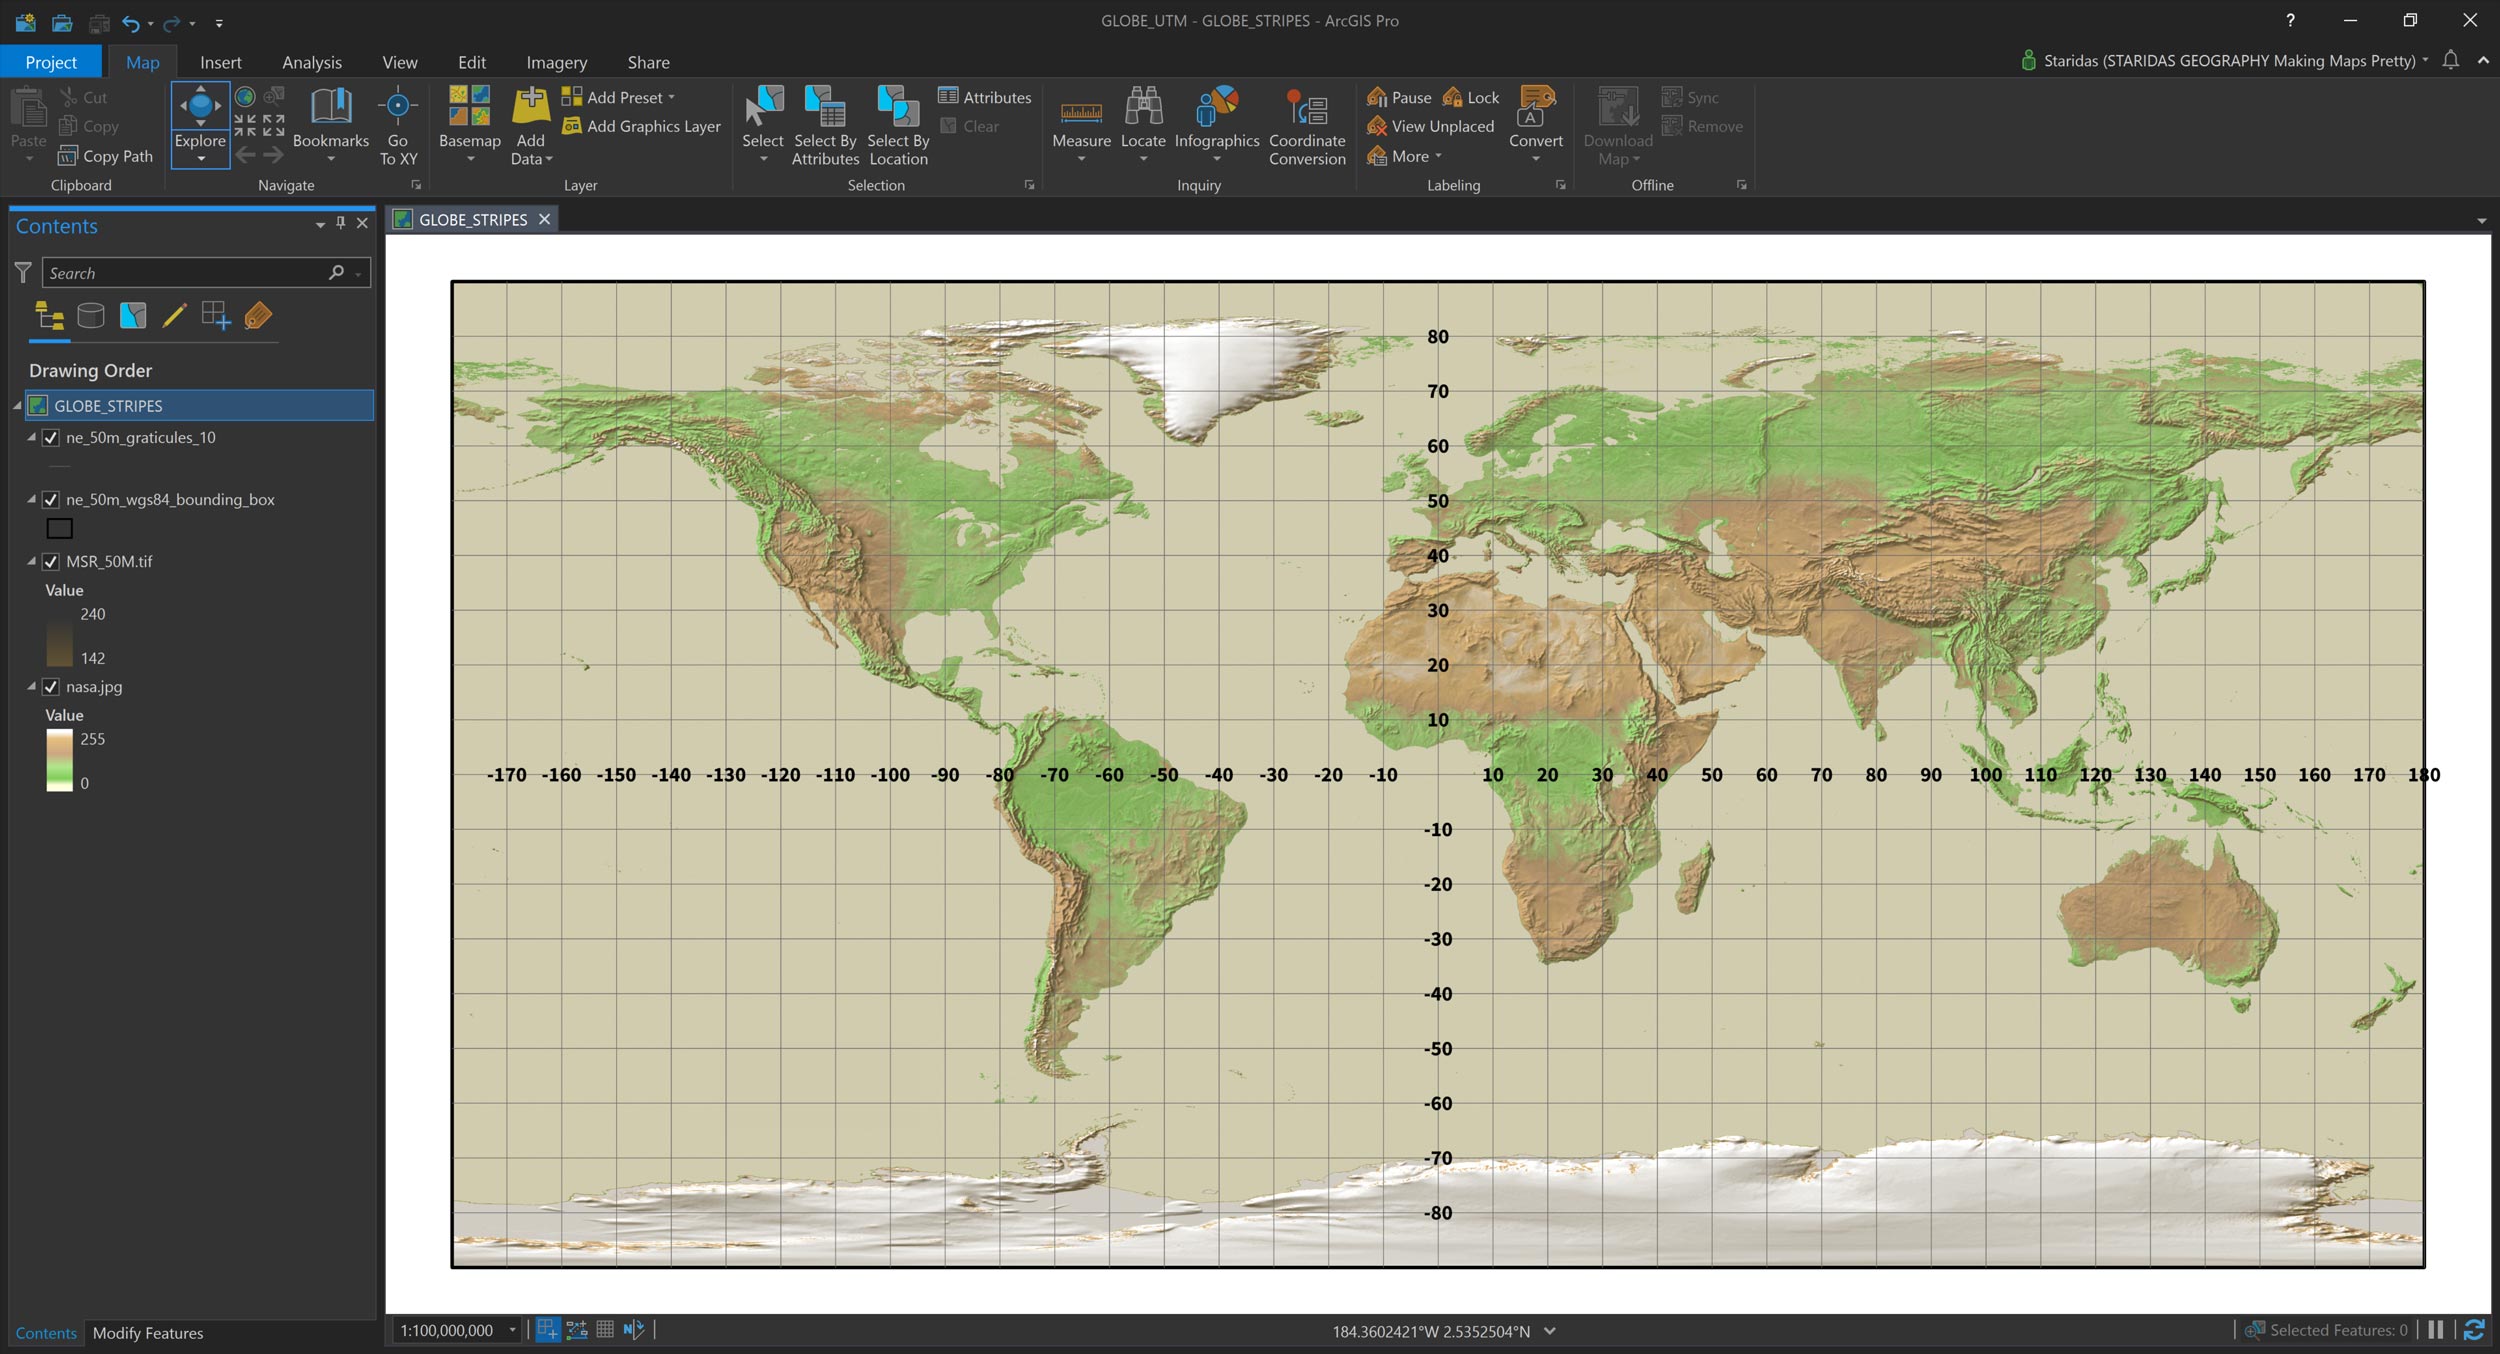
Now, I drag the image below the hillshade layer and I have a shaded simplified global land cover basemap.

Understanding the Graticule
Time to load the grid layer on the map. Firstly, I select the 10 degree intervals grid layer. I turn on the labels and I label it with the degrees of longitude and latitude. Since, I have given a WGS84 coordinate system to the map, I see the whole World spread along the overall longitude and latitude. The map is centered at the meridian zero.
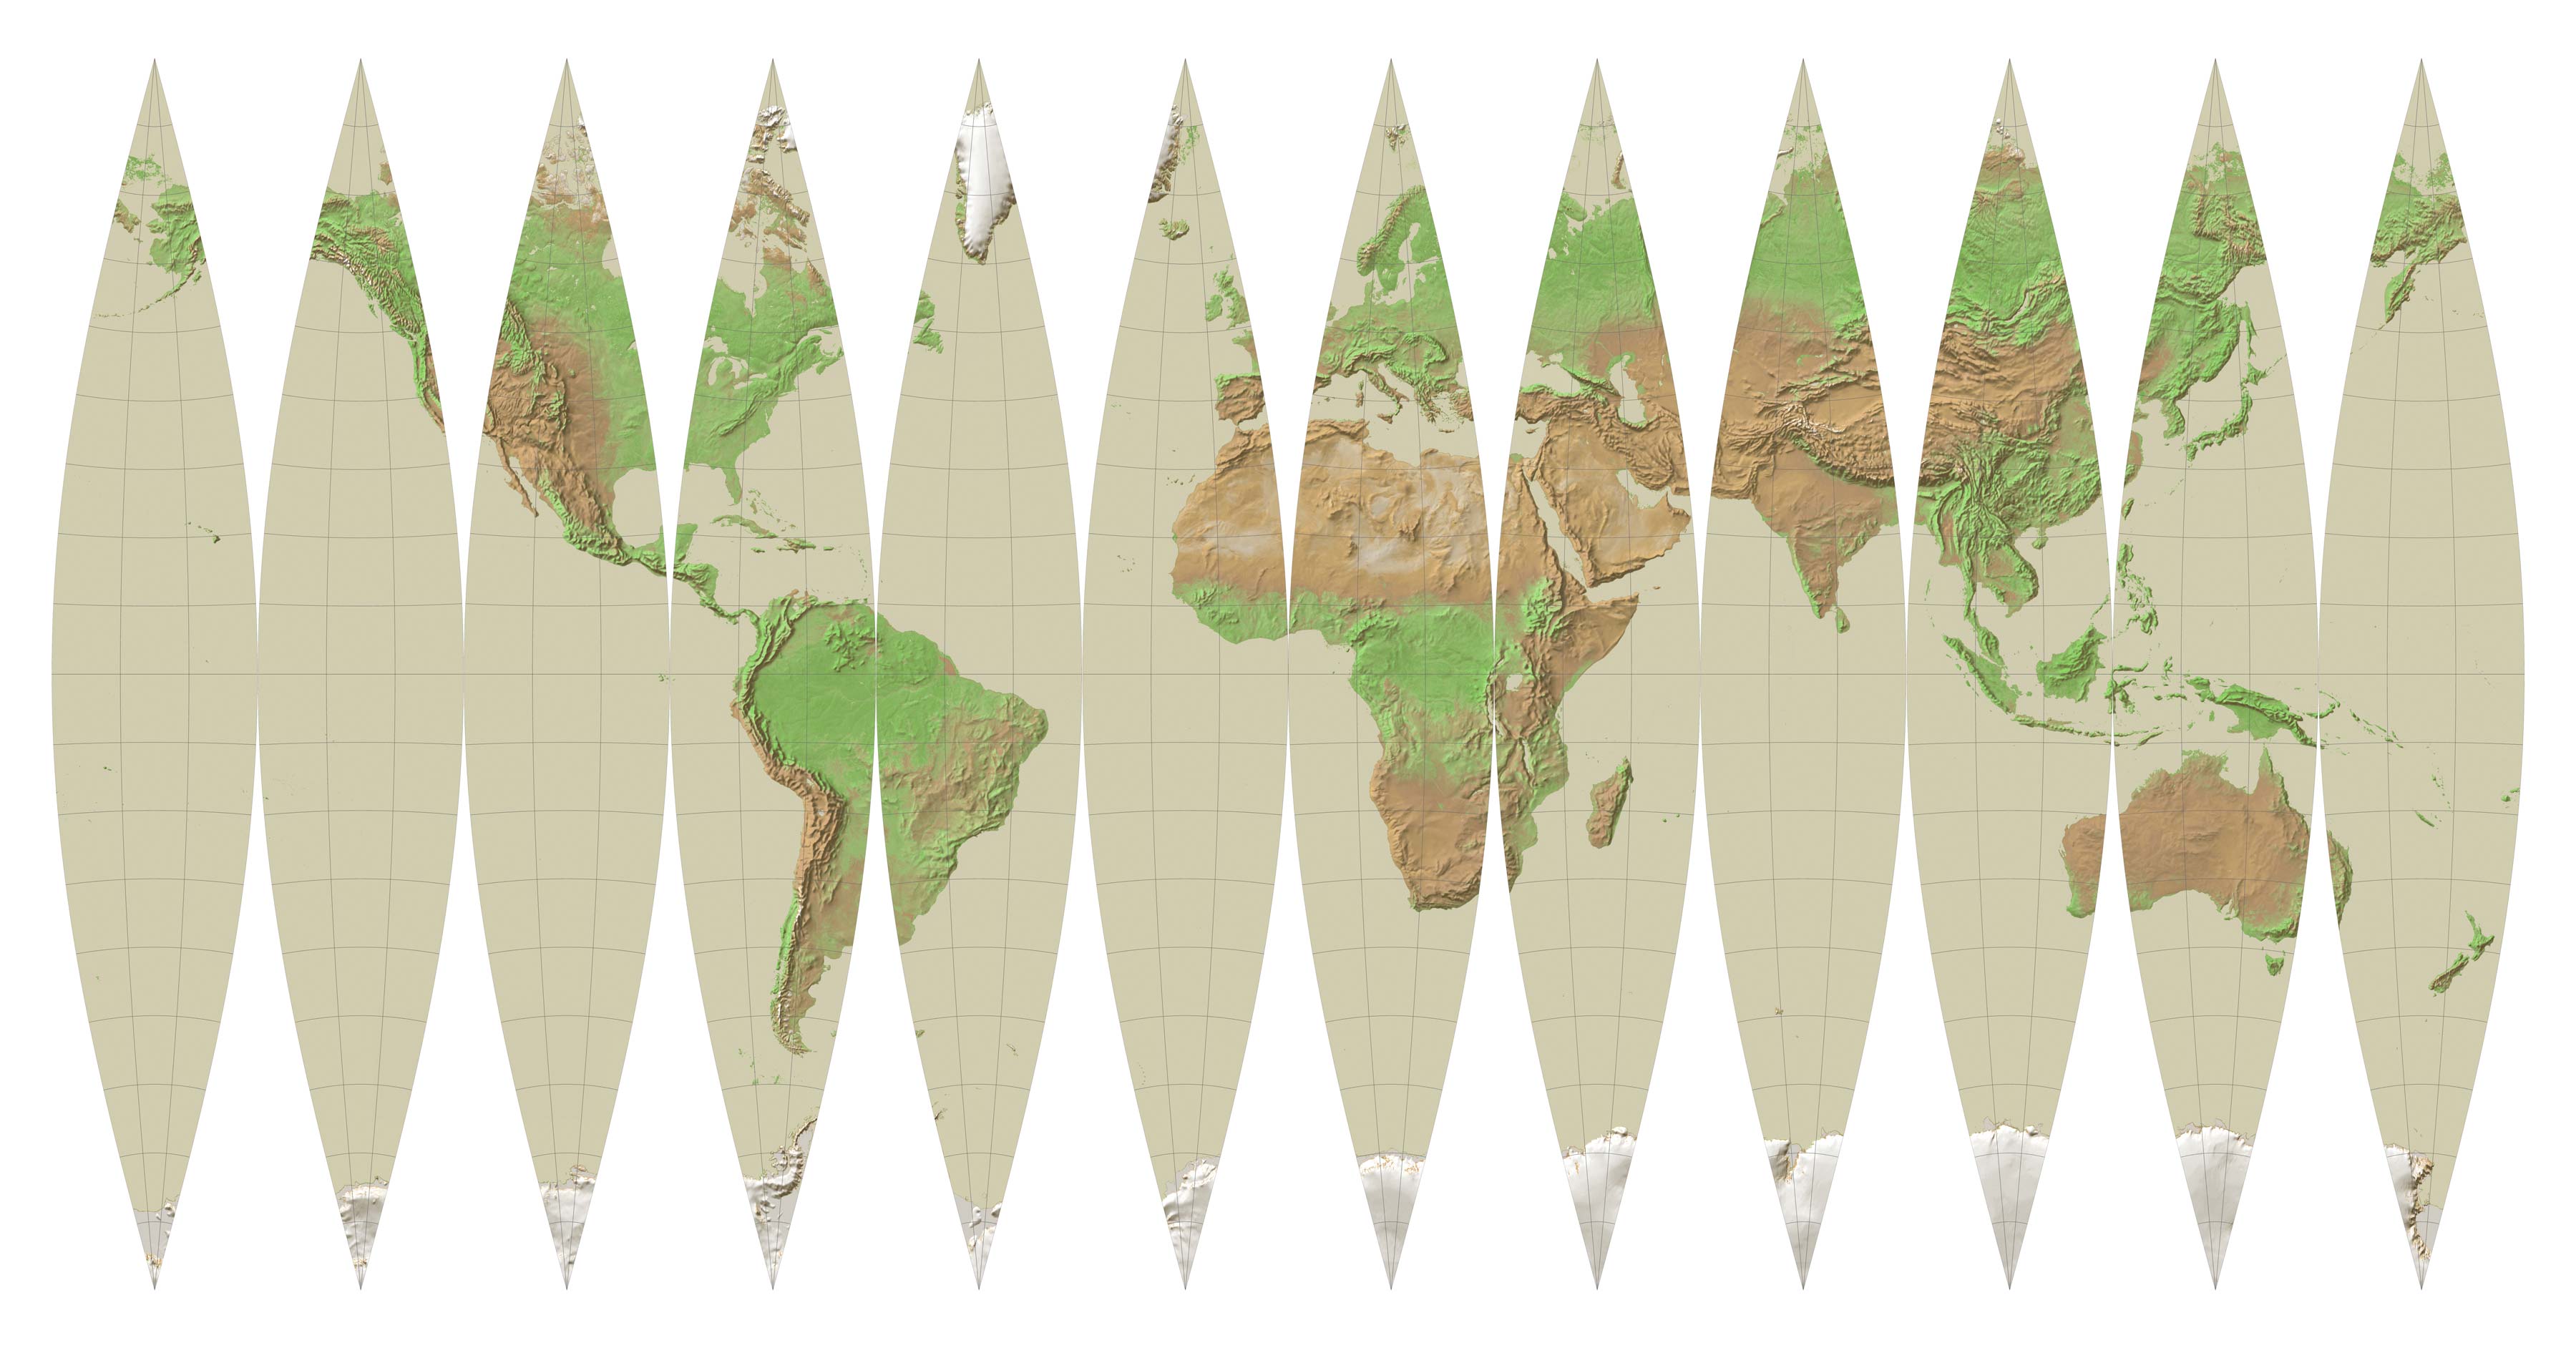
If I want to transform this two dimensional map to a sphere (a Globe) I need somehow to extract stripes off of it, or more specifically to create gores out of it (I like the word stripes, so I’ll keep this for the rest of the article).
I must select a divider of 360, thus I may separate the map to say six stripes of 60 degrees each, twelve stripes of 30 degrees each, or eighteen stripes of 20 degrees each.
I have realised that people in Bellerby & Co usually create their splendid globes out of twelve stripes of 30 degrees each, so I will go with it.
Creating the Stripes
As I stare at the graticule I realize that I must end up with twelve polygons, each one of them having a total width of 30 degrees and a total height of 180 degrees. There are several ways to do such a thing.
One option is to copy the World bounding box to a new layer and divide it in twelve equal parts. Another way is to create a new layer of 30 degrees width and then make eleven copies out of it.
The most important thing to consider is that these polygons should have dense vertices in equal intervals. This is crucial for the stage where I change the coordinate system, where the edges of the polygons are no longer straight lines, but curves.
Again there is an easy way to do this, by applying a densify tool for instance, and a hard way which is to manually create these polygons.
I will go the hard way, so I load on the map the grid with 1 degree intervals and I also create a new empty polygon layer to store my edits.

I name STRIPES the polygon layer, I turn on the snapping options and I start creating a new polygon feature. I click on every intersection of the 1 degree graticule, so I produce a polygon with very dense vertices, every 1 degree.
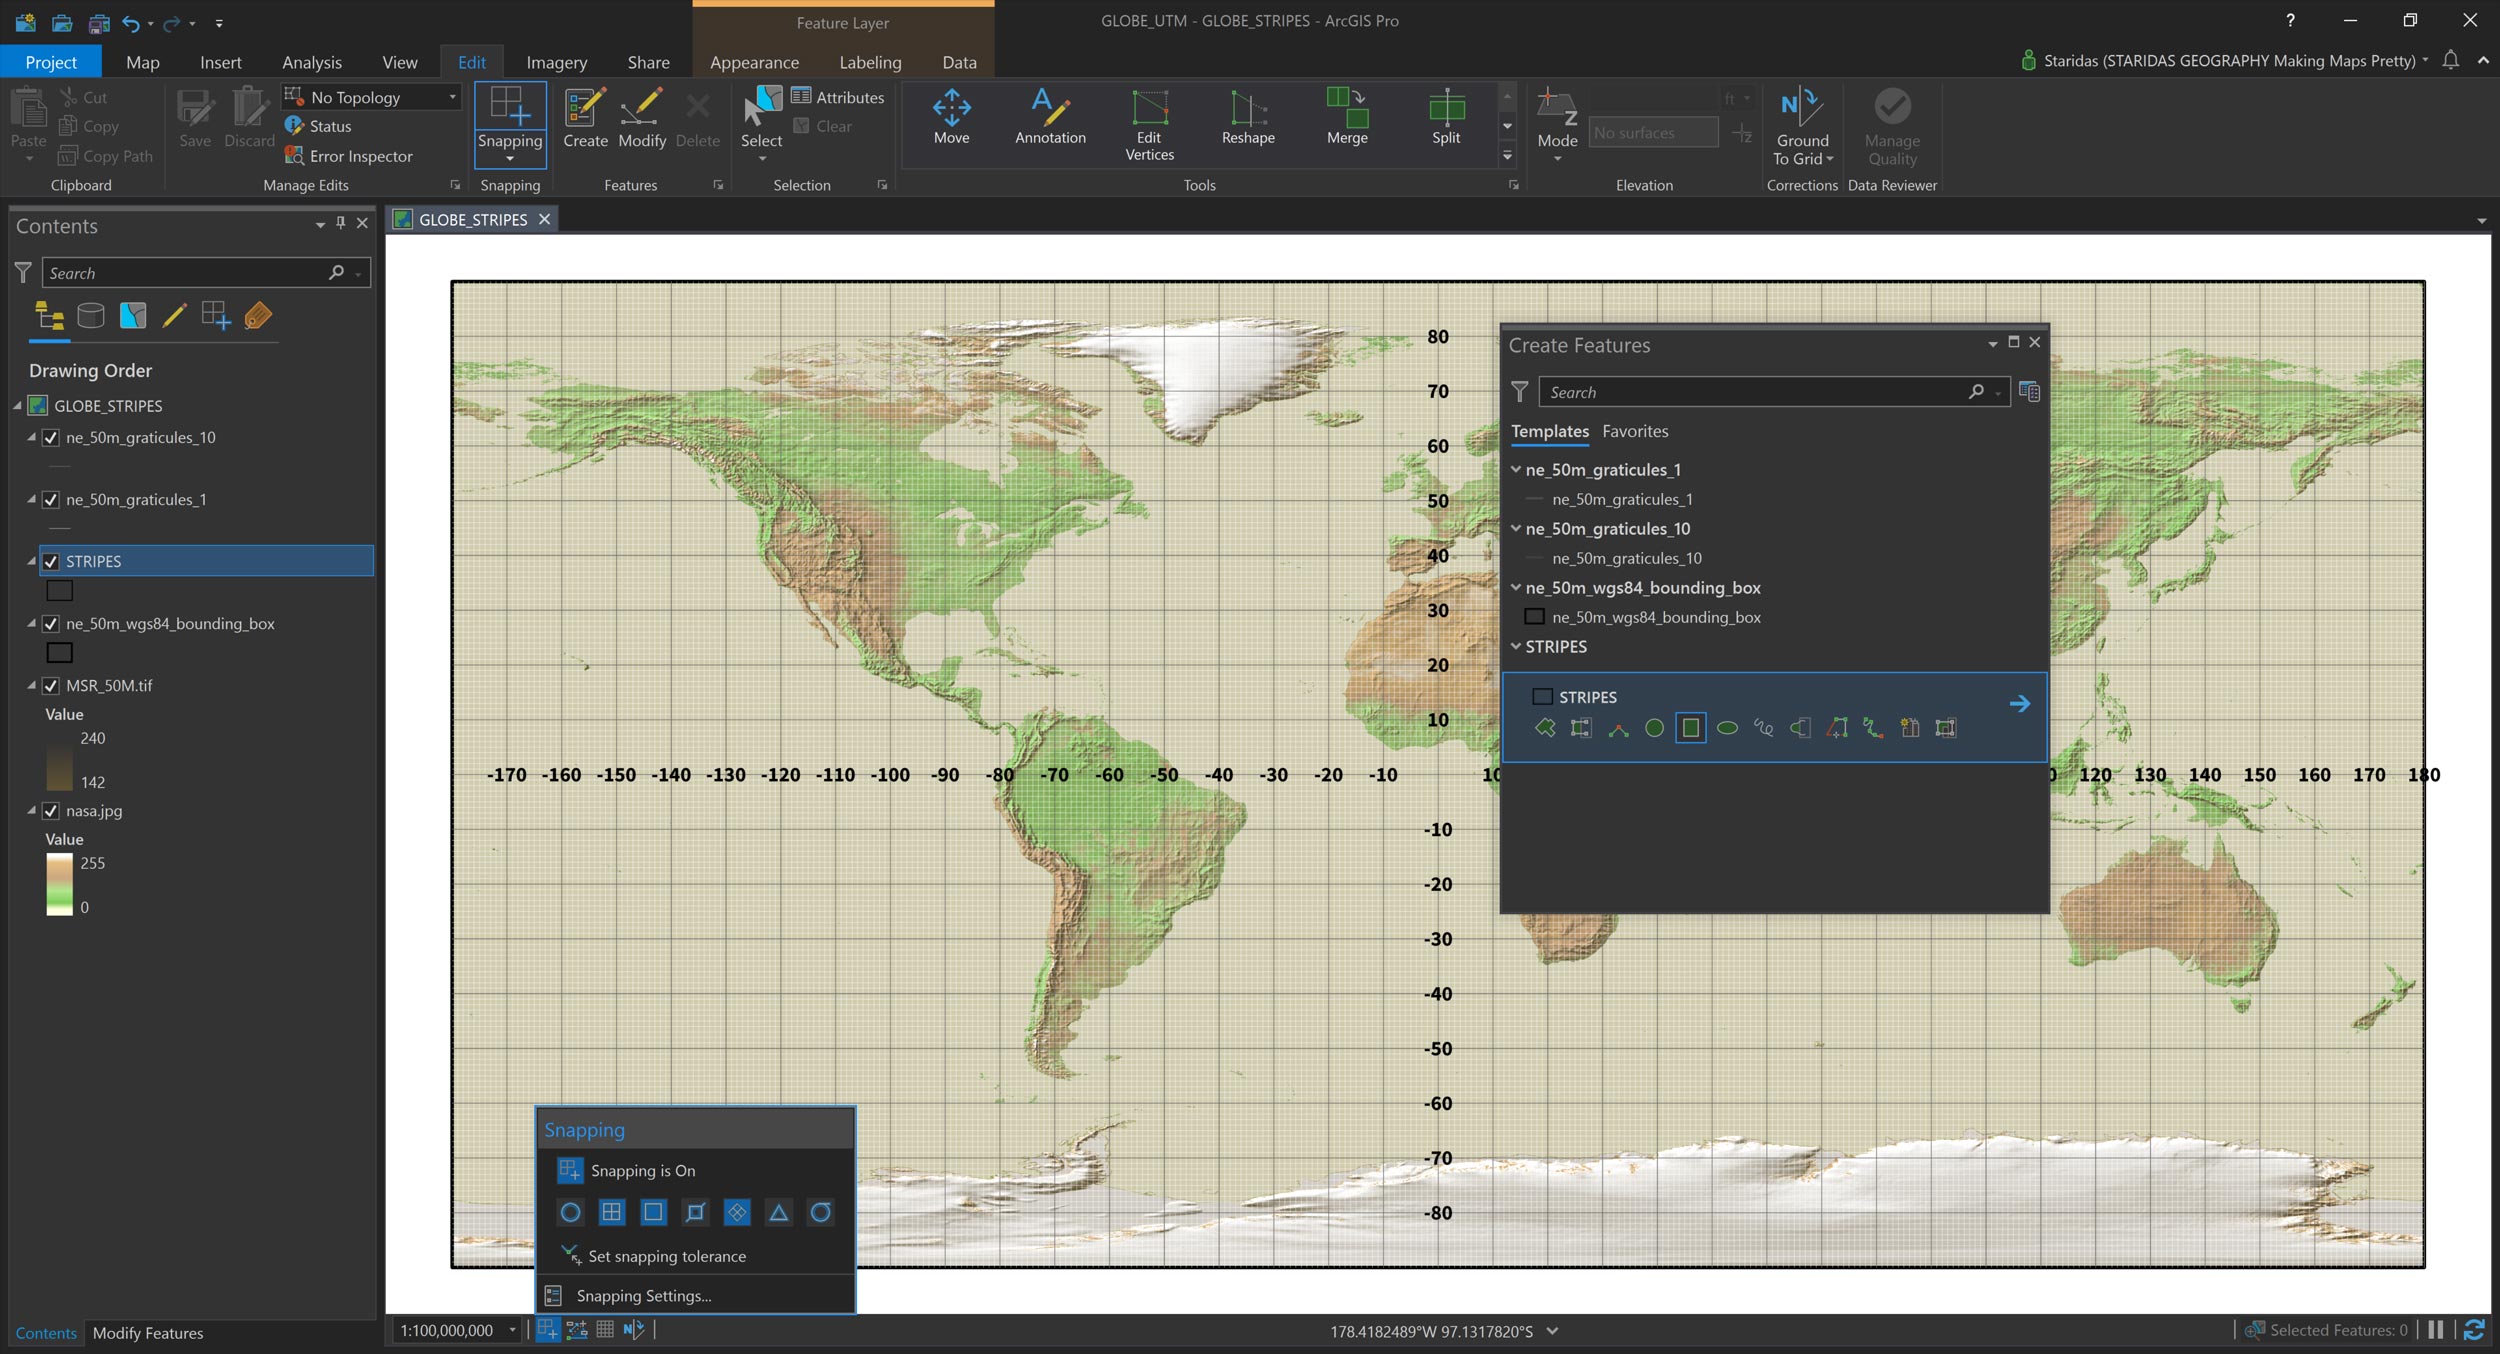
I firstly created a polygon of 30 degrees wide and then I made eleven copies. I ended up with twelve polygons of equal width (30 degrees).
| STRIPE ID | Longitude MIN | Central Meridian | Longitude MAX |
|---|---|---|---|
| 1 | -180 | -165 | -150 |
| 2 | -150 | -135 | -120 |
| 3 | -120 | -105 | -90 |
| 4 | -90 | -75 | -60 |
| 5 | -60 | -45 | -30 |
| 6 | -30 | -15 | 0 |
| 7 | 0 | 15 | 30 |
| 8 | 30 | 45 | 60 |
| 9 | 60 | 75 | 90 |
| 10 | 90 | 105 | 120 |
| 11 | 120 | 135 | 150 |
| 12 | 150 | 165 | 180 |

I have published my STRIPES layer as a hosted feature service on my ArcGIS Online account, which one may use under a CC BY-NC-SA 4.0 licence.
Sculpt the Globe
Time to change the coordinate system of the map. I used to apply a Transverse Mercator projection which worked perfectly, but after reading this magnificent blog post by John Nelson on how to Make this Cassini Globe Ornament I decided to try the suggested Cassini projection.
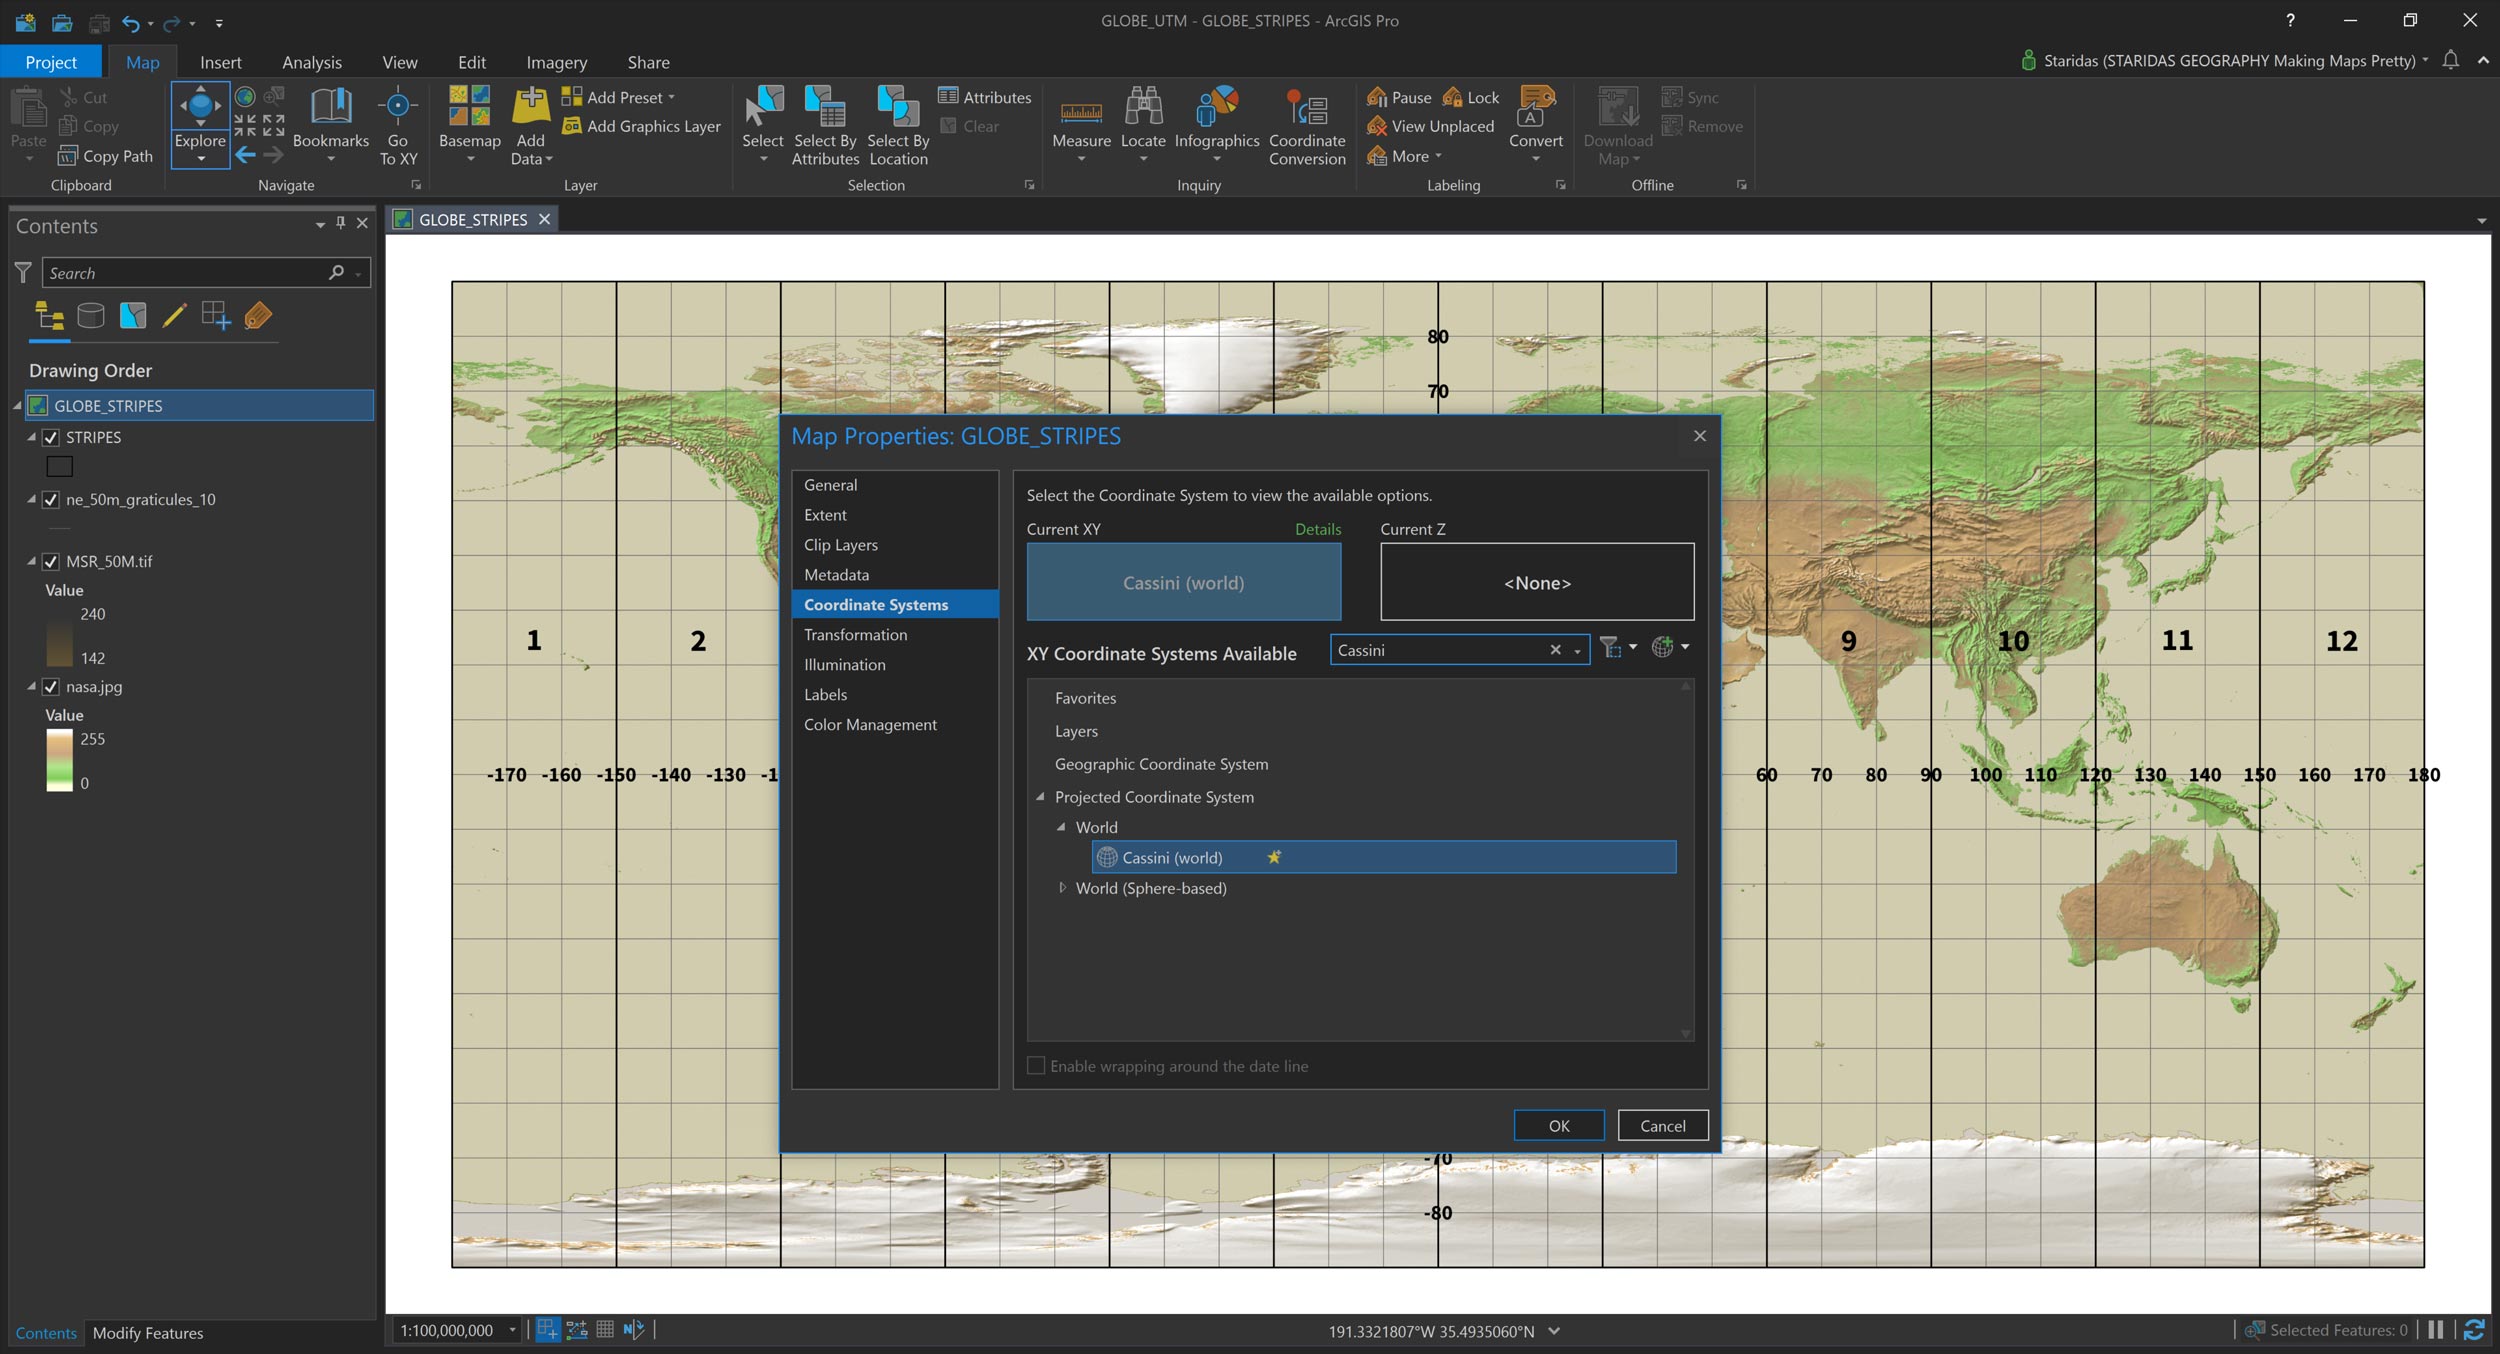
So, I go to the Map Properties and at the Coordinate Systems tab I search for the Cassini projected coordinate system and I select it. The map changes and I no longer see the whole World, but only an aspect of it.
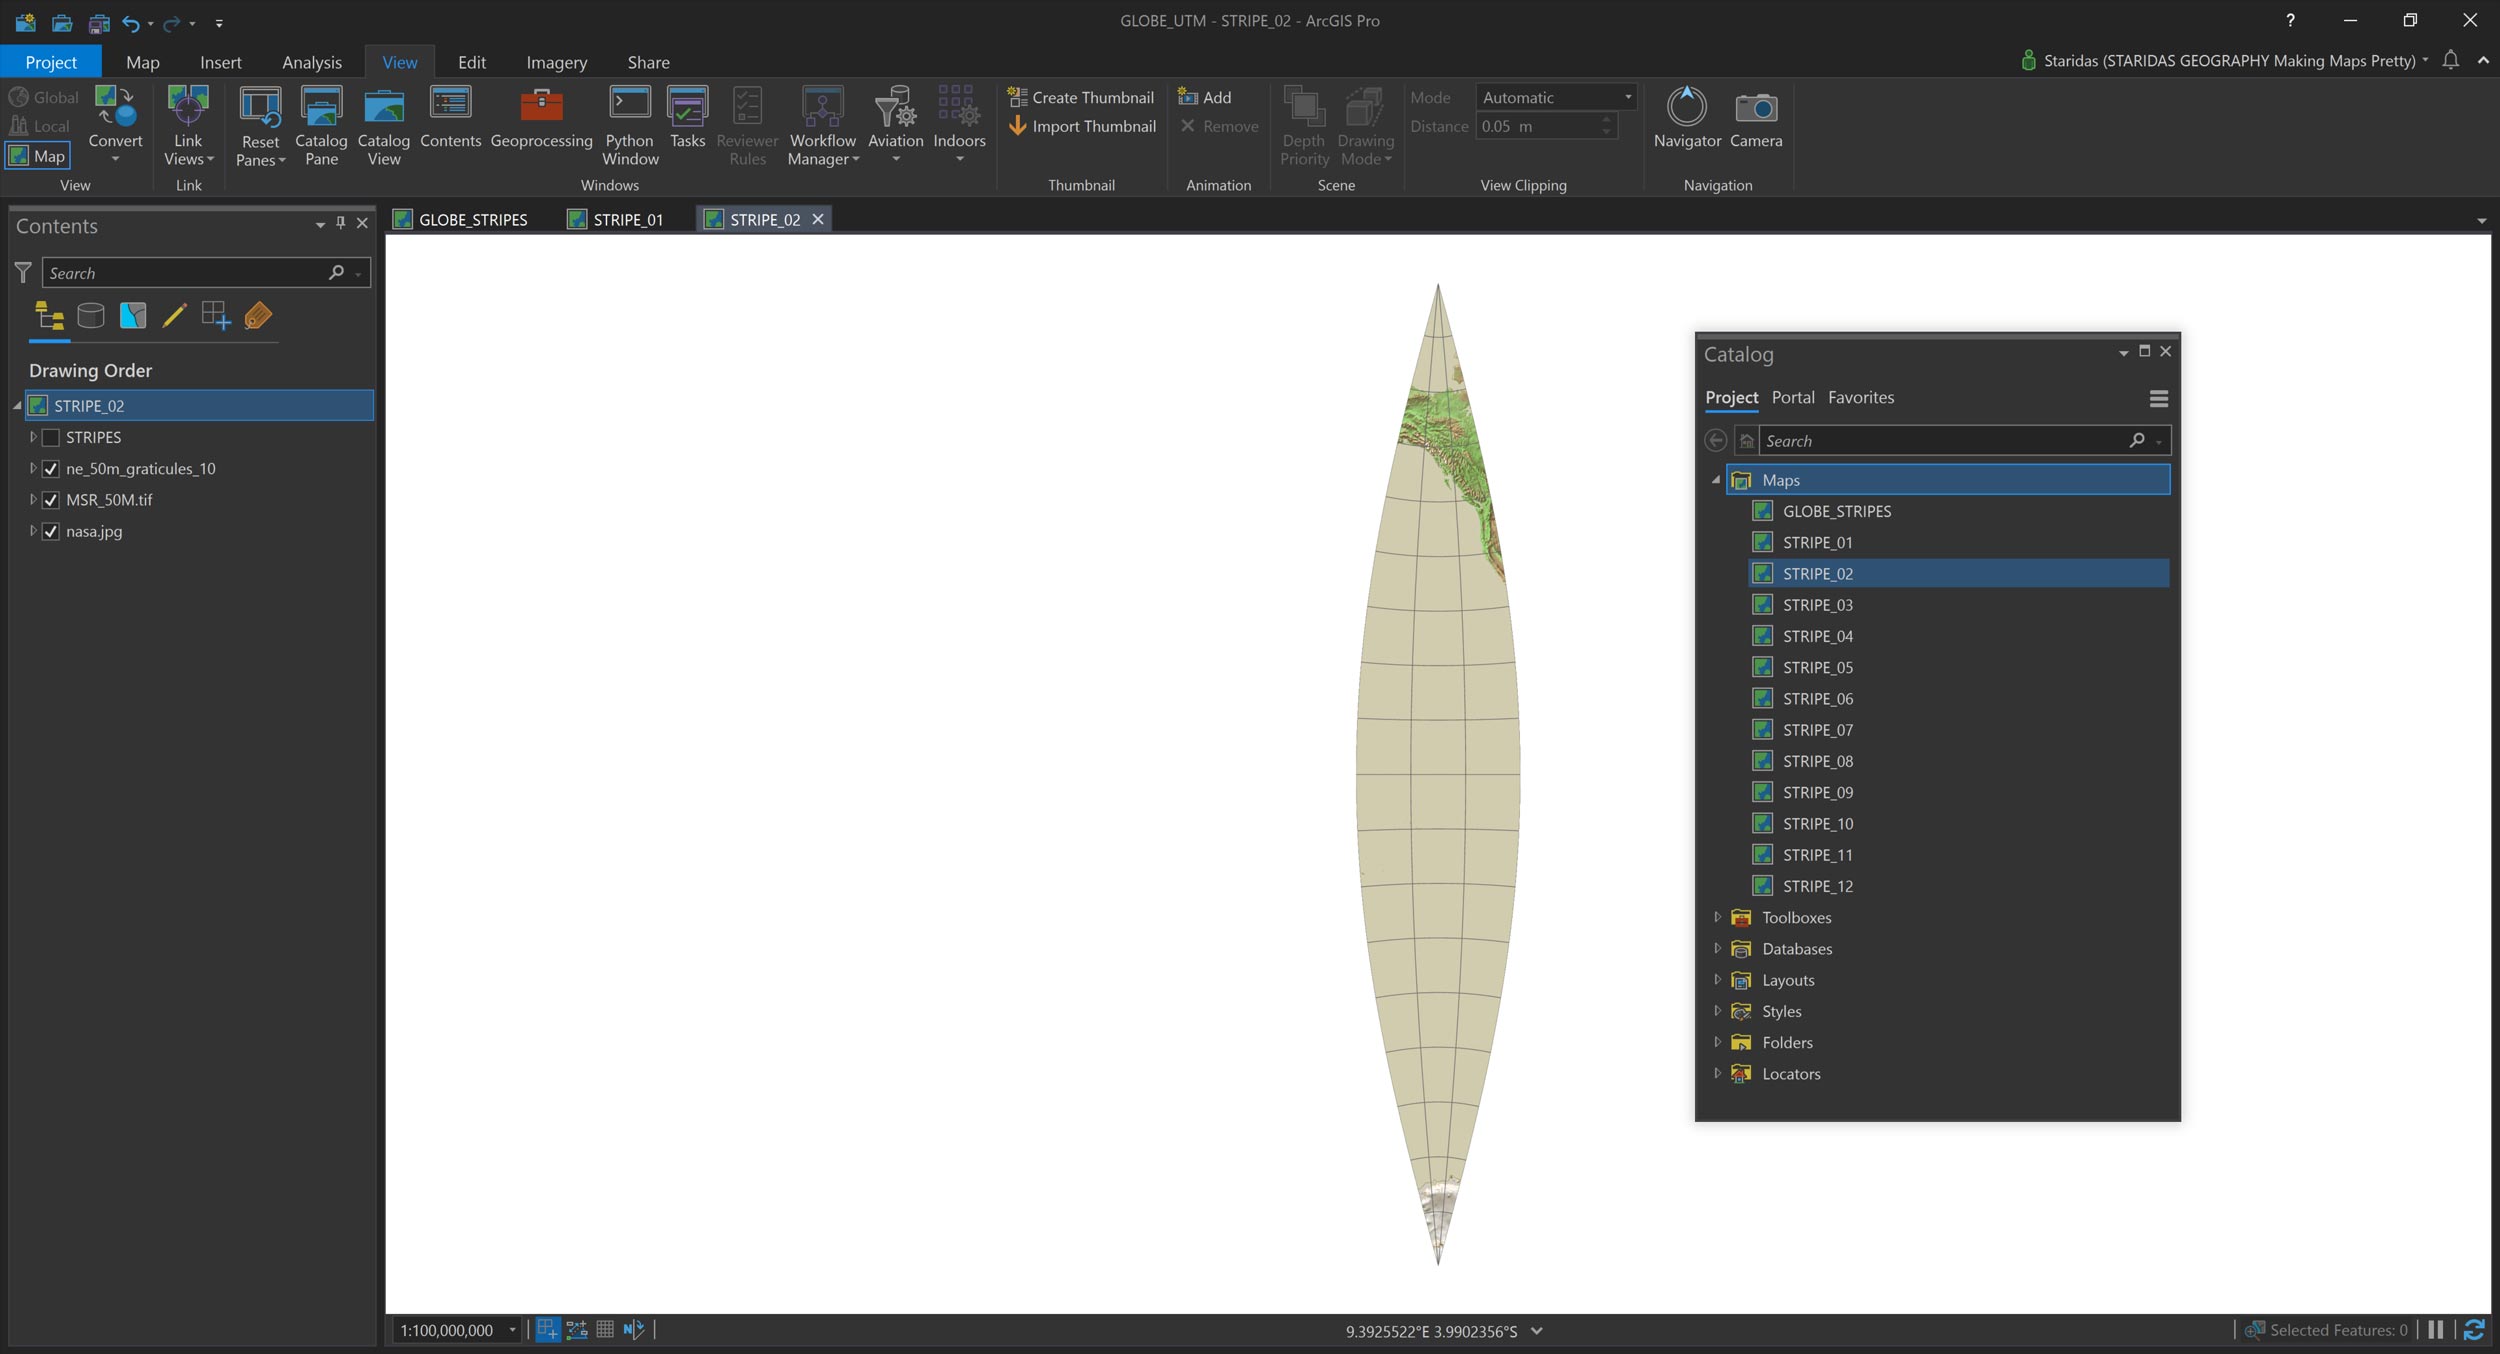
I also observe that the polygons I created earlier are now actually starting to look like stripes (gores).

I want to center at the first stripe, so I open once again the Map Properties, I copy the selected projection and I change the value of the Central Meridian from 0 to -165.


The map is now centered at the first stripe, but it extends beyond the desired range of longitude degrees. I want a steady 30 degrees width, while at the moment it extends to 90 degrees, so I need somehow to clip it.

Before proceeding to clipping, I open the properties of the STRIPES layer and at the Definition Query tab I select only the first polygon to be shown.


Back to the Map Properties, at the Clip Layers tab, I select the Clip to the outline of features option from the dropdown list and I select the STRIPES layer, which is limited to only one feature because of the query I performed.

I hit OK and I am done! I just produced the first stripe (gore) of my globe!

To produce the rest eleven I only have to copy the map eleven times and for each map to change the central meridian and of course to query the correspondent feature from the STRIPES layer.
Spread the Globe
Provided I created all twelve stripes by repeating the steps described in the previous paragraphs, I am ready to spread them on a single layout.
I simply add twelve map frames, one for each map. All map frames must have equal dimensions and of course the same map scale. This demands a little of trial and error to find the appropriate combination of dimensions and scale.
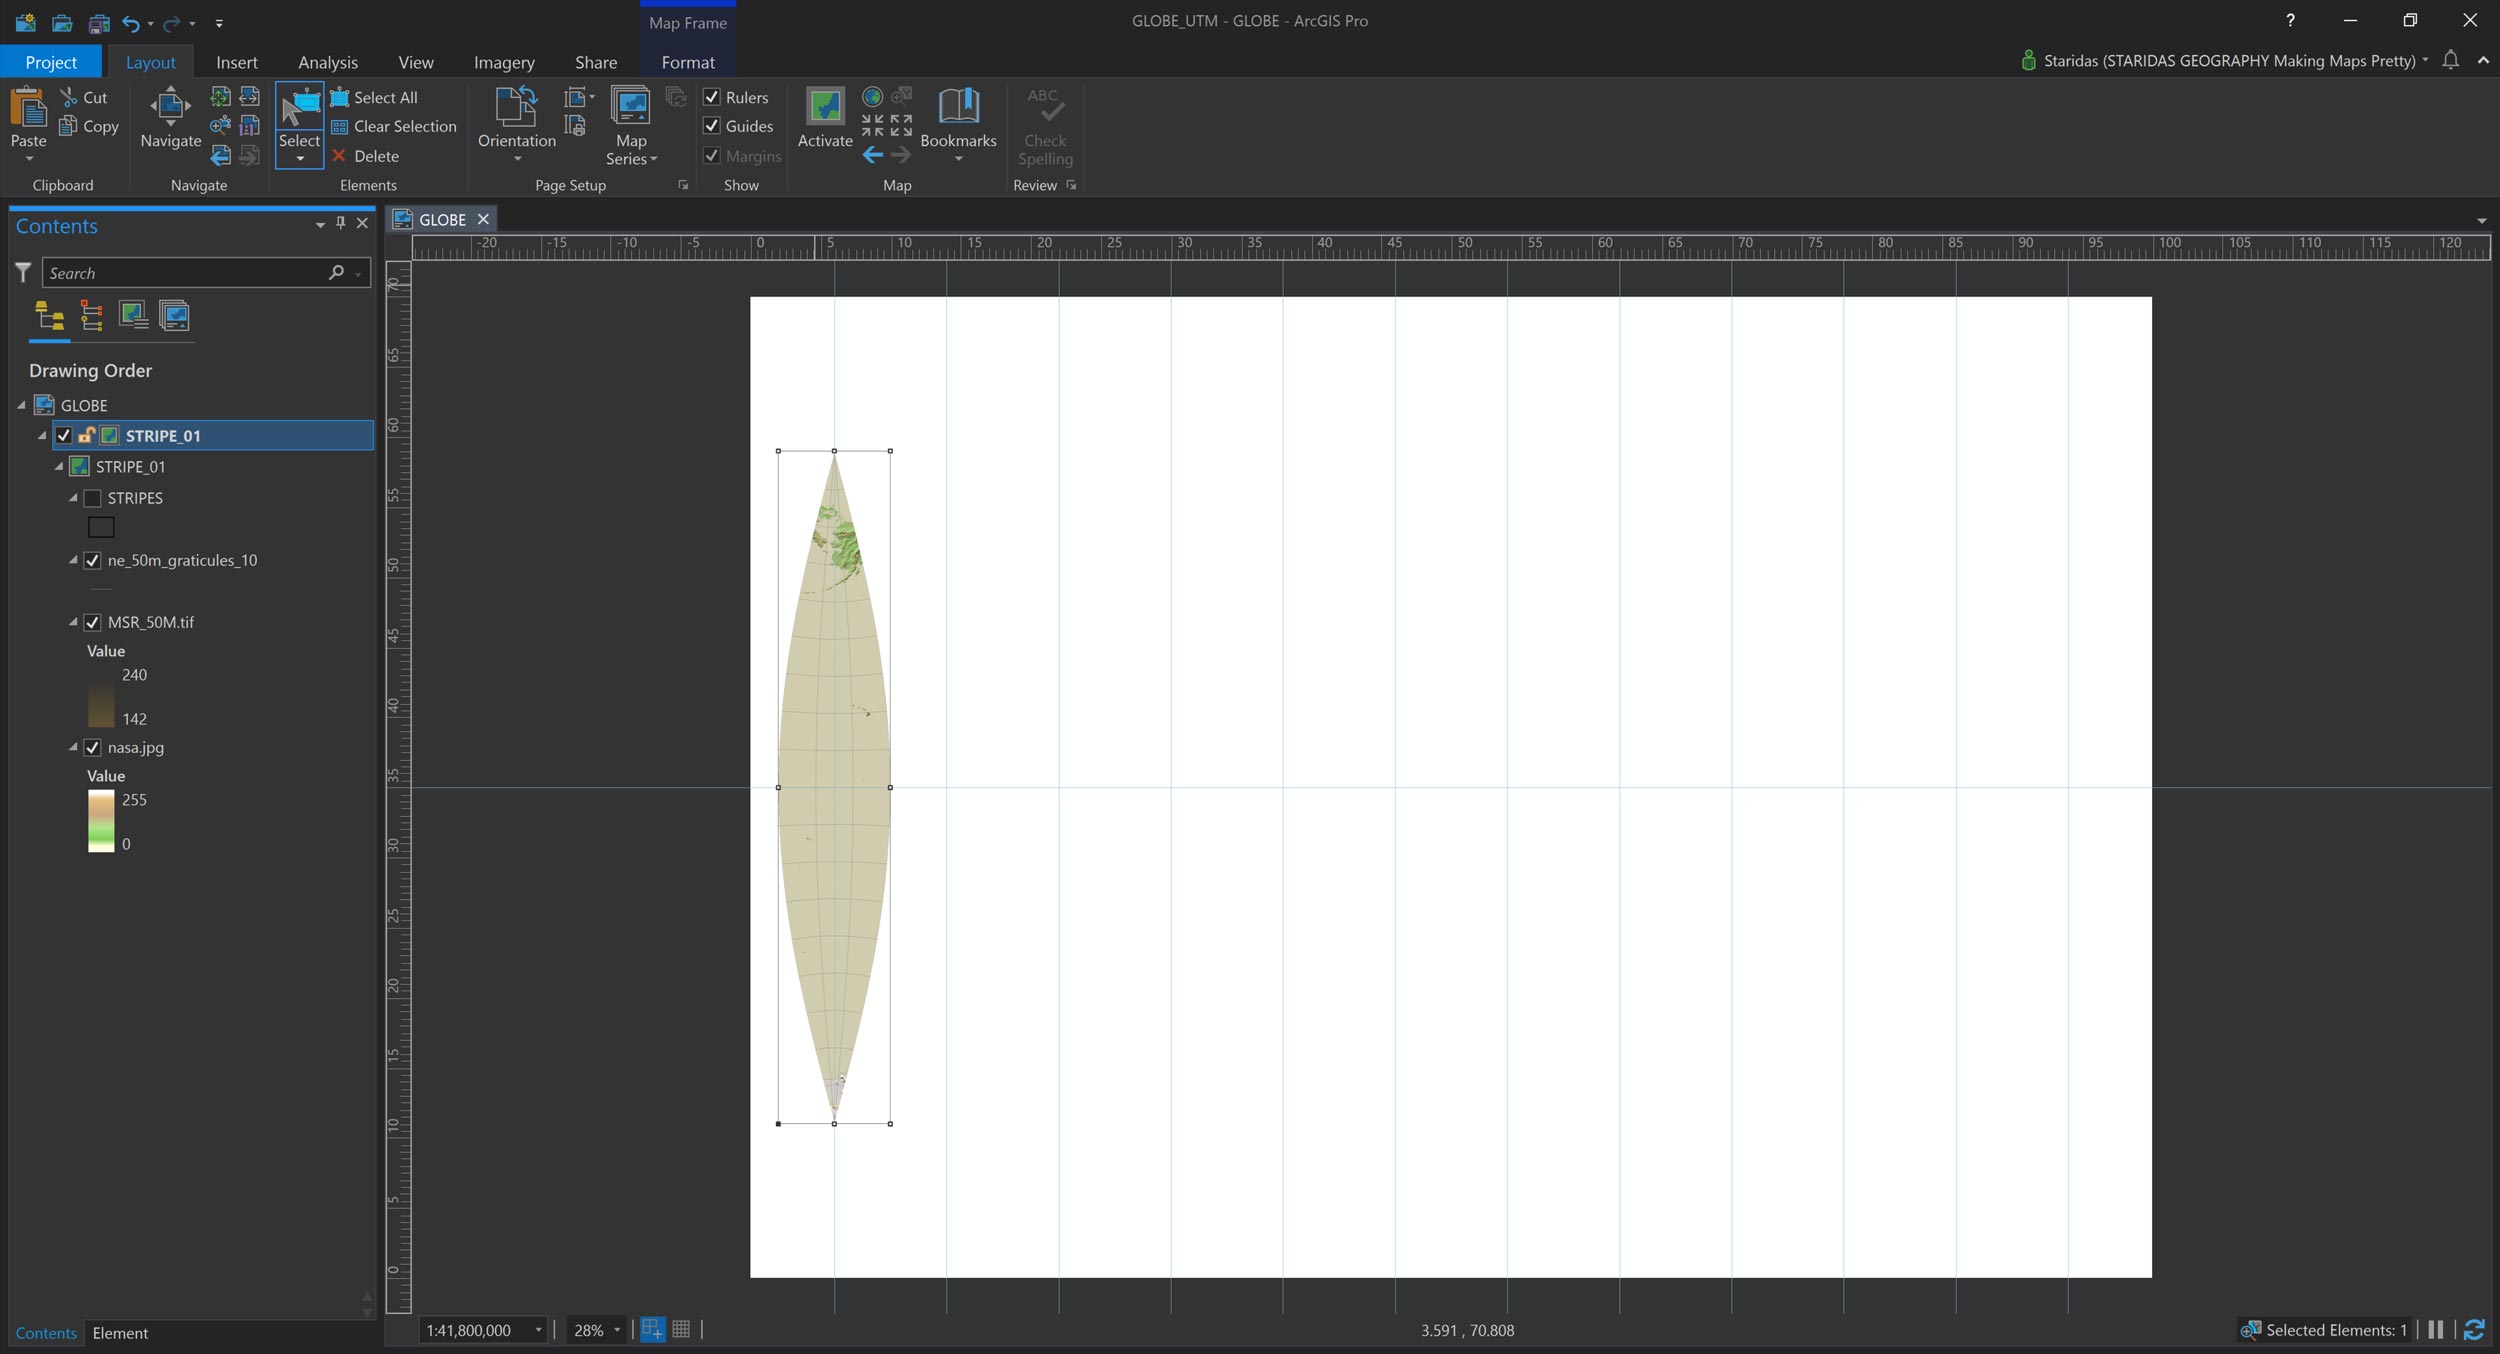
One useful tip is that the ratio of width/height for each map frame must be 30/180 or 1/6. In my example, each map frame has width 8cm and height 48cm.
It is also important that every map frame is completely adjacent to its neighbours to give the illusion of continuity. For this, the Guides of the layout view are really helpful.

Final touch the information associated with the map, like the title, a scale bar, credits, attribution and my logo.


That’s it!
In case you want to give it a try, you may use the STRIPES layer, which I have published as a hosted feature service on my ArcGIS Online account, under a CC BY-NC-SA 4.0 licence.
Kindest regards from Crete, Greece
Spiros