While certain Android users can expand their device’s storage, the onboard RAM is usually the same. In this case, if you see a visible lag or the device keeps freezing when doing the easiest tasks, like sending a message, consider clearing the RAM on your Android phone.
There are many ways to clear the RAM on your Android phone. However, this all depends on what is occupying the excess memory. This can be anything from an unwanted app to a recently added widget. But what happens when you free up RAM on Android? Let’s find out.
What Happens When You Clear the Android Phone RAM
Let us quickly look at what happens when you clear the RAM on your Android phone.
- Stops random app crashes: Clearing the RAM frees it up for other apps. This can help make the memory for the apps you currently use, preventing them from crashing due to the lack of device memory.
- Prevents battery drain: Ample memory helps your device manage other processes better. This can save your device’s battery life in the long run. However, certain other factors can influence this.
- Improves multitasking speed: Switching between apps is often a memory-intensive process. If sufficient device RAM is unavailable, there can be lags or app crashes when switching. Clearing the RAM helps your device keep up with your multitasking requirements.
- Reduces app loading time: When you open an app, it uses your device’s resources to load it and its contents. This time can be significantly reduced if your Android device has sufficient RAM.
How to Clear RAM on Your Android Phone
Now that we know more about how clearing the RAM impacts your Android phone, let us look at 6 ways to free up RAM on Android.
1. Using the Force Stop Option
Certain apps can occupy more memory than others. You can see these apps from your device’s developer options. Then, use the Settings menu to force the app to close, thus ending all of its background processes for the time being. To do this, here’s how to enable developer options and check the memory usage on your Android device.
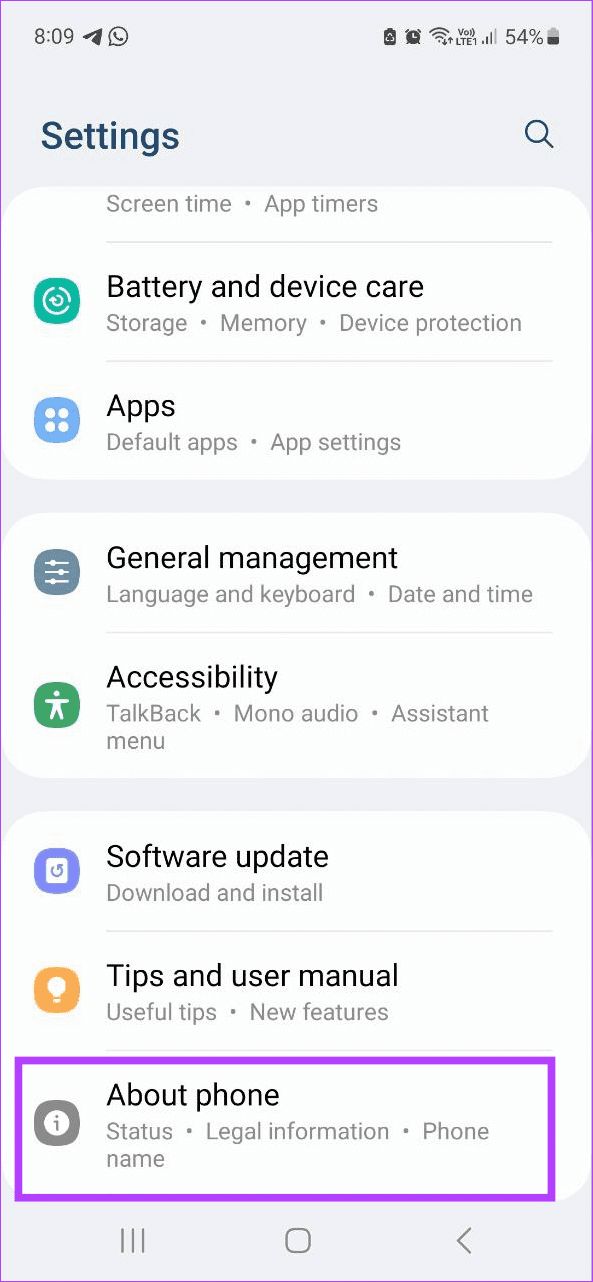
Step 1: Open Settings and tap on About phone.
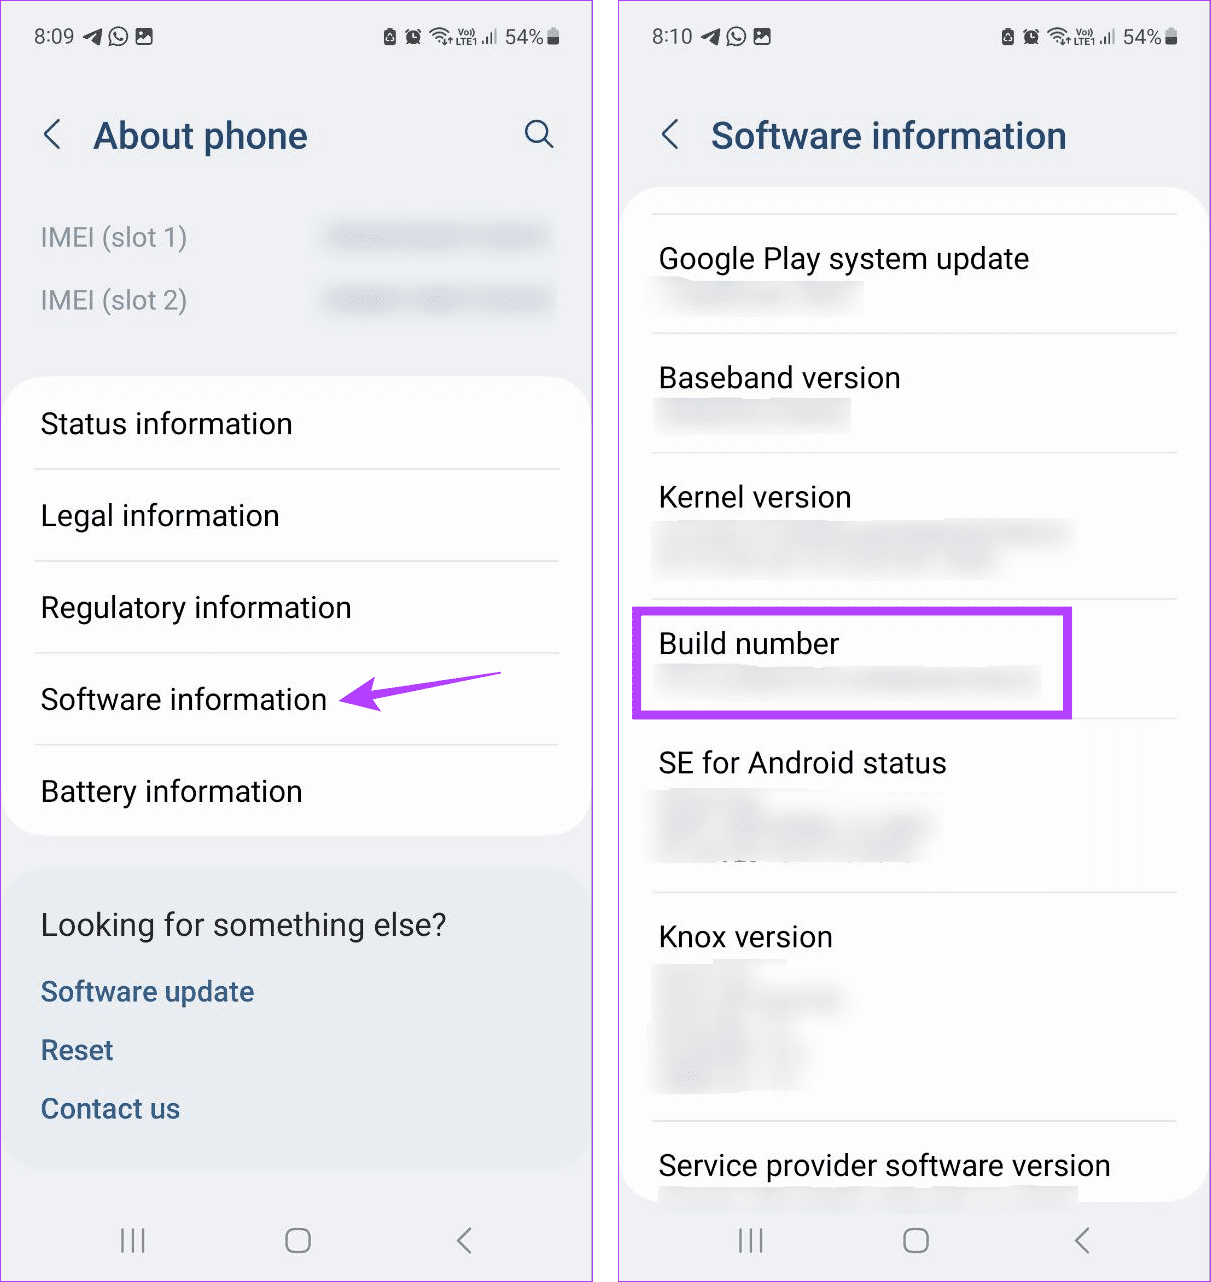
Step 2: Tap on Software information. Then, quickly tap on Build number five or seven times in a row.
Enter your device PIN or password to enable developer options.
Tip: Check our guide if developer options are not showing up on Android.
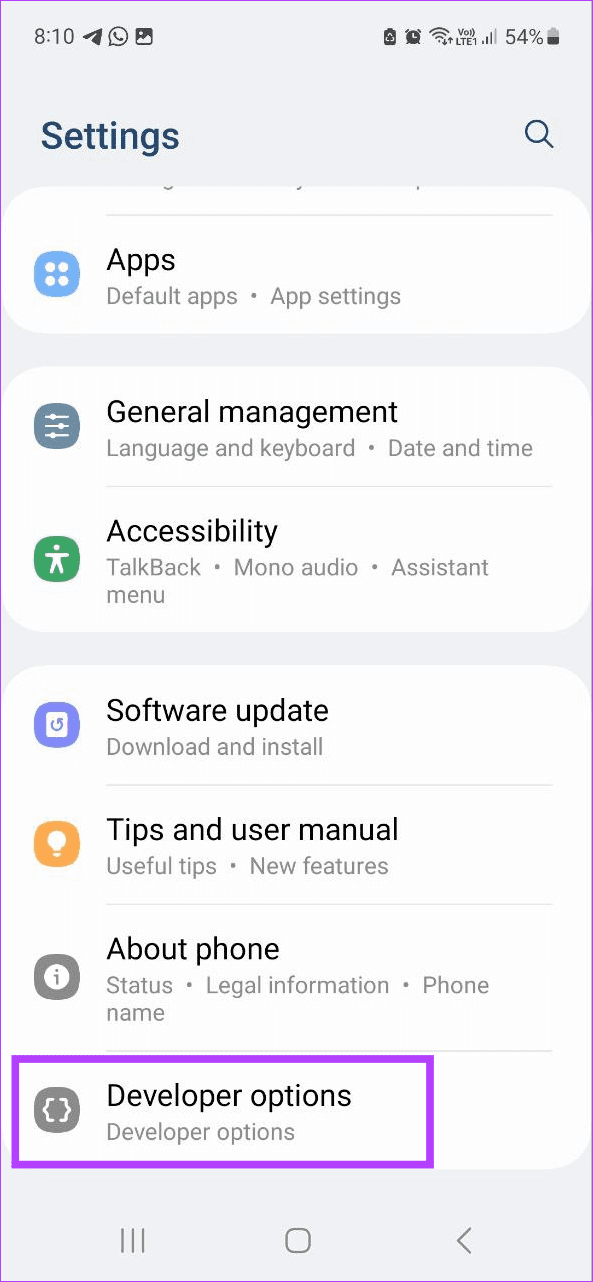
Step 3: Now, go back to the Settings page and tap on Developer options.
Step 4: Then, tap on Memory.

Step 5: Here, use the drop-down to select the relevant memory usage duration.
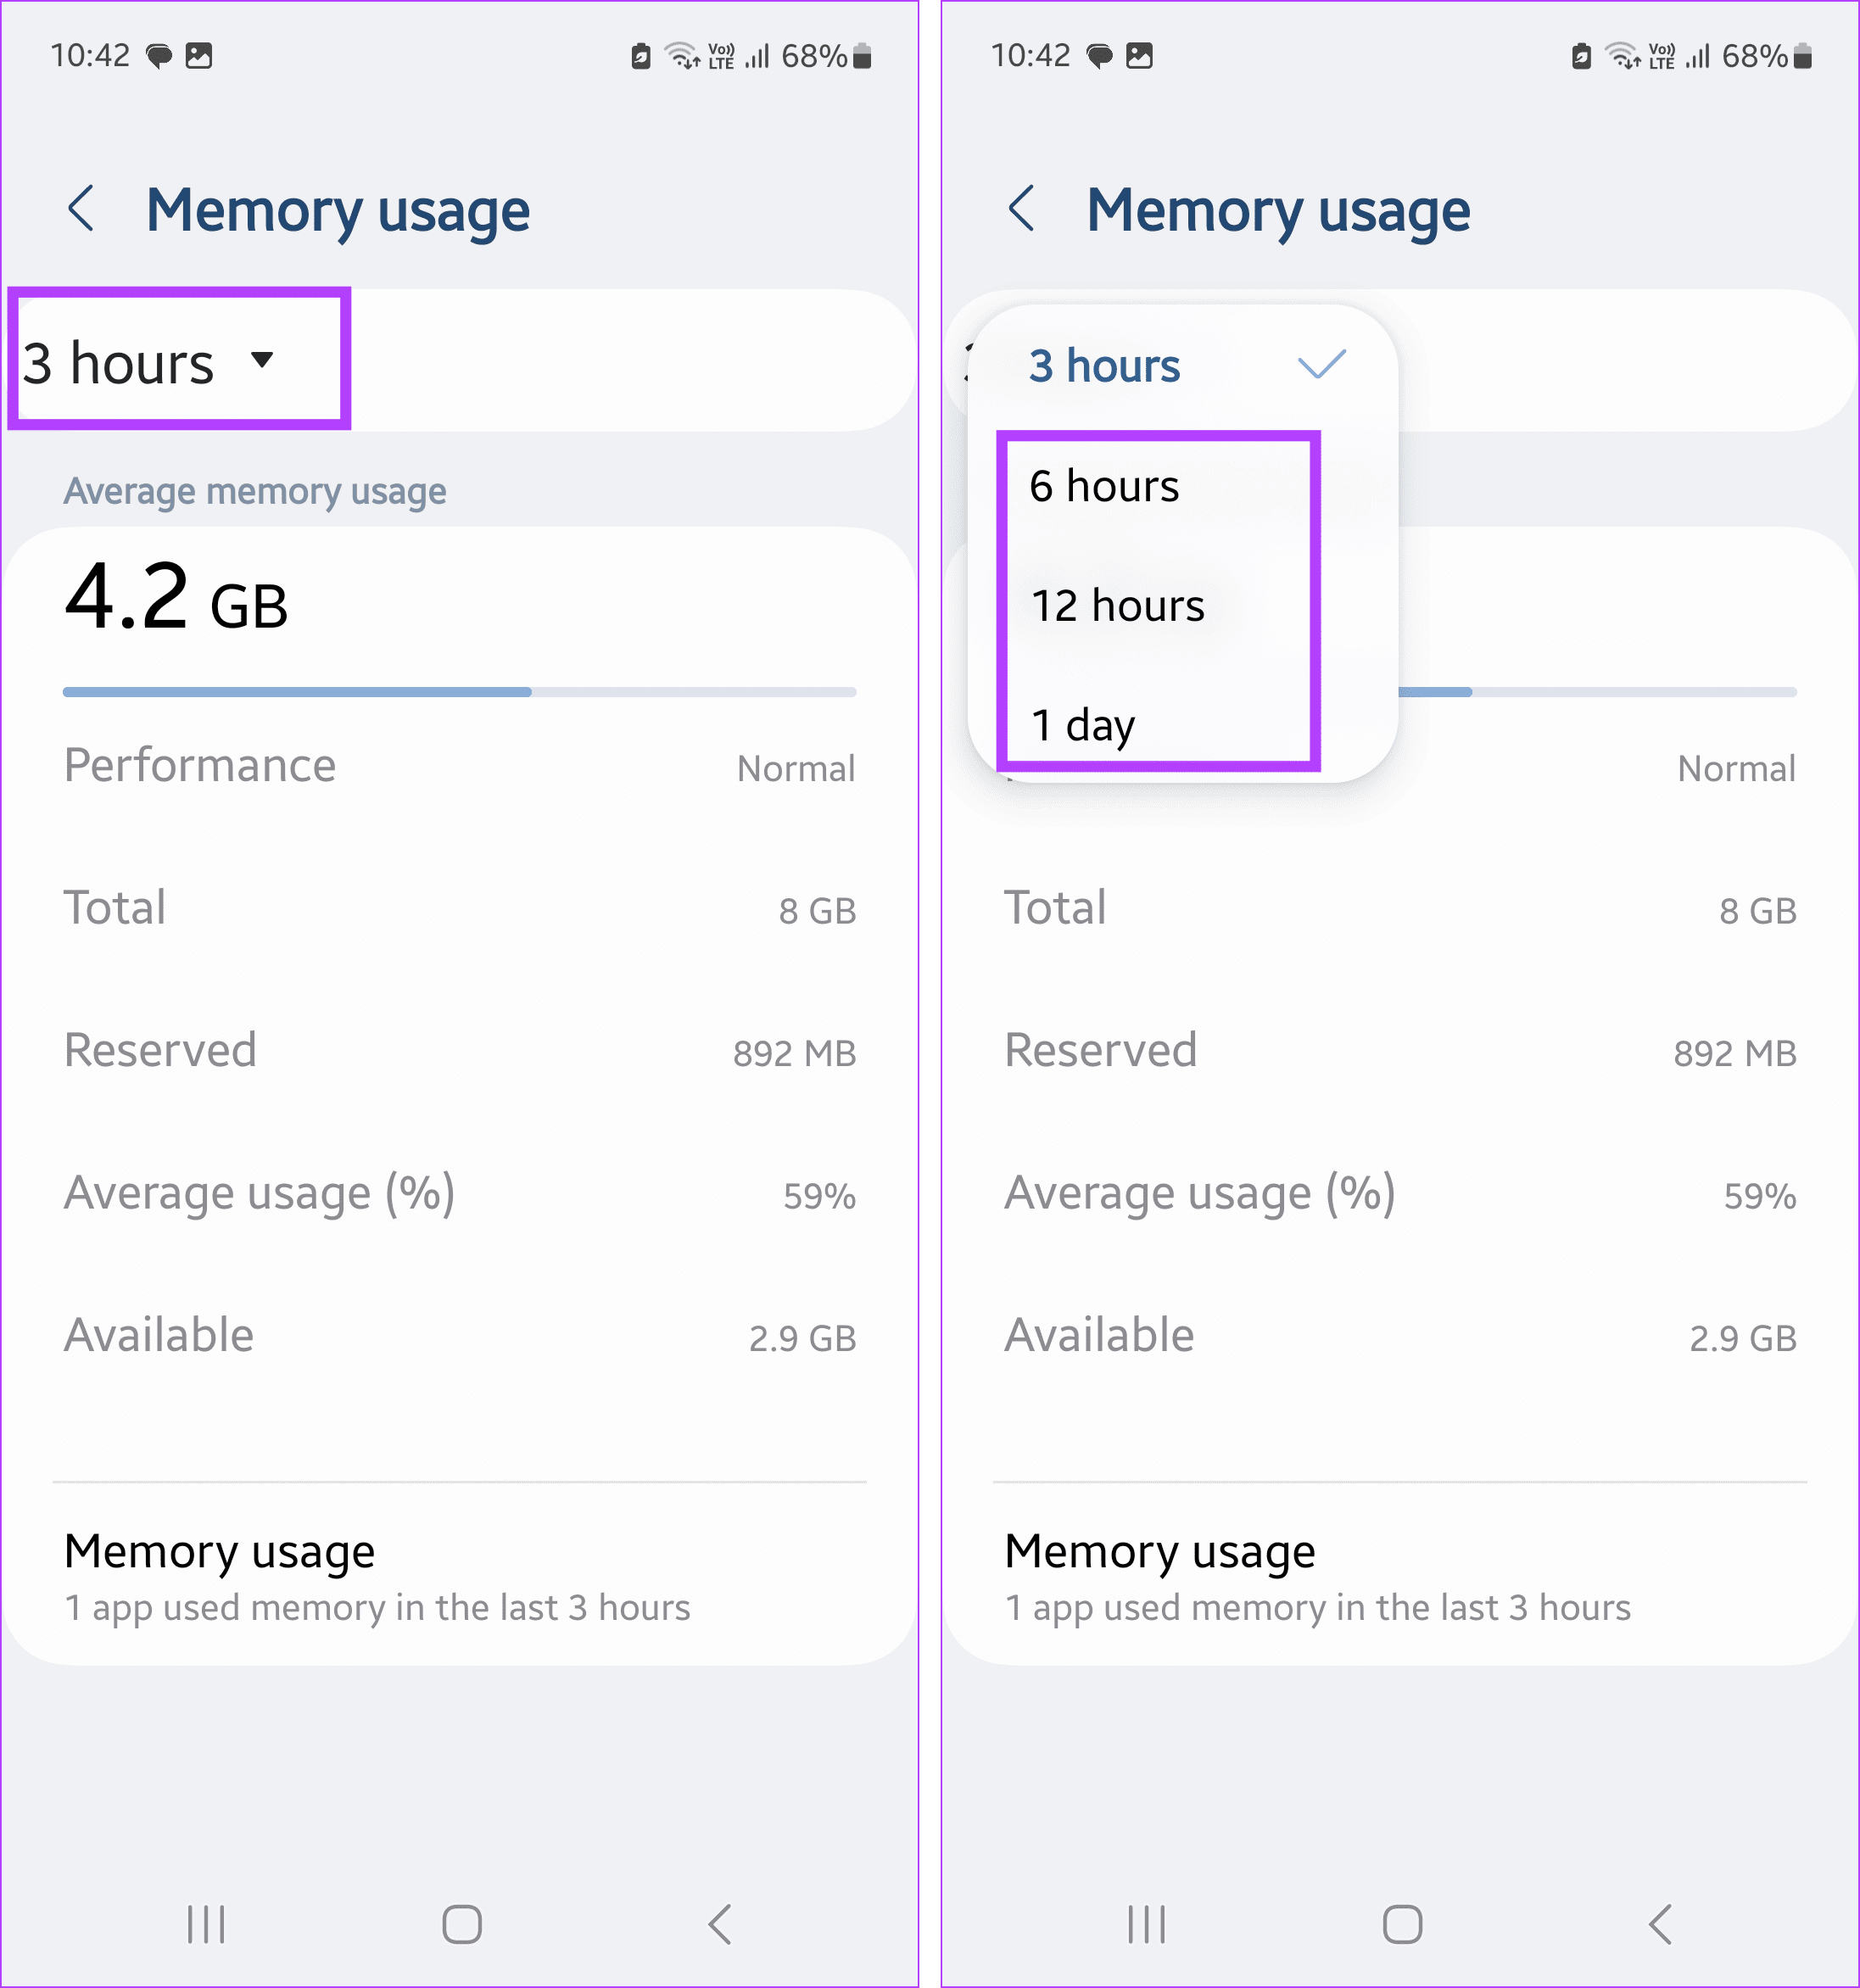
Step 6: Once done, tap on Memory usage.

Here, take note of the apps with the most memory usage. Then, use the below steps to force stop them on your Android device.
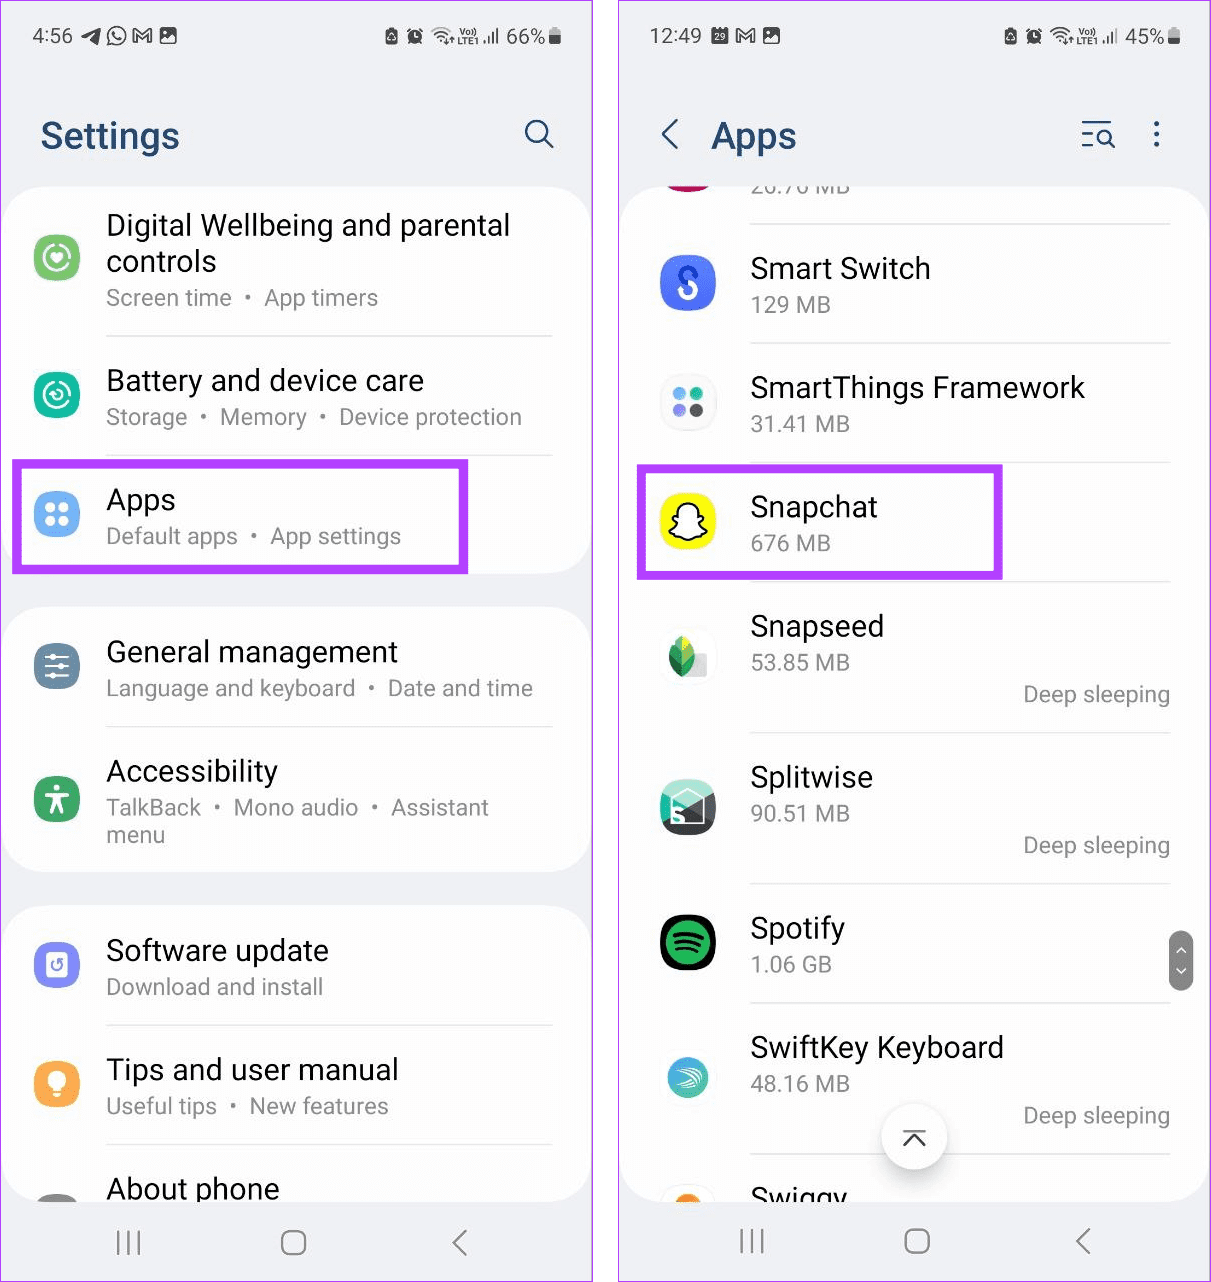
Step 1: Open the Settings menu and tap on Apps.
Step 2: Here, tap on the relevant app.
Step 3: Then, tap on Force stop.
Step 4: When prompted, tap on OK.
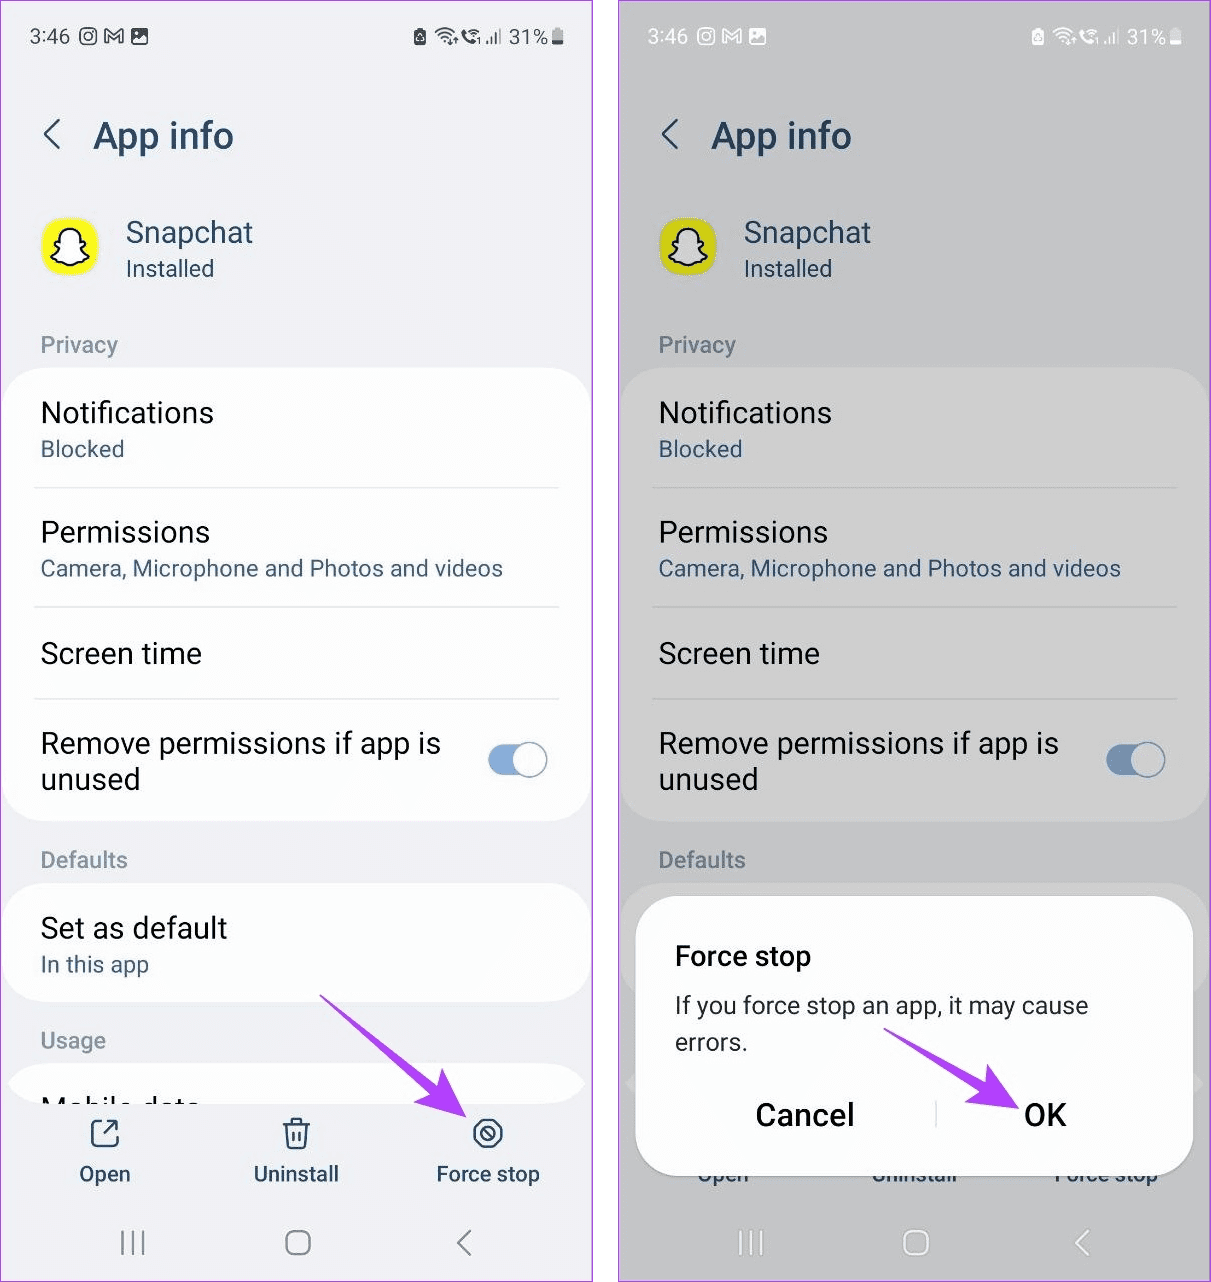
This will immediately force-stop the app on your Android device. You can also repeat these steps to force stop any other apps and reduce the RAM usage on Android.
2. Removing Unwanted Apps
Certain apps can start and operate in the background. This will not only drain your device’s battery but also take up additional memory. If this app is not in use or not required anymore, uninstall it from your Android device. This will free up the space and memory on Android. Here’s how to do it.
Tip: You can also uninstall the updates for certain system apps on your Android device.
Step 1: Open Settings and tap on Apps.
Step 2: Scroll through the currently installed apps and tap on the relevant one.
Step 3: Here, tap on Uninstall.
Step 4: When prompted, tap on OK.
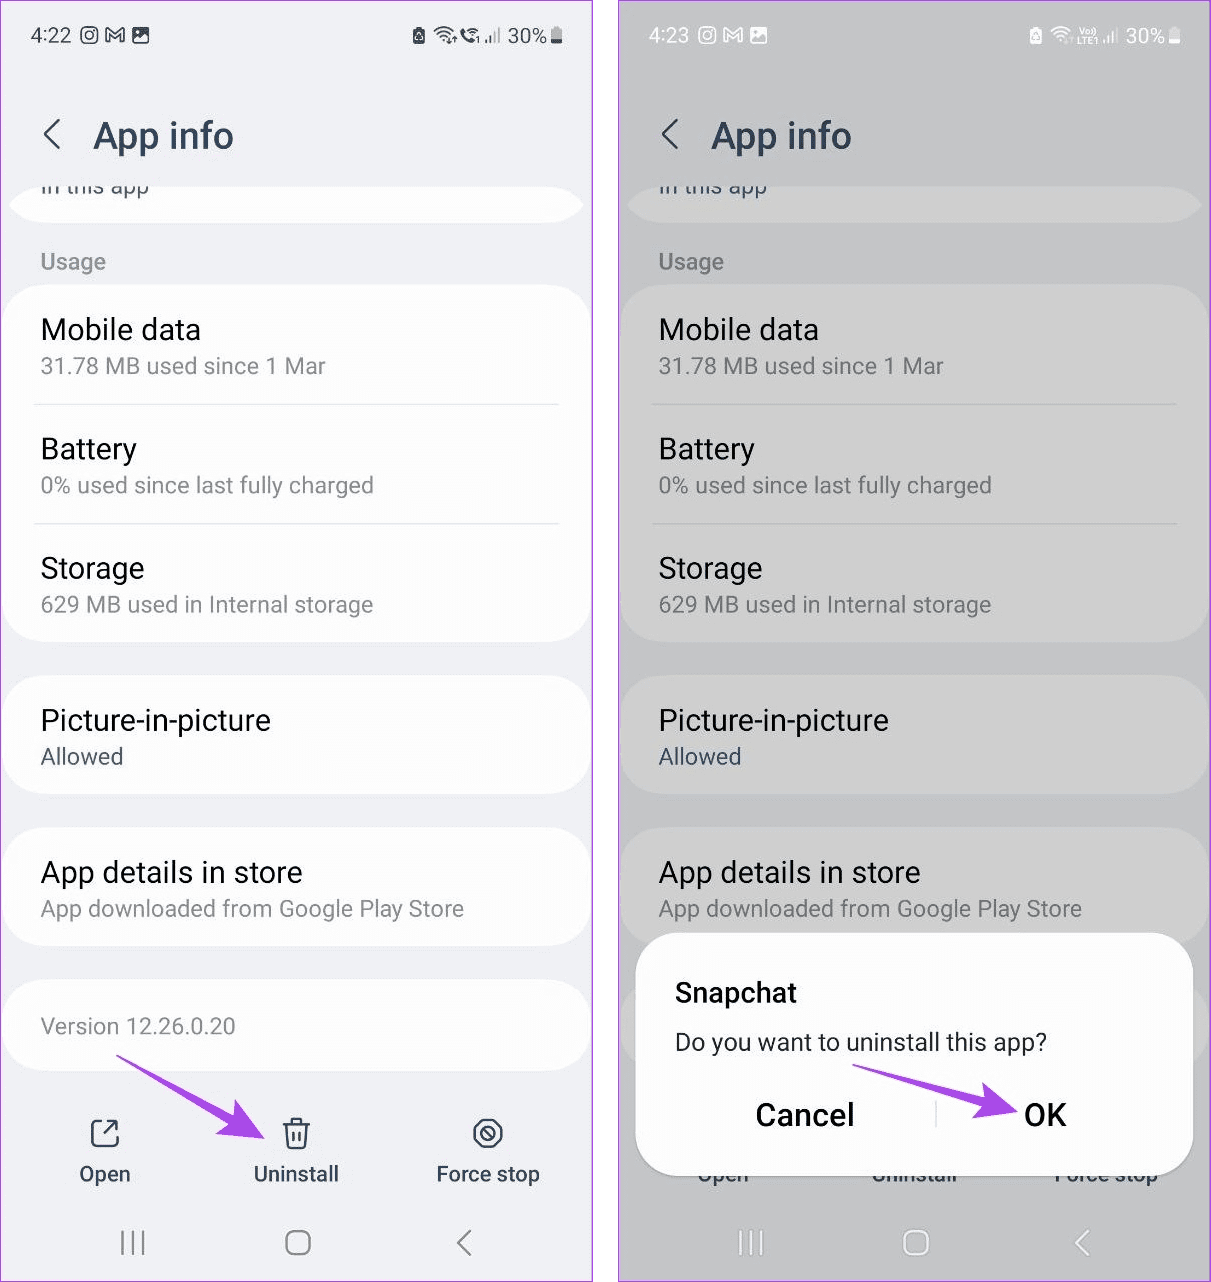
Wait for the app to finish uninstalling. Then, go back to the Apps page and uninstall any other unused app from your Android device.
3. Closing Background Apps
You can easily access the apps currently open in the background using the Recent option. It is a great way to multitask as you switch between multiple apps at a swipe. However, these apps can occupy your device’s memory and, over time, slow down processes. To stop that from happening, close these background apps on your Android device. Here’s how.
Step 1: Tap on the Recent icon to open background apps.
Step 2: Now, hold and swipe up until the app is cleared from the screen.
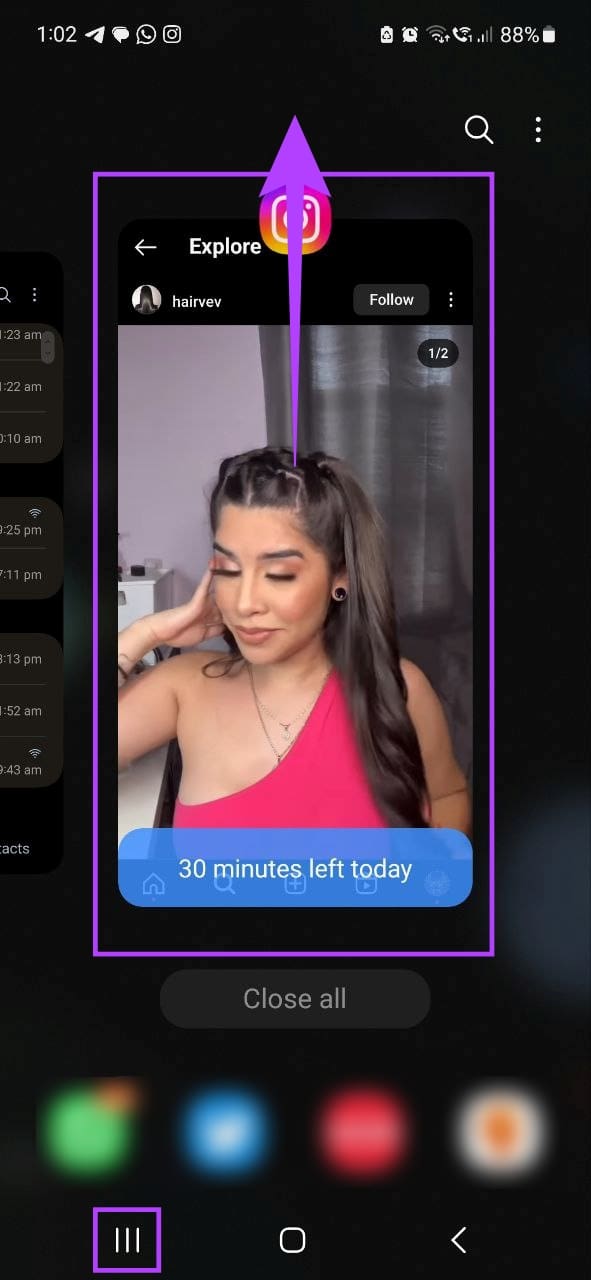
Repeat these steps to close all the currently open background apps on your Android phone. Now, tap on the relevant app icon to reopen the required apps.
4. Disabling Phone Animations
Animations help liven up your browsing experience. However, they often use too much memory, especially if you use RAM-heavy apps on the side. In this case, disable the animations on your Android phone and revert to the classic look.
To do this, enable developer options on your Android device and follow the below steps.
Step 1: Open Settings and tap on Developer options.
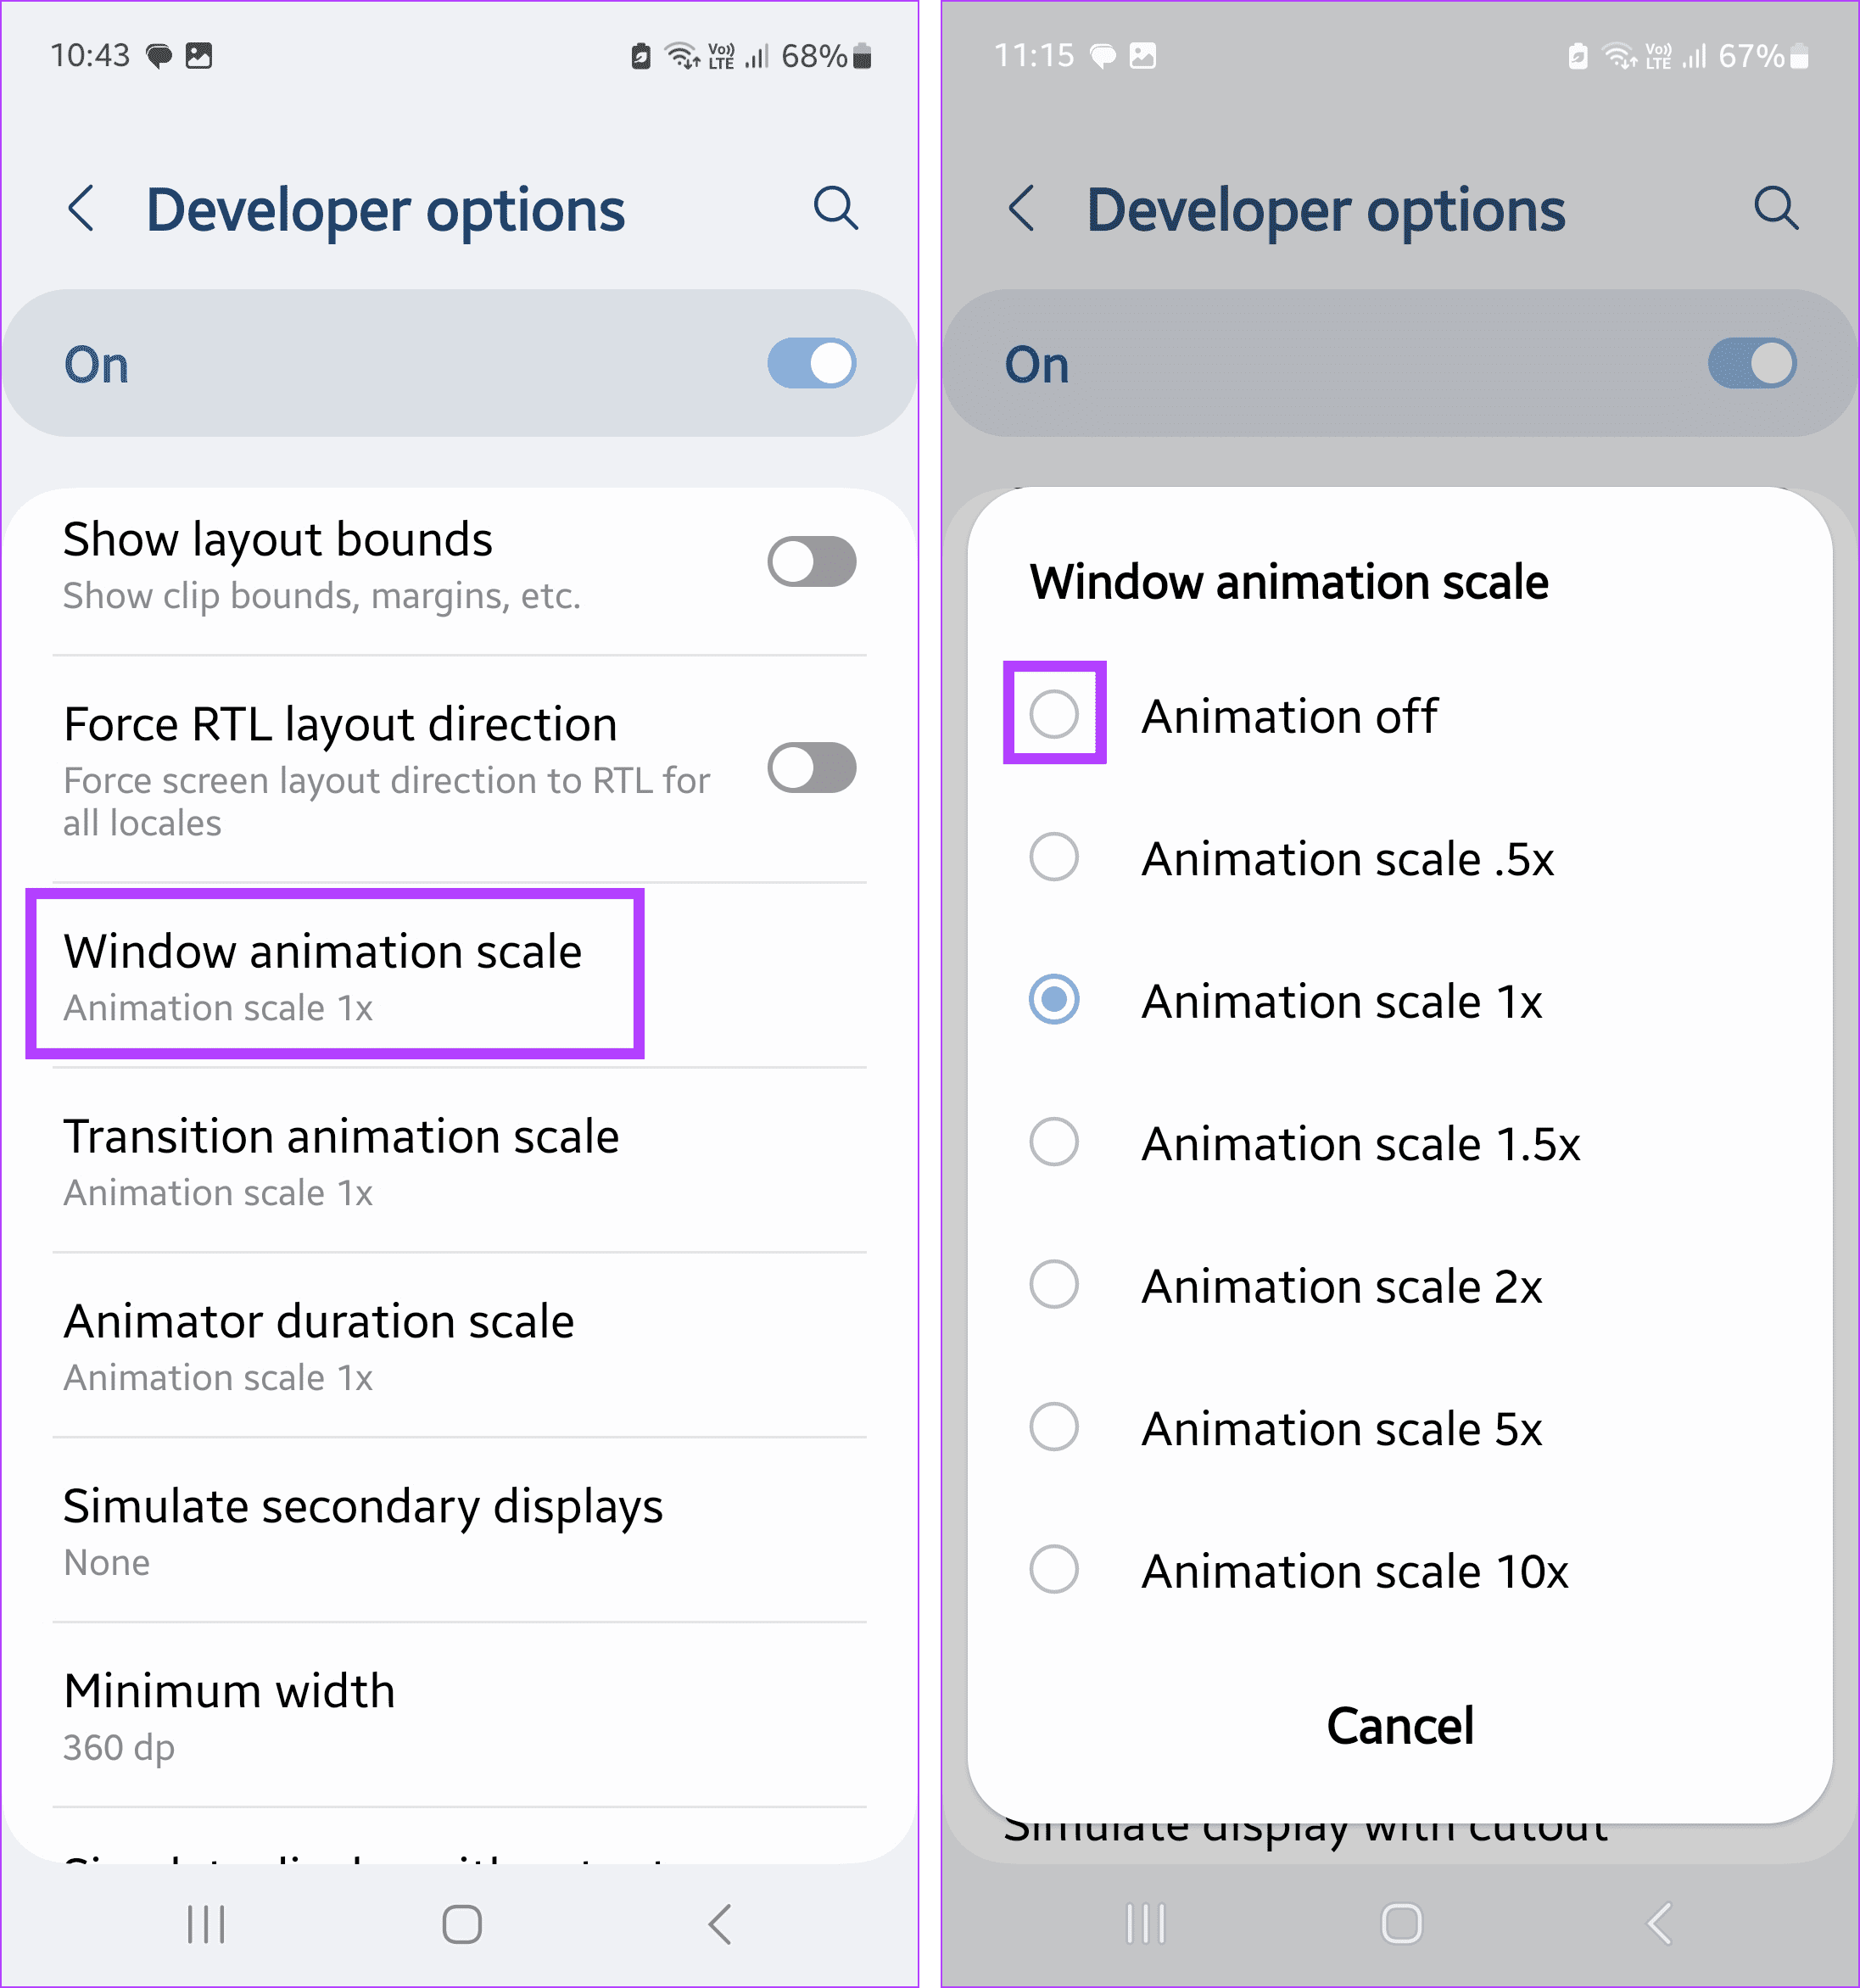
Step 2: Scroll down and tap on Window animation scale.
Step 3: Then, select Animation off.
Step 4: Next, tap on Transition animation scale.
Step 5: When prompted, select Animation off.

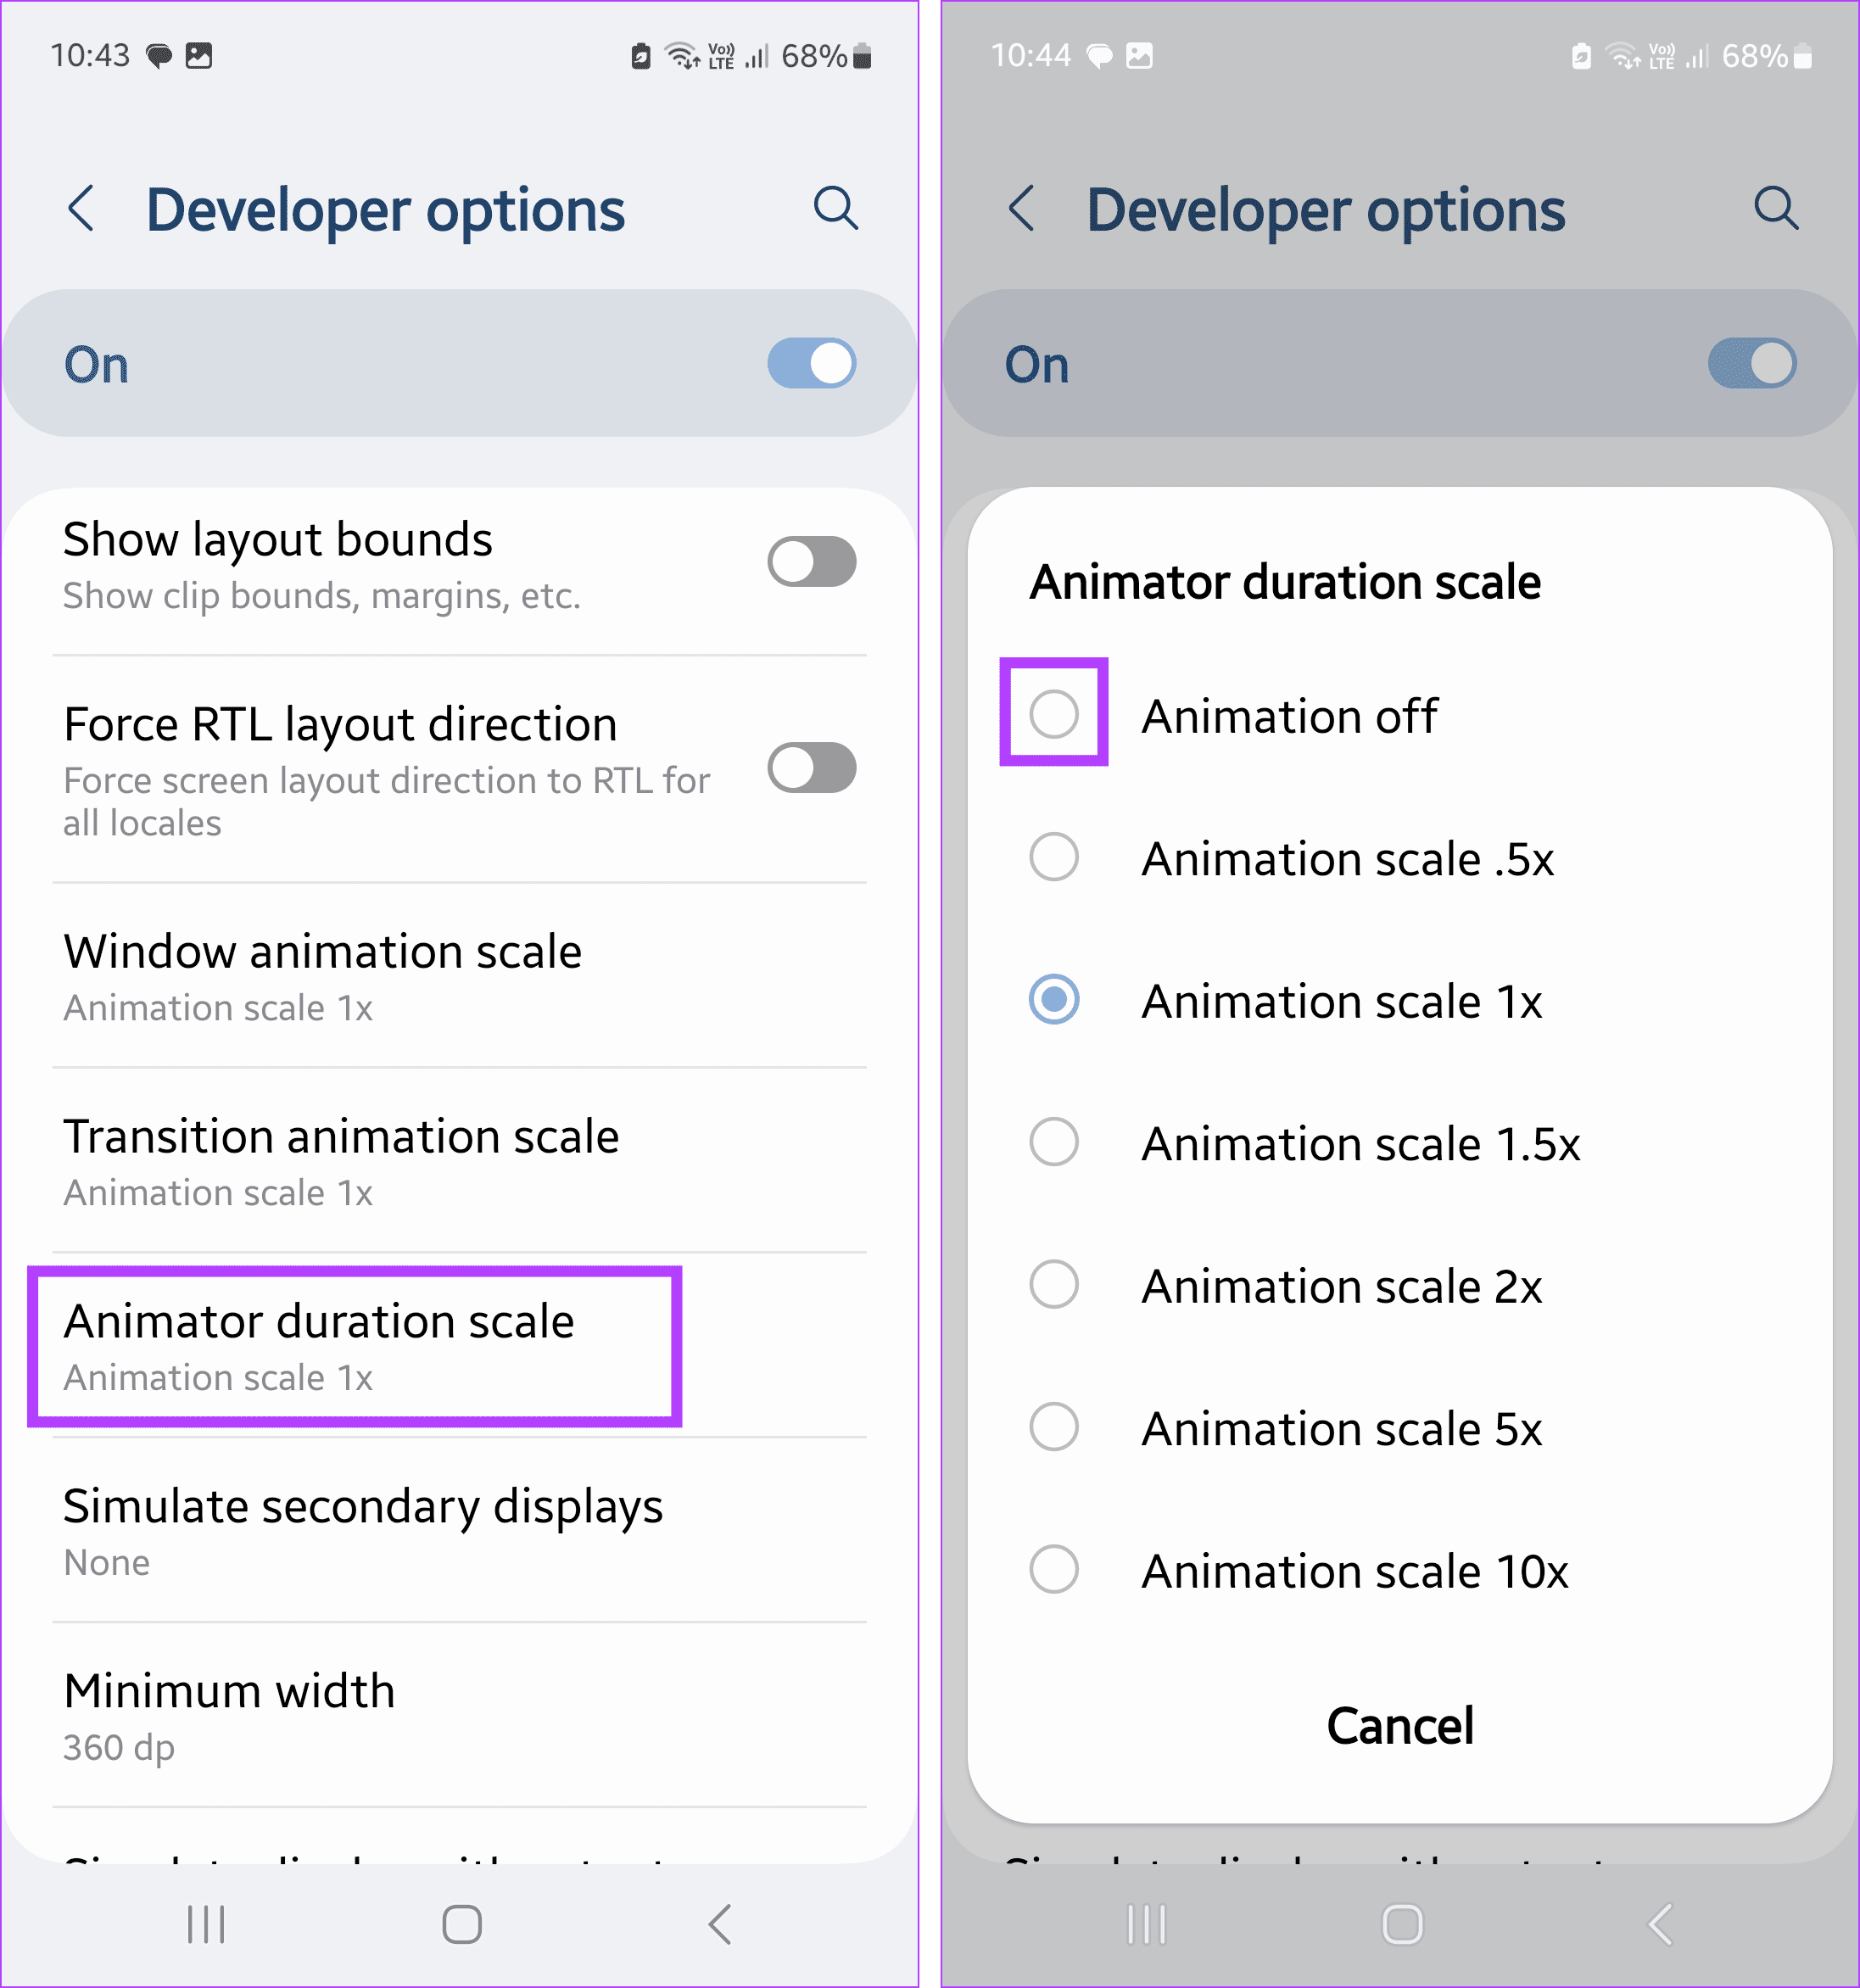
Step 6: Lastly, tap on Animator duration scale.
Step 7: Again, select Animation off.
5. Deleting Widgets
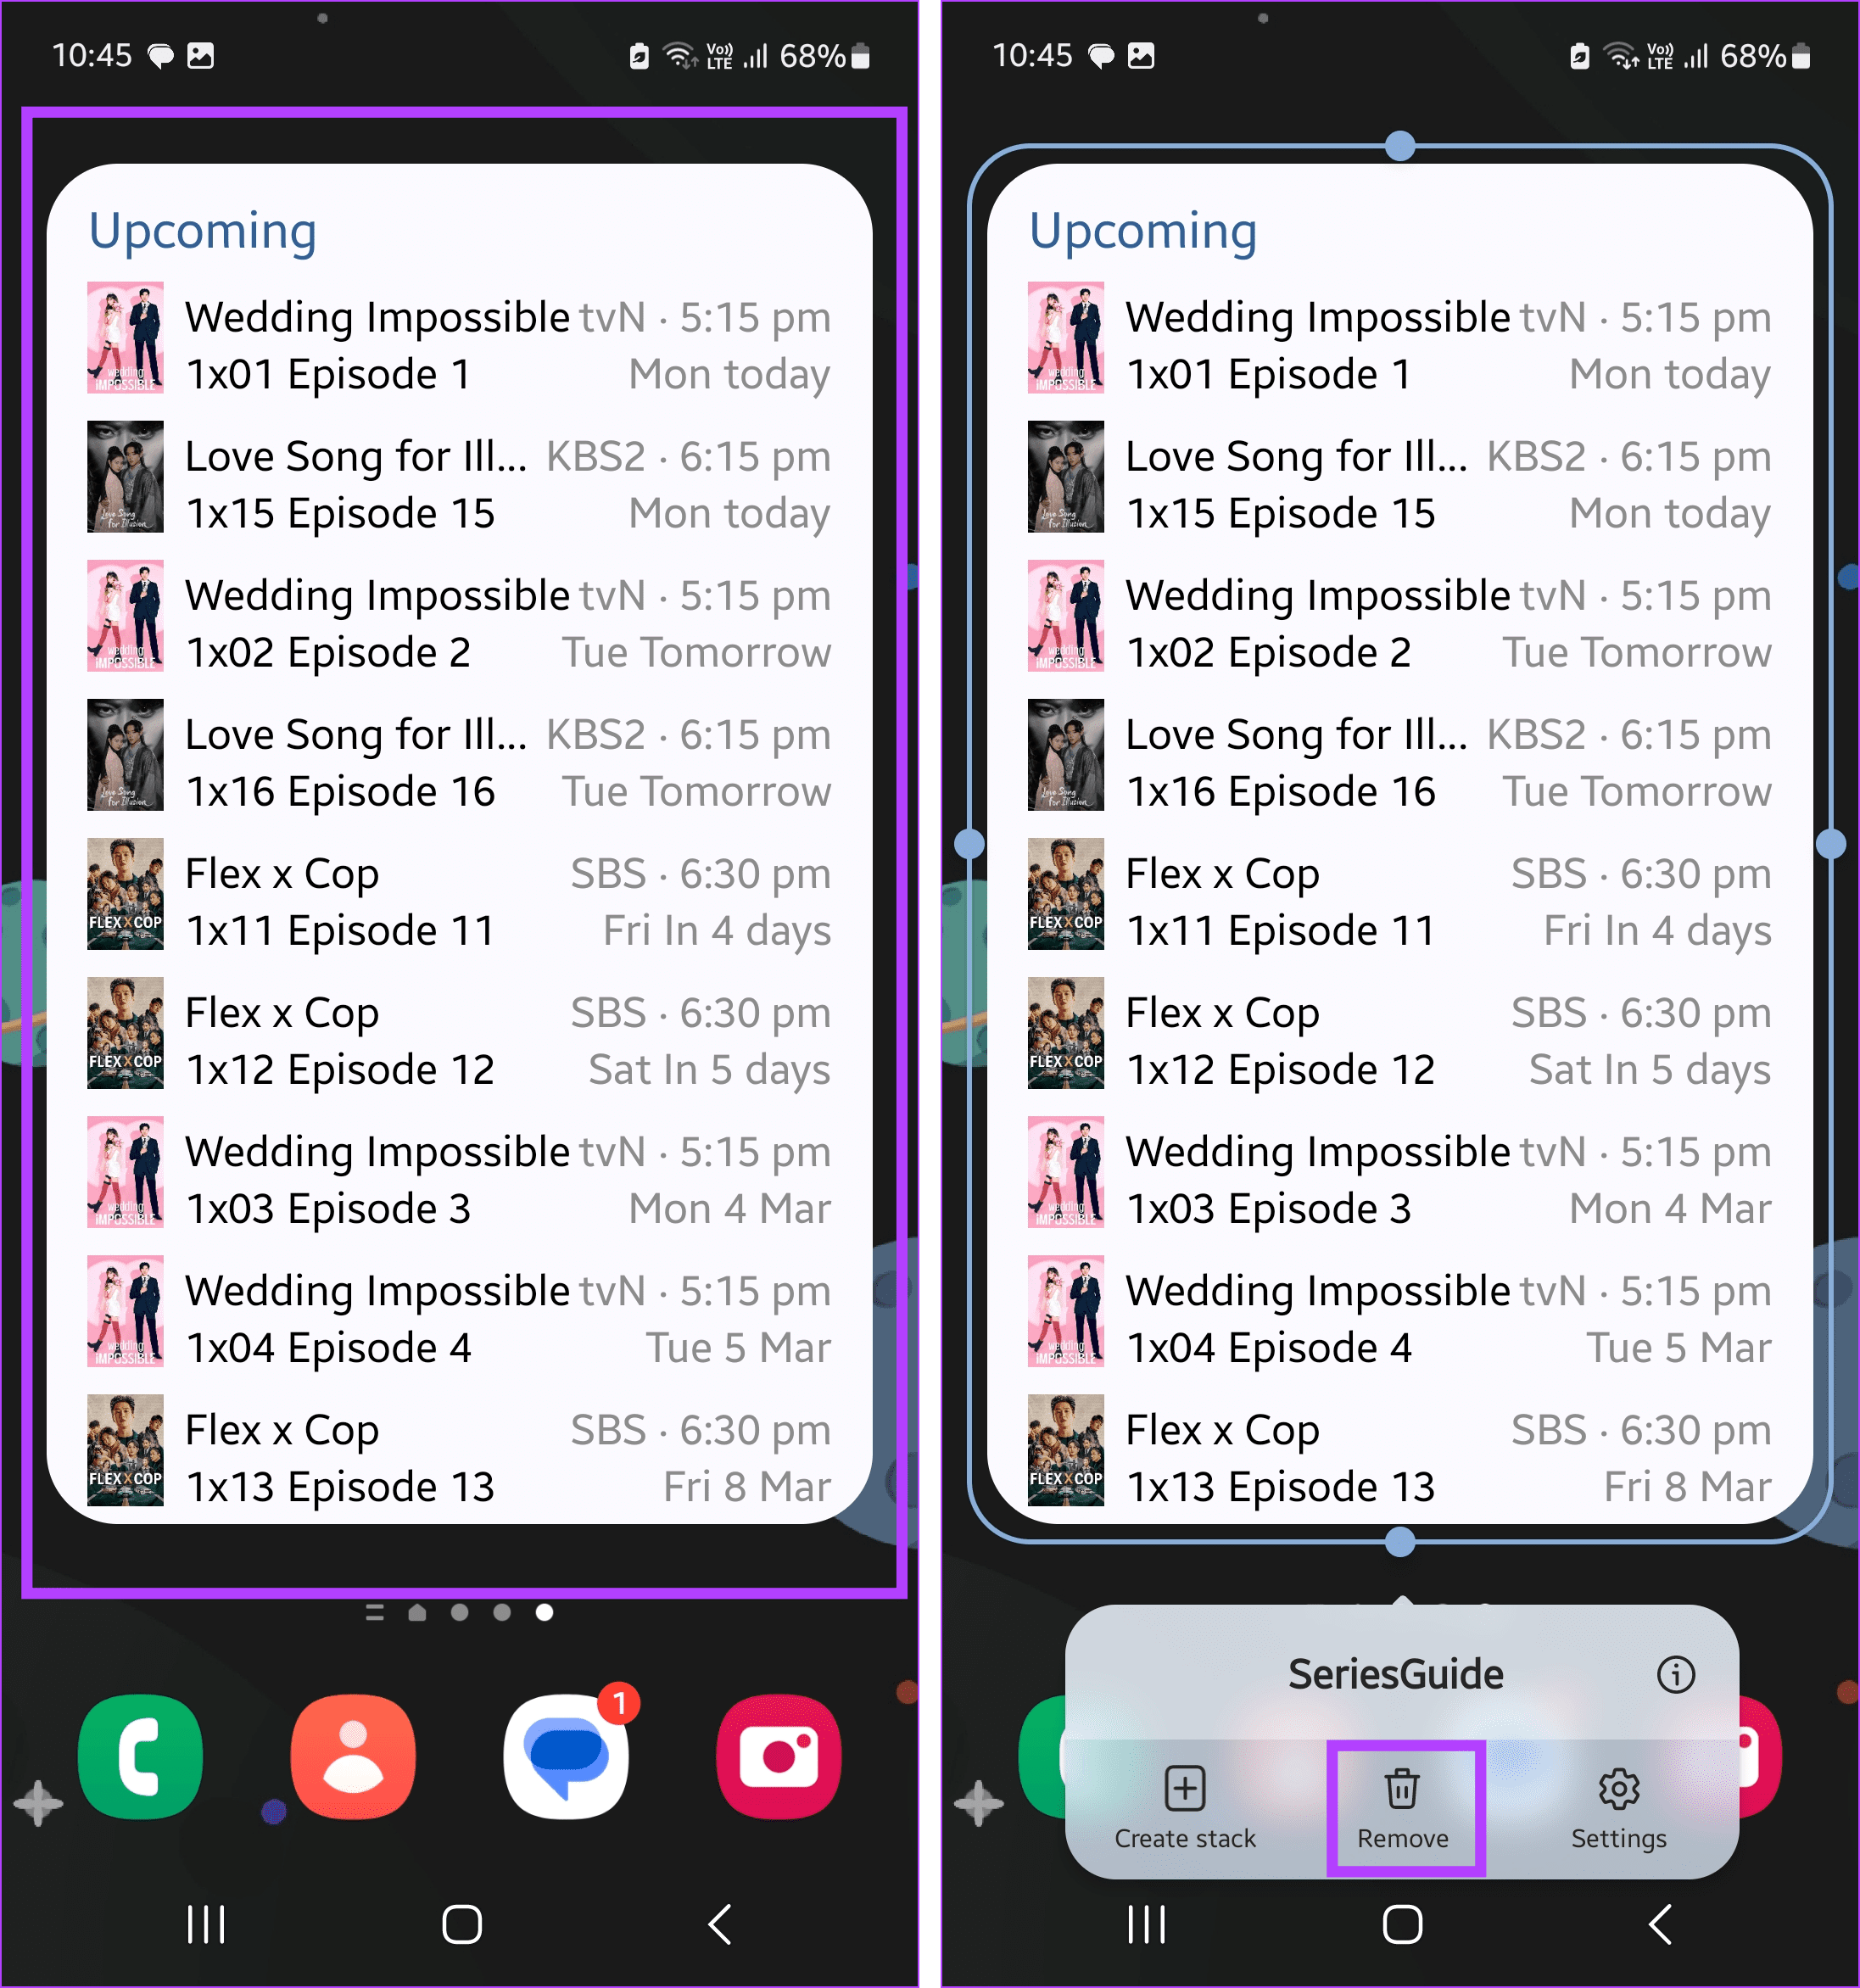
Most Android widgets update in the background to show you the most recent information. This causes the related apps to remain active as well. So, if you’ve been experiencing a system slowdown after adding a widget recently, remove it. This should reduce the RAM usage on Android and speed up other processes. Here’s how to do it.
Step 1: On your Android device’s home screen, locate the relevant widget.
Step 2: Long-press on it to see more options.
Step 3: Here, tap on Remove.
6. Using a Static Wallpaper
Most Android devices these days come pre-loaded with animated wallpapers that automatically change. This is a great way to change your wallpaper without doing anything. However, this is done at the expense of your device’s memory and can often hog it to download and display the next wallpaper.
To stop this, set a static wallpaper. It might be less fun, but it will help free up RAM on your Android device. Follow the below steps to do it.
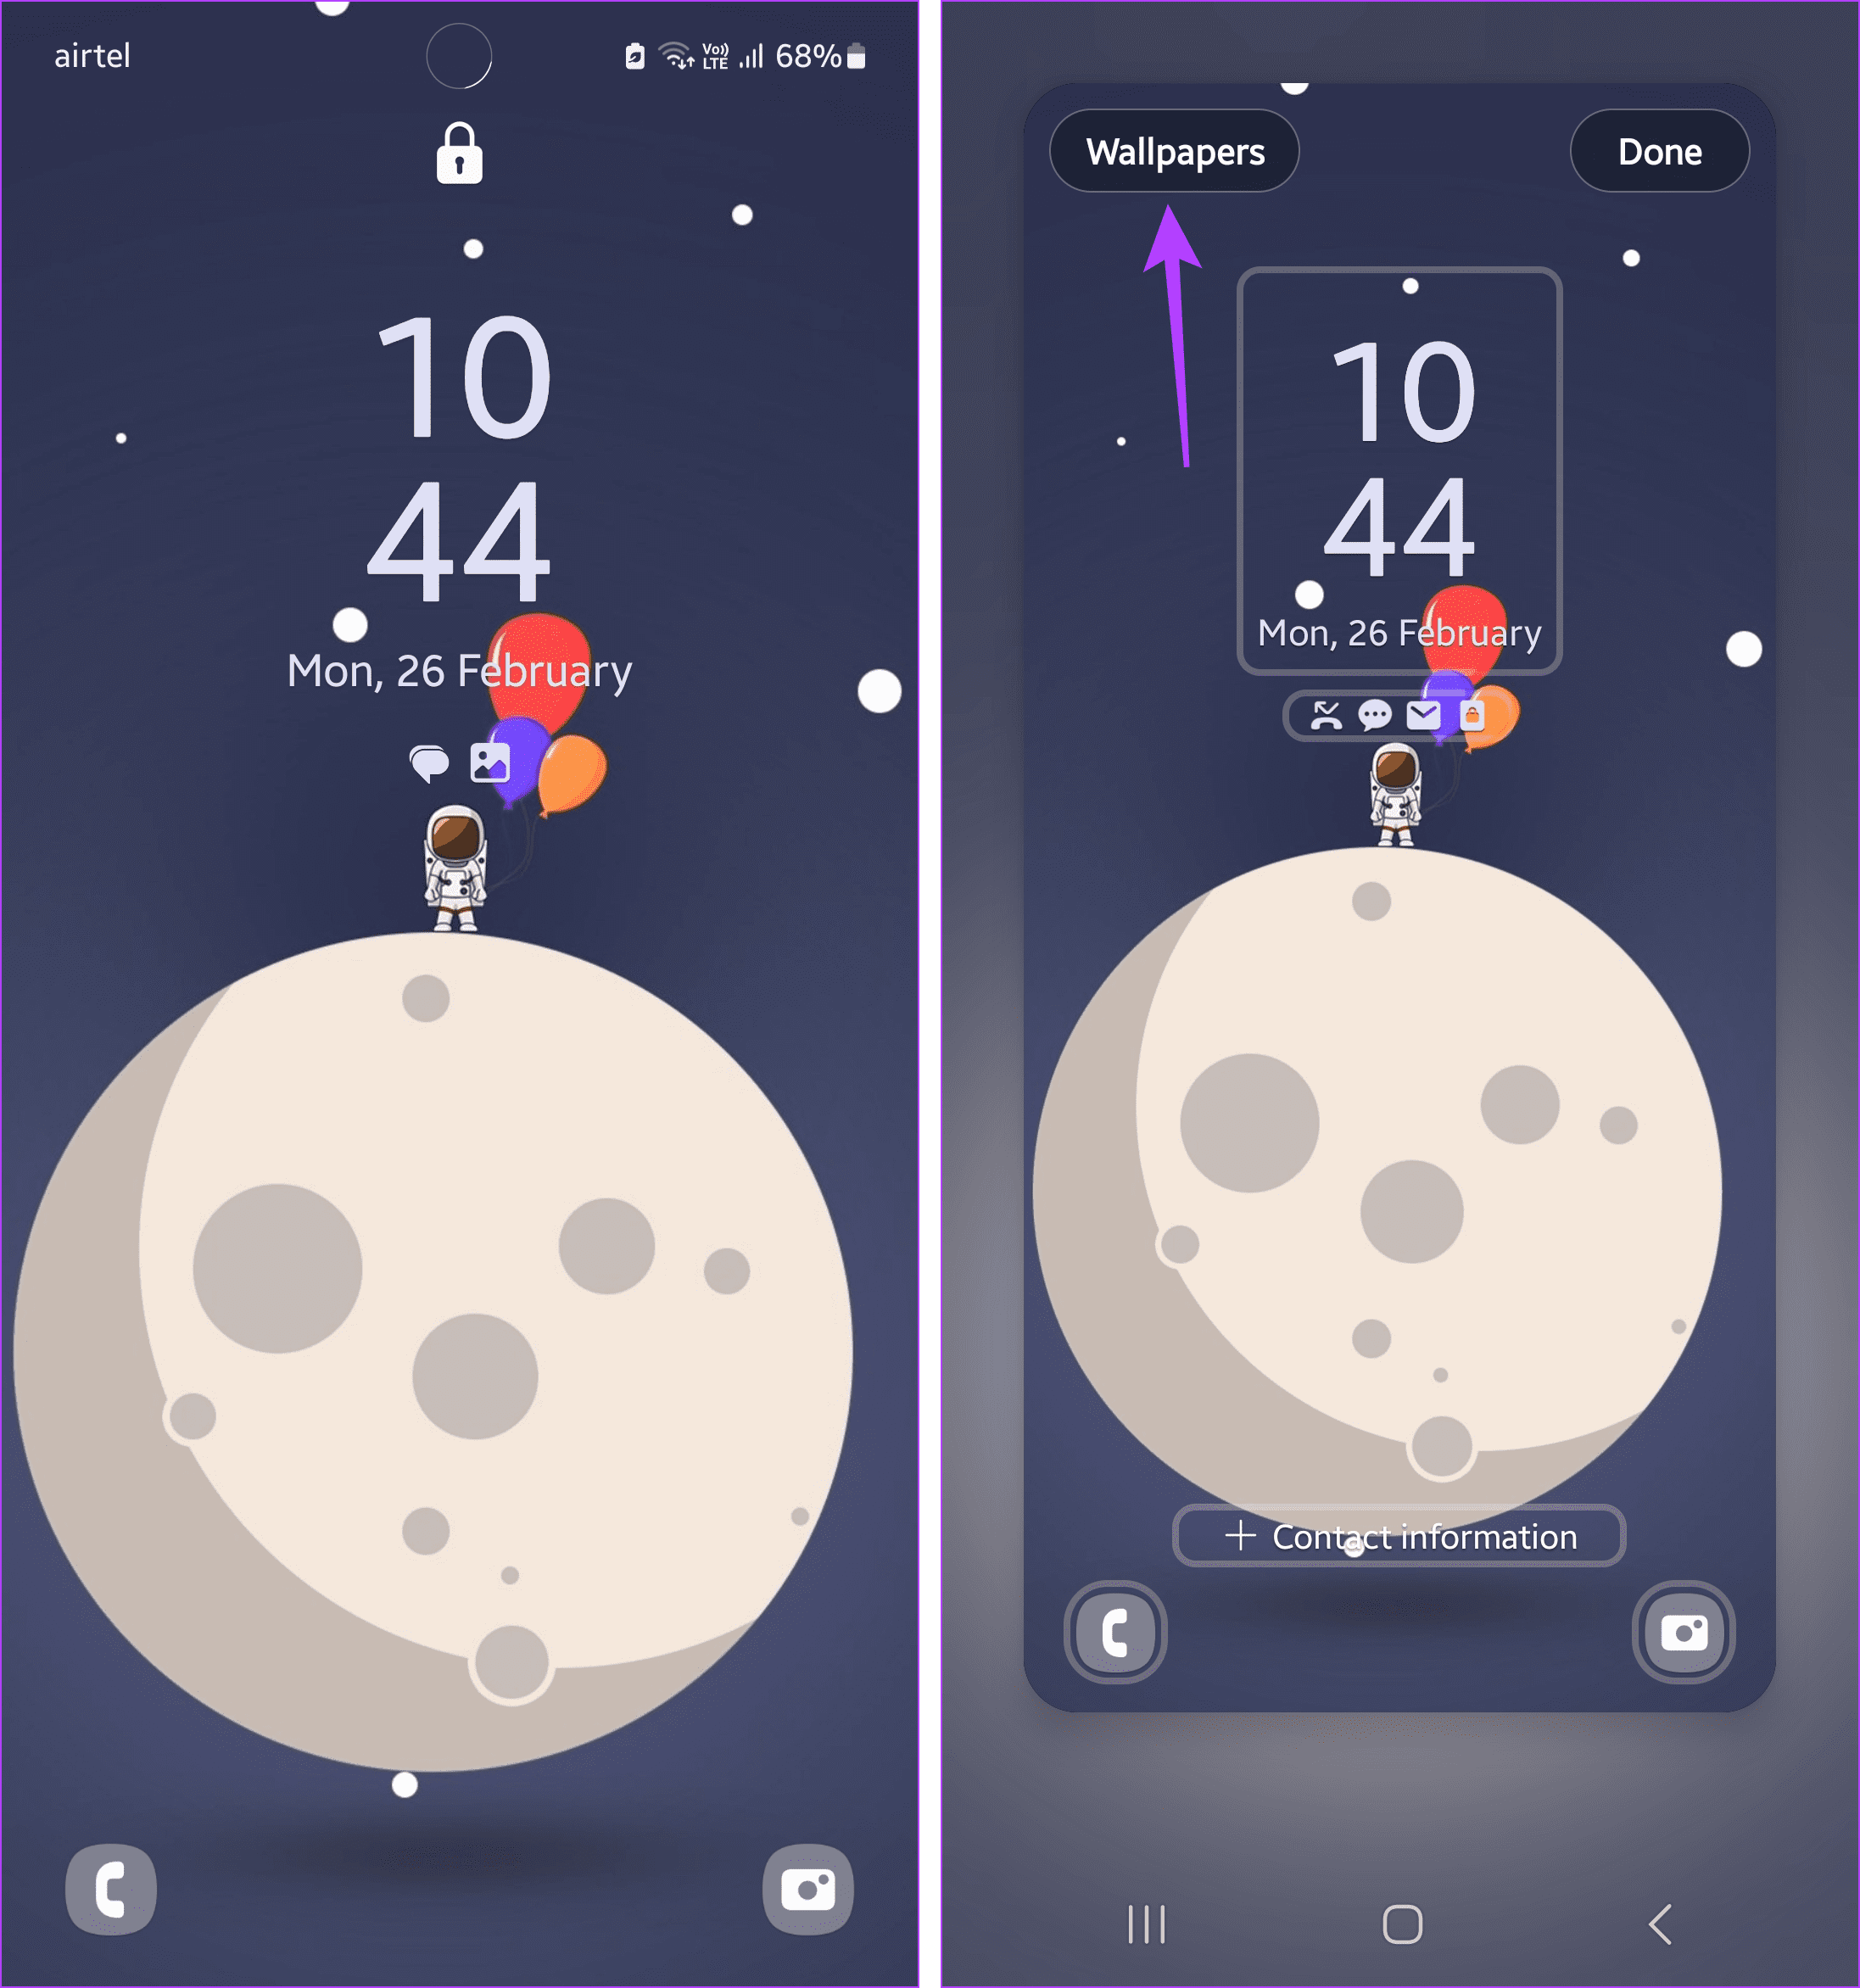
Step 1: Open your Android device’s lock screen and long-press on it. When prompted, enter your device’s password or PIN.
Step 2: Then, tap on Wallpapers at the top left.
Step 3: From the list of wallpapers, select the relevant one.
Step 4: Here, see how the new wallpaper looks. Once satisfied, tap on Done.
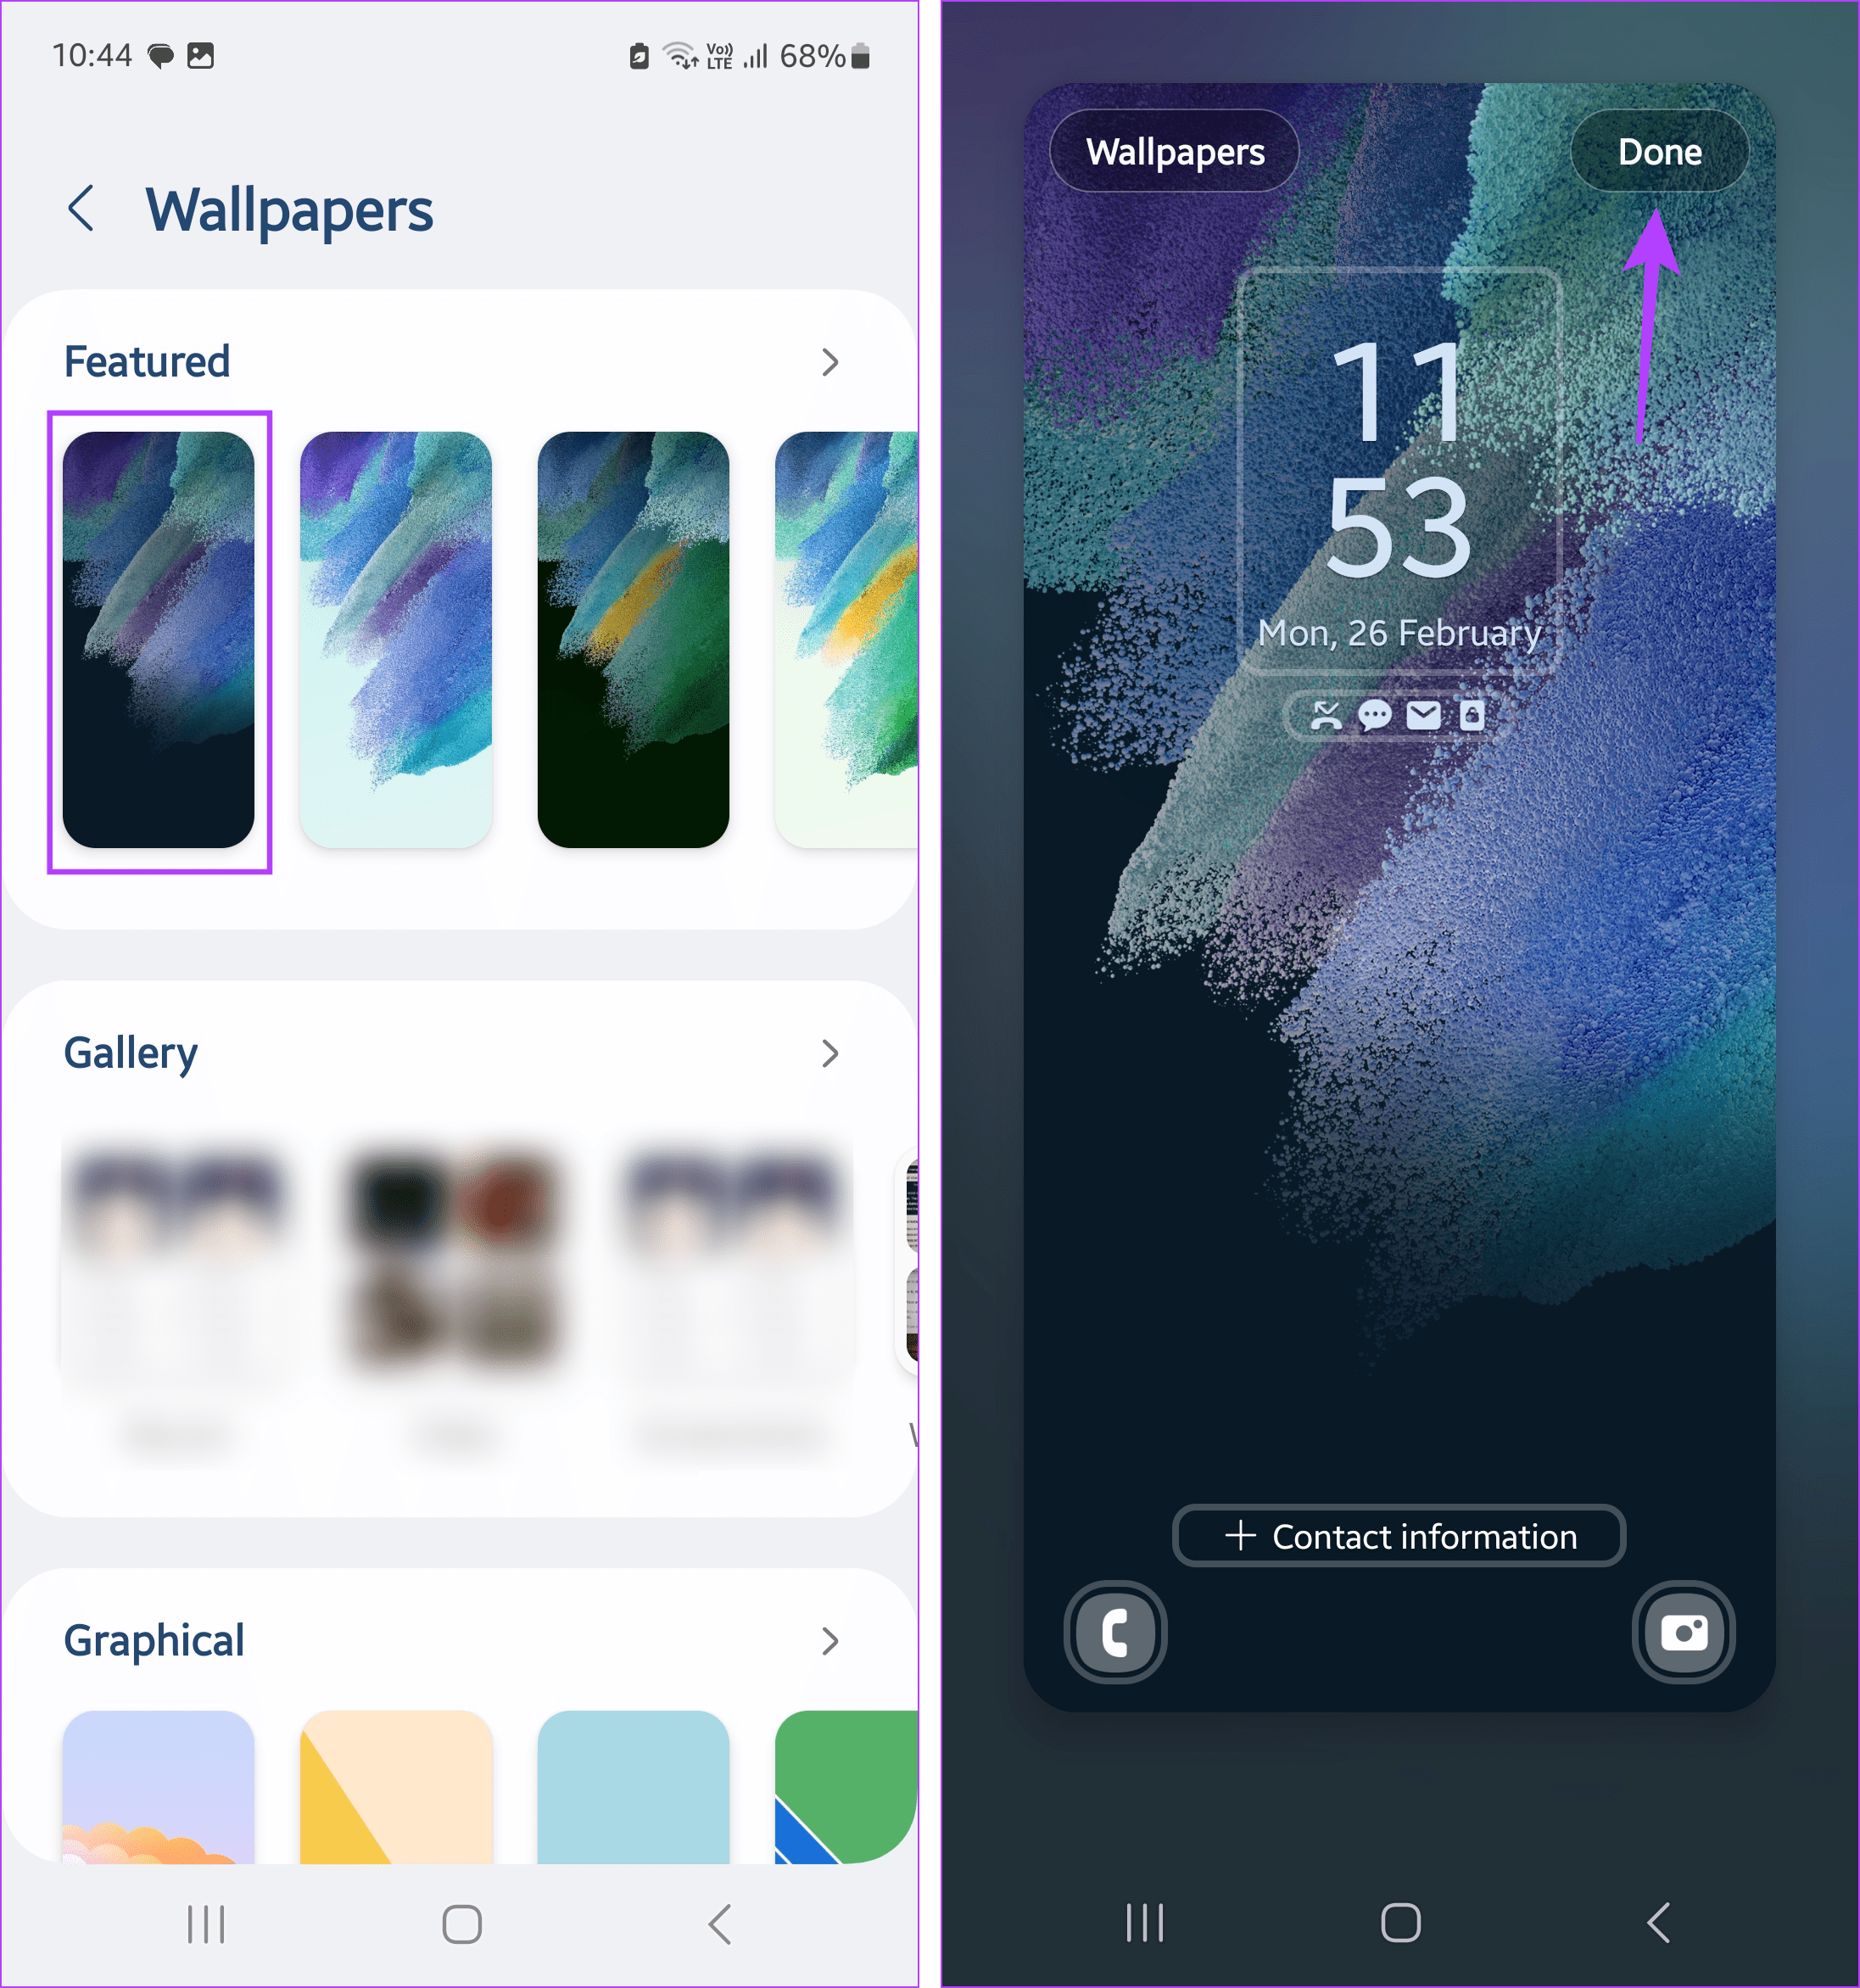
This will change the wallpaper and set the new static wallpaper on your Android phone. If you have a live background, you can also change it to static to further reduce the memory usage on your Android device.
FAQs on Reducing RAM on Android Phones
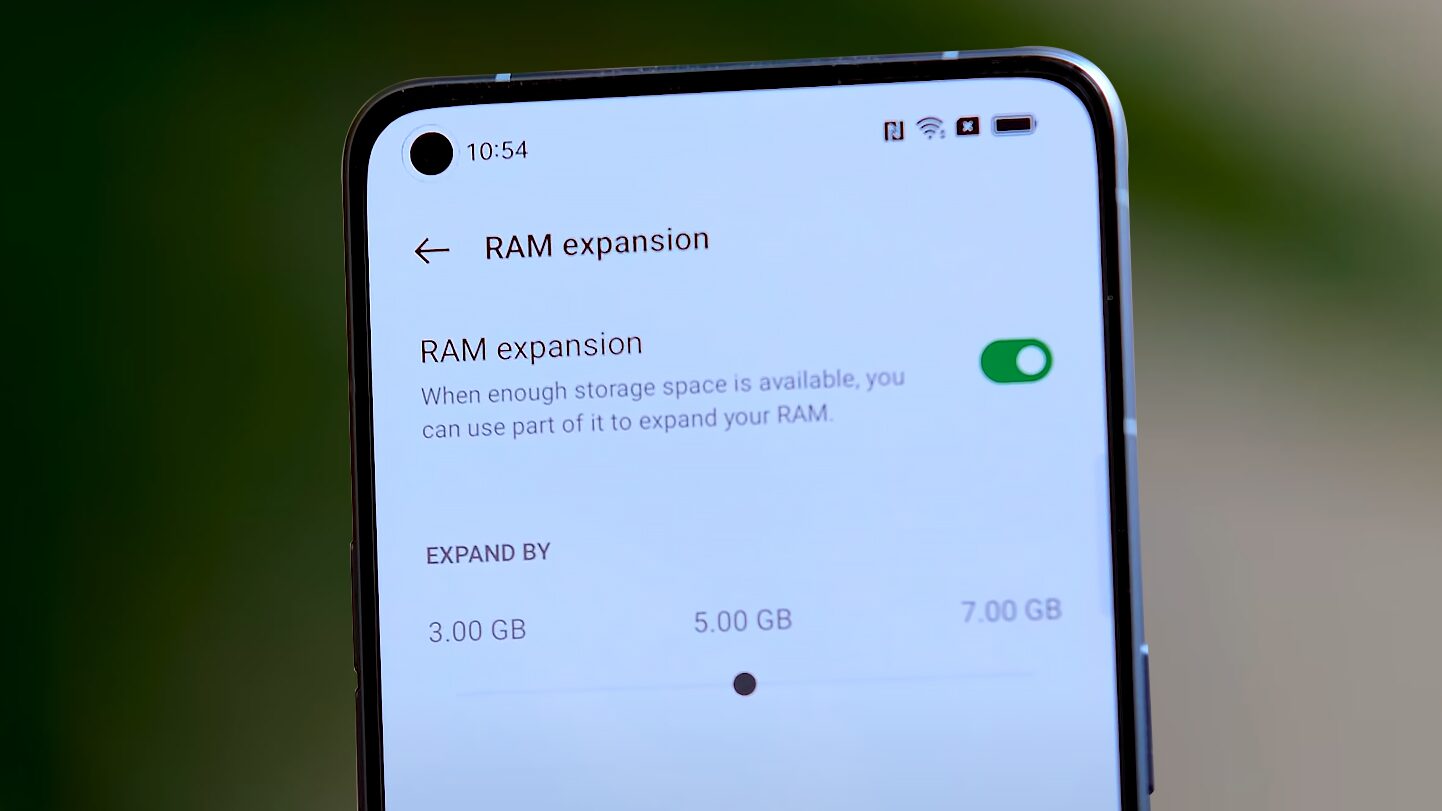
Most Android devices come built-in with options to check and see your current RAM usage. You can then use these stats to clear the RAM accordingly. If you need a RAM boost, check and see if you can use virtual RAM. We advise against using third-party apps as they can access your device’s data and any other sensitive information.
Ideally, an Android device should have anywhere between 2GB to 4GB of RAM to make your browsing experience smooth. However, if you play games or simultaneously use too many task-heavy apps, go for devices with 8GB to 12GB onboard RAM.
Free up RAM on Android
Slow or unresponsive phones can be a nightmare to navigate. So, we hope this article helped you understand more about clearing RAM on your Android phone. You can also check our article on disabling the sensors on your Android phone to reduce device memory consumption further.
Was this helpful?
Last updated on 04 March, 2024
Read Next
 3 Best Ways to Clear RAM Cache on Windows 11
Would you like to improve your computer's performance?
3 Best Ways to Clear RAM Cache on Windows 11
Would you like to improve your computer's performance?
 How to Clear RAM on Your iPhone
When using smartphones, the occasional glitches and crashes become a part of the process.
How to Clear RAM on Your iPhone
When using smartphones, the occasional glitches and crashes become a part of the process.
 What Is Virtual RAM in Android and Should You Care
Apart from huge camera megapixels and high refresh rate displays, the biggest trend in the smartphone world seems to be Virtual RAM.
What Is Virtual RAM in Android and Should You Care
Apart from huge camera megapixels and high refresh rate displays, the biggest trend in the smartphone world seems to be Virtual RAM.
 5 Best Ways to Check RAM Speed on Windows 11
Getting better RAM or memory can improve your experience on a computer.
5 Best Ways to Check RAM Speed on Windows 11
Getting better RAM or memory can improve your experience on a computer.
 9 Ways to Limit RAM Usage in Opera GX
https://youtu.be/OqVMVrGSoRY Method 1: Enable Opera GX’s Built-in RAM Limiter Enabling the built-in RAM limiter in Opera GX should be your first solution since this feature will manage how much memory
9 Ways to Limit RAM Usage in Opera GX
https://youtu.be/OqVMVrGSoRY Method 1: Enable Opera GX’s Built-in RAM Limiter Enabling the built-in RAM limiter in Opera GX should be your first solution since this feature will manage how much memory
 Which Browser Uses the Least RAM and CPU on Windows
Selecting a primary web browser can be confusing given the wide variety of existing options.
Which Browser Uses the Least RAM and CPU on Windows
Selecting a primary web browser can be confusing given the wide variety of existing options.
 5 Best Ways to Check RAM Type in PC on Windows 10 and Windows 11
Whenever you try to upgrade or add more RAM to your PC, you start looking for the RAM type supported by your PC.
5 Best Ways to Check RAM Type in PC on Windows 10 and Windows 11
Whenever you try to upgrade or add more RAM to your PC, you start looking for the RAM type supported by your PC.
 5 Best DDR3 RAM for Laptops and Desktops
While newer DDR4 and DDR5 RAM modules dominate the market, DDR3 still thrives in older laptops and desktops.
5 Best DDR3 RAM for Laptops and Desktops
While newer DDR4 and DDR5 RAM modules dominate the market, DDR3 still thrives in older laptops and desktops.
The article above may contain affiliate links which help support Guiding Tech. The content remains unbiased and authentic and will never affect our editorial integrity.